glow-vogue.site
  • Beauty
    • Beauty
    • Arab Beauty
    • Asian Beauty
    • British Beauty
    • Canadian Beauty
    • Indonesian Beauty
  • Cosmetics
  • Fashion
    • Fashion Over 50
    • Luxury Fashion
    • Plus Size Fashion
    • Sustainable Fashion
    • Women’s Fashion
  • Hair Styling
  • Skin Care
  • Uncategorized
Category:

Asian Beauty

Asian Beauty

Sapphire – The Velvet Edit 🖤✨

by Lina Clémence June 5, 2025
written by Lina Clémence


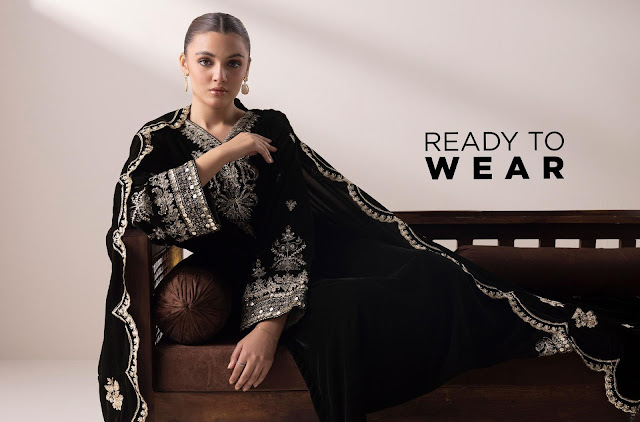
Wrap yourself in luxury and warmth with our Velvet Edit – the perfect choice for winter festivities! Featuring intricate embellishments and beautiful embroidery our range of Velvets are available in both unstitched fabric and chic ready-to-wear silhouettes.

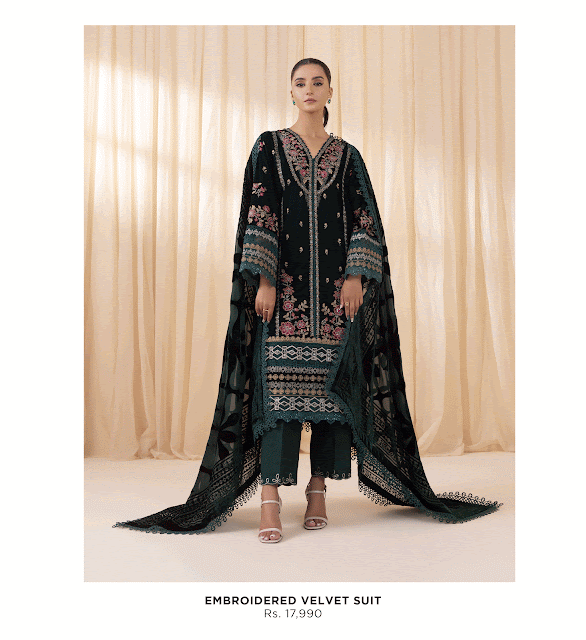
At the heart of this collection is the intricate French floral-inspired sequin embroidery  meticulously crafted to enhance the richness of the velvet fabric.

Available at Sapphire online and at the sapphire outlets nationwide.


June 5, 2025 0 comments
0 FacebookTwitterPinterestEmail
Asian Beauty

Is It Worth Investing in K18 Hair for Healthier and Stronger Hairs

by Lina Clémence June 4, 2025
written by Lina Clémence


In the realm of hair care, innovation is the key to unlocking the secret to luscious, healthy locks. Enter K18 Hair, a groundbreaking brand that’s taking the world of hair care by storm with its cutting-edge technology and transformative products. In this post, we’ll explore the science and benefits behind K18 Hair and why it’s becoming a game-changer in the beauty industry.

The Science Behind K18 Hair:

At the heart of K18 Hair’s success lies its patented bioactive peptide, known as K18Peptide™. This revolutionary ingredient is designed to repair and restore damaged hair at a molecular level. Here’s how it works:

Hair Structure: Hair is primarily composed of a protein called keratin, which contains amino acids linked together in chains. These chains can be damaged by various factors, including heat, chemicals, and environmental stressors.

K18Peptide™: K18Peptide™ is a bioactive peptide that has a unique ability to penetrate the hair shaft. It seeks out broken keratin chains and reconnects them, effectively repairing the damaged hair structure.

Structural Repair: By repairing the internal structure of the hair, K18 Hair products restore elasticity, strength, and overall health to your tresses.

The Benefits of K18 Hair:

Repair and Reversal: K18 Hair products are specifically designed to repair damage caused by heat styling, chemical treatments, and other stressors. They can help reverse the effects of overprocessing and restore your hair’s natural strength and resilience.

Strengthening: By restoring the structural integrity of your hair, K18 Hair products make your strands less prone to breakage and damage, promoting longer, healthier hair.

Improved Elasticity: Damaged hair often lacks elasticity, making it prone to snapping and frizzing. K18 Hair helps improve elasticity, leaving your hair more manageable and less prone to damage.

Color Retention: For those with color-treated hair, K18 Hair products can help maintain and protect your color by strengthening the hair shaft and preventing color molecules from leaching out.

Softness and Shine: K18 Hair leaves your hair feeling soft, silky, and noticeably shinier. It helps smooth the cuticle, reducing frizz and enhancing overall luster.

Suitable for All Hair Types: K18 Hair products are formulated to benefit all hair types, from fine and straight to curly and coily.

How to Use K18 Hair Products:

K18 Hair offers a range of products, including their Leave-In Molecular Repair Hair Mask, Leave-In Molecular Repair Hair Mist, and more. Here’s a basic guide on how to incorporate them into your hair care routine:

**Shampoo and condition your hair as usual, then gently towel-dry it to remove excess water.

Apply K18 Hair’s Leave-In Molecular Repair Hair Mask from roots to ends, focusing on areas that need extra repair.

Leave it in for 4 minutes to allow the peptide to work its magic.

Style your hair as desired. You can also use the Leave-In Molecular Repair Hair Mist throughout the day for a quick moisture boost and added protection.

In Conclusion:

K18 Hair is rewriting the rules of hair care with its innovative approach to hair repair. With its patented K18Peptide™ technology, this brand is making it possible to restore and rejuvenate even the most damaged of locks. If you’re looking to transform your hair and experience the benefits of healthier, stronger tresses, K18 Hair products might just be the game-changer you’ve been searching for. Discover the science behind beautiful hair and let K18 Hair pave the way to a healthier, more vibrant you.

Bloglovin | Facebook | Twitter | Pinterest


June 4, 2025 0 comments
0 FacebookTwitterPinterestEmail
Asian Beauty

Write an title about: Asian Makeup and Skincare Blog: BENTON Cacao Moist and Mild Cream Review

by Lina Clémence June 3, 2025
written by Lina Clémence


rewrite this content and keep HTML tags as is:

When we think of cacao, we think of chocolate, right? However, did you know that cacao extract has moisturizing properties? 

I was sent this Cacao Moist and Mild Cream from BENTON for review purposes, but I’m excited to try a cacao product that’s not greasy and heavy like typical cocoa butters.

Cacao, otherwise known as cocoa, is high in antioxidants and blocks harmful free radicals in the body. The exotic bean also contains omega 6 fatty acids which helps in cellular healing (hello, beautiful skin)!

Benton’s Story

“Benton is inspired by and named after the movie ‘The Curious Case of Benjamin Button’ in which Benjamin Button grows younger with time…It may just be a fictional movie, but wouldn’t most people have the same desire to be young again? Benton desires to restore your skin back to its original, healthy recipes, rather than to give temporary effects with harmful ingredients. Benton presents freshly made products by sticking to small batch production.” 

Price: $16

Size: 50g

Shelf life: 6 months

Scent: None

Claims:

  • Lightweight texture
  • Suitable for summer
  • Moist finish
  • Water-oil balance
  • Mild formula

Ingredients:

Theobroma Cacao (Cocoa) Extract, Theobroma Cacao (Cocoa) Seed Butter, Butylene Glycol, Glycerin, Water,   Sorbitan Olivate, 

1,2-Hexanediol,  Pentylene Glycol, Theobroma Cacao (Cocoa) Seed Extract,  Zanthoxylum Piperitum Fruit Extract, Pulsatilla Koreana Extract,   Usnea Barbata (Lichen) Extract, Sodium Hyaluronate,   Polyglutamic Acid, Madecassoside, Beta-Glucan,  Carbomer, Arginine, Xanthan Gum

I noticed that the cream was very lightweight. It seemed to literally melt from my body heat into a watery essence which would be appropriate for summetime (not so much for colder seasons when skin gets drier).

As you can see, the cream gave my skin a dewy complexion (which is totally different from a greasy feeling and appearance).

Overall, this cream is extremely lightweight and appropriate for all skin types. As an eczema sufferer, I found that the cream did little for my flaky patches but did wonders on my face. Plus, the fact that the cream is made from natural ingredients and unscented is a huge plus for those with sensitive skin like me.


Source link

June 3, 2025 0 comments
0 FacebookTwitterPinterestEmail
Asian Beauty

Discover The Best Beach Coverup For The Ultimate Summer Outfit!

by Lina Clémence June 2, 2025
written by Lina Clémence


🌴 Introduction

Greetings, Sobat Penurut! Are you excited to hit the beach, but still unsure what to wear as a coverup?

With so many styles and designs to choose from, finding the perfect beach coverup may seem overwhelming. But fret not! We’ve got you covered.

In this article, we’ll introduce you to the world of beach coverups, explore their strengths and weaknesses, provide you with a comprehensive table, and answer frequently asked questions to help you find the perfect coverup for your summer outfit!

🌟 Strengths and Weaknesses of Beach Coverups

Beach coverups come in a variety of styles and designs – from dresses to kaftans to sarongs – making them the perfect accompaniment to any beach outfit. They are lightweight, versatile, and easy to carry in your beach bag, providing you with a quick and easy solution to cover and protect your swimsuit.

However, their versatility and lightweight nature also come with a few downsides. They may not provide adequate sun protection, especially if made from thin fabrics, and some designs may not be suitable for all body types. Furthermore, some coverups may be more high-maintenance than others, requiring special care while washing.

👍 Benefits of Beach Coverups

✓ Lightweight and easy to carry

✓ Versatile and can be worn in multiple styles

✓ Ideal for covering and protecting swimsuits

✓ Add an element of style and sophistication to your beach outfit

👎 Drawbacks of Beach Coverups

✕ May not provide adequate sun protection

✕ Some designs may not be suitable for all body types

✕ Some coverups require special care while washing

📖 Comprehensive Table

Coverup Style Material Sun Protection Body Type Suitability Washing Instructions
Swim Dress Polyester Blend UPF 50+ Universal Machine Wash Cold
Sarong Cotton Varies Varies Hand Wash Cold
Kaftan Rayon Varies Universal Machine Wash Cold

❓ Frequently Asked Questions

Q1. How do I choose the right size for my beach coverup?

A1. Verify the size chart of the manufacturer and compare it to your actual measurements before purchasing. If you’re still unsure about the size, opt for a larger size that you can adjust with a belt or drawstring.

Q2. Can I wear my beach coverup for activities other than beach hopping?

A2. Absolutely! Beach coverups can be worn as casual wear or dressed up for evening events. Pair your coverup with statement jewelry and wedges for a stylish look.

Q3. What is the ideal material for a beach coverup?

A3. Lightweight, breathable, and quick-drying fabrics such as cotton, rayon, or blends of spandex and polyester are ideal for beach coverups.

Q4. How do I care for my beach coverup?

A4. Follow the washing instructions provided by the manufacturer. Most coverups can be machine washed in cold water and hung to dry. Some coverups may require gentle hand washing.

Q5. Can men wear beach coverups?

A5. Absolutely! Men can opt for lightweight coverups such as kaftans or tunics to elevate their beach style.

Q6. What is the difference between a beach coverup and a sarong?

A6. While sarongs are a type of beach coverup, they are usually worn as a wrap skirt or dress around the waist. Beach coverups, on the other hand, are more versatile and may come in styles such as tunics, kaftans, or dresses.

Q7. Can I wear my beach coverup in the water?

A7. Most beach coverups are not designed to be worn in the water and may get damaged if submerged.

🔍 Finding the Perfect Beach Coverup

Now that you have a better understanding of beach coverups, it’s time to find your perfect match. Consider your body type, color preferences, and comfort level when choosing a coverup.

Remember, beach coverups are more than just a functional accessory. They can be the perfect complement to your beach outfit, allowing you to express your individuality and style.

🤝 Conclusion

We hope this article has provided you with valuable insights into the world of beach coverups. Remember to choose a coverup that suits your individual style and needs, whether it’s lightweight and easy to care for or a more high-maintenance option. Happy shopping and have a fantastic summer!

⚠️ Disclaimer

This article is for informational purposes only and is not intended to provide medical or fashion advice. Always consult a medical professional or fashion expert before purchasing a beach coverup or making changes to your beach outfit.


Source link

June 2, 2025 0 comments
0 FacebookTwitterPinterestEmail
Asian Beauty

How I Grew My Thinning Hair Back Thicker and Stronger Than Ever Before (with no drugs or medical treatments) – Fifty Shades of Snail

by Lina Clémence June 2, 2025
written by Lina Clémence


Self-perception is whack. Because we see ourselves in the mirror every day, we often fail to see changes taking place over time. Sometimes the brain refuses to perceive changes and keeps showing us the same image of ourselves we used to see. Other times, the brain continually rewrites our self-image, tricking us into thinking we’ve always looked the way we look now. It’s why I always encourage people to take periodic progress pictures. Being able to look back and forth from then to now can make changes obvious that we don’t pick up on in the mirror.

Anyway, last week I got curious and made a quick side-by-side of my hairline. I’ve been working on reducing my hair fall and regrowing my hair for a few years now. I used a picture from a couple of years ago and a picture from a couple months ago. The visible difference—which I had completely overlooked until then—blew me away.

This is a long, long blog post. It’s the culmination of almost everything I’ve tried for my hair over the past three years and everything I’ve learned in that time. If you’ve been worried you’re shedding too much hair, I hope you find something helpful in here for you.

I used to be afraid to wash my hair, because every time I did, so much fell out. Clumps of it at a time, often so big that they’d stop the tub from draining. I had to pull the clumps out of the drain catcher after every shower.

I called the clumps hair mice because, well, they were the size of small rodents. They were so bad that my own kid would call me out if I forgot to dispose of one before he used the shower. Obviously the drain rodents were bigger when my hair was longer, but even when I had my hair cut into a shorter bob, I’d still shed clumps of it at a time. They just came out more gerbil-sized. Maybe dormouse sized if I was lucky, but that was rare. You get the idea.

My hair has always been a huge source of insecurity for me. It’s always been fine and thin. It became my biggest insecurity these past few years, as I’ve chipped away at what I can change and grown into real acceptance of what I can’t change about my meat suit.

Definitely never felt like this back then.

I felt self-conscious of my fivehead, and of how much scalp showed through the extra sparse baby hairs on either side of my widow’s peak. Unfortunately, I had to let the thin hair at the front show, because I kept my hair pushed back from my face to cover up the thin spot at the crown of my head, which bothered me even more. I could just think of the thin hair in front as a high forehead and widow’s peak. The patch on my crown just felt like a bald spot. I knew intellectually that it was probably just my whorl, positioned a little too close to my natural part, but I hated it anyway.

Despite how unhappy I was with the state of my hair, though, I didn’t really do anything about it for the longest time. Since it had always been thin, I figured that’s just how it was supposed to be. And I figured the amount of hair I shed in the shower was normal and, again, just how it’s supposed to be.

I’m not afraid to wash my hair anymore. I realized that when I was taking a shower tonight. It has been a long time since I’ve winced at the amount of hair that would come off into my hands when I shampooed. It has been a long time since the shower water has puddled up to my ankles from how clogged the drain catcher would get. I’m kind of sad I didn’t fix this problem years ago, but not that sad, because better now than never.

I’m even happy with it unstyled these days!

According to the American Academy of Dermatology, “It’s normal to shed between 50 and 100 hairs a day.” And while I never got fixated enough to actually count the hairs in the hair mouse, or my hair brush, or the vacuum roller brush, or the hair tumbleweed zone in the corner of the bathroom where air currents carry strays, I figured it was about that much. Even if it was more than 100, I assumed that my hair shedding was within a normal range anyway. Not something that I could change. Just something I had to live with.

Over the past few years, however, I’ve learned so many lessons about how much control I actually had over “normal” physical attributes that I used to think were unchangeable. Like the first signs of sagging skin from age, previous lifestyle choices, and sun damage. Or my formerly flat ass.

Two major victories in one picture: a chubby braid and…you know.

We often place a lot of value on the concept of “normal.” So much so that we can conflate the concepts of normalcy—which just means that an attribute is common and shared by a lot of people—and inevitability. It was normal for my skin to start losing elasticity. It was normal for me to have so little booty meat that it hurt to sit on flat surfaces. But as it turns out, just because those things were normal, doesn’t mean they had to stay as they were.

I was probably shedding hair at a “normal” rate. My hair was thin, but not outside a normal range compared to others. And then I made some changes here and there. Those changes added up over time. Turns out I wasn’t suffering from permanent hair loss, where the follicles die and don’t produce more hair anymore.

I started to feel new hair growing in—a lot of it in some places. The hair mice were getting smaller and smaller. I saw fewer and fewer of them in the drain catcher. The new strands kept growing, turning into visible new layers of hair. They stuck out awkwardly in some places but blended in as they grew longer. My braid got fatter. The super sparse baby hair zones at my hairline filled in and took the top cm of my fivehead with them. Even the thin patch at the crown of my head is shrinking.

To really confirm, I took another comparison pic in similar lighting conditions and angle as the original one.

I’ve been wanting to share everything I did and everything I learned to get to this point. Originally, I was going to make a YouTube video, but I kept stalling. It’s a lot of information to try to organize into one video. Video creation really isn’t my strong suit anyway. I knew scripting, shooting, and editing it would take a million years.

The only reason I didn’t just write up a blog post as I’m doing now is because my blog posts get scraped and reposted without my permission on random shady websites within minutes of publishing. Getting those removed from Google and taken down from the websites is a massive pain in the ass. But ultimately, I knew writing this out gave me the best shot of actually presenting my full routine in the most easily digested and easily referenced format. So here we are. I’ll just deal with the plagiarism bots if I have to.

I’m not a doctor. I’m not a trichologist. I’m not a dietitian nor even a self-styled nutritionist with an online certification. I am a layperson, telling you my personal story of how I reversed my hair shedding and grew my own hair back. I just happen to be a very vain and obsessive person who enjoys learning how to improve my meat suit and communicating what I’ve learned even more.

There are a lot of potential medical causes for hair shedding (which can grow back) and hair loss (which can’t). If you feel you’ve been losing hair at an unusual rate and you can see a doctor, absolutely do that first. Get checked out, get bloodwork done. Similarly: it’s always best to first check with your doctor before you make any major changes to your diet or begin taking any supplements.

However. I live in the United States. I know a lot of you do too. “Go see a doctor” isn’t always (or even often) feasible for something that’s really a cosmetic issue. The changes that I made are minimally invasive and minimally drastic, which is why I feel comfortable sharing them for those who may want to try what I tried.

Everyone’s body is different. The reasons for your hair fall may be totally different from mine. Therefore I can’t promise that anything I did will have the same results for you. But I do feel that the things I did that helped me immensely are very low-risk. They’re also fairly inexpensive as compared to treatments like, say, scalp microneedling with PRP in a clinical environment. So if you’ve been noticing a lot of hair shedding, I suggest that the solutions I use are, if nothing else, a solid starting point.

I couldn’t have predicted that I’d end up here.

As always, my routines are not an instruction manual. I’m not saying try every single thing I do. Look through. Think about which ones sound like they might apply to you. Start with one or two. Build from there. As you get more mindful of your own routine and the effects you see, you’ll get a better sense of where to go next. What’s right for me may not be right for you!

Finally: I use affiliate links and codes in this post, which enable me to earn a small commission if purchases are made from my links or codes. Many of the products I discuss are provided to me by the brands.

I swear we’re almost ready to dive into the products and practices that have helped me stop my hair shedding. But one last thing before we get down to the details: my data!

I’ve been keeping track of my hair shedding since summer of 2022. That’s when it started bothering me enough to actually try to do something about it.

My system is pretty simple. Every day, I’d note down the size of the hair mouse (none, tiny, small, medium, or large—and none doesn’t mean I literally didn’t drop a single hair, just that I dropped so few that none of them got caught in the drain catcher).

I call it the hair mouse, but this also includes hair found elsewhere in the house too. It’s not a perfect system by any means. Neither was my record-keeping for the first few months. But it’s more than good enough for me to be able to spot patterns and correlate any changes with my cycle and with changes to my haircare or supplement routine, which I also always note down.

In June of 2022, I was shedding some amount of hair every day. By the end of 2022, I was seeing fewer large hair mouse days and, more excitingly, starting to see some no hair mouse days.

The left picture is from summer 2022, the start of this journey.

By spring of 2023, my hair fall had stabilized enough for me to spot a pattern. I shed the most at a certain point in my monthly cycle. By the end of the year (with one blip very obviously caused by a change in my nutrition), even those heavier shed days were only adding up to medium hair mice. No more large ones. Also by the end of 2023, my number of no hair mouse days had increased significantly. By that point, I was finding more long, curly blond hairs in the house (courtesy of my boyfriend, who does not live here and is not losing his hair) than I was finding my own long, straight black ones.

(If this was tedious to read, I’m sorry! It was even more tedious to track, and to transfer my 2022 and 2023 data over to a grid format like I’ve been doing with my 2024 so that I can visualize the patterns more easily.)

2024 has been great for my hair so far. My number of no hair mouse days is at its all-time high. My monthly heavier shed days only result in small hair mice. And after almost two years of steady improvement, I can actually see the changes on my head. The thin, sparse baby hair regions by my hairline are filling in. So is the thin patch at the crown of my head. I can run my hands through my hair back there without seeing my scalp. I have to clip my hair up in sections to style it because there’s now too much to just style it in one go, the way I used to. My hair has always grown fast, which is why I’m not focusing on length at all—it’s the density that’s gotten so much better.

It feels amazing. This is why I realized it’s time to finally dig in and tie everything together in one comprehensive post. I’ve talked about it plenty on my Instagram, but only in little snippets here and there, and Instagram posts are hard to search through and get buried quickly by both newer content and the algorithm.

So. You’ve borne with me for almost 2000 words. Let’s get into the meat of this post!

As I mentioned before, I’m no doctor or trichologist. If you suspect a medical cause for your hair shedding, consult a doctor if you can. But if you’re really not sure where to even begin figuring out the causes for your hair mouse infestation, here are some common ones, straight from the American Academy of Dermatology.

  • Damage to hair: Bleach and heat damage or overly rough brushing can contribute to increased hair shedding. We’ll talk about this one a lot below.
  • Friction and traction alopecia: If you frequently wear tight hats or headbands, the rubbing against your scalp can cause permanent hair loss. Similarly, if you often pull your hair back tightly in a ponytail, braid(s), or bun, watch out for traction alopecia, which usually shows up as thinning at the hairline.
  • Nutritional deficiencies: Per the AAD, deficiencies in biotin, iron, protein, or zinc can cause excessive hair shedding. We’ll discuss this in much more detail below.
  • Scalp health issues: Infections, skin disorders, and general poor skin condition on the scalp can cause increased hair shedding or permanent hair loss.
  • Medical problems: I’m grouping a number of these together under this category because I won’t be delving into them much since I’m not a doctor. Certain medications, including chemotherapy, can cause increased hair fall or permanent hair loss. So can some autoimmune disorders and hormonal balances, as well as childbirth, breastfeeding, illness, and chronic or extreme stress. Please see a doctor if you’re concerned that medical issues are causing your hair to fall out.
  • Genetics: Both men and women can suffer from androgenic alopecia, aka hereditary balding. Male pattern baldness typically affects the top of the head from the hairline back and results in total hair loss in that area. Female pattern baldness typically involves some amount of hair loss all over, and/or marked thinning outwards from the hair part on the top of the head, but usually doesn’t end in fully bald spots. Both can be emotionally distressing.
  • Age: Many of us experience some loss of hair density as we get older. Over time, our hair follicles slow down and may stop growing new hair. You’d think this is inevitable, but actually…it might not be. Let’s see.

Below I’m going to break down my hair regrowth routine into several sections working from the inside out. You’ll see how they link back up to some of the causes discussed here.

As I mentioned before, my hair has always been pretty fine and thin. Because it has always been pretty fine and thin, I assumed it was just destined to be fine and thin. And yes, it will probably always be on the finer side, but I had no idea how much changing my nutrition would impact my hair density. Because adding a couple of supplements apparently unlocked a whole new world of hair growth for me.

When it comes to hair regrowth, almost everything else in this post is secondary to the nutrition piece. Scalp care, haircare, heat protectants, and various tools only help what’s already growing. The nutrition piece is what allowed me to grow more.

I know the party line when it comes to supplements. “It’s expensive pee.” “You should be getting all the nutrition you need from your food.”

Sure. In ideal conditions. The conditions where we have:

  • Access to blood work to figure out exactly what our nutritional needs and deficiencies are
  • The time and inclination to do the research to figure out exactly which foods we need to include in our diets in order to get the nutrients we’re currently missing
  • The budget to procure the foods we’ve identified as containing the nutrients we’re missing
  • The time and inclination to prepare those foods if necessary
  • The willingness to eat whatever foods we’ve identified we should be eating in order to round out our personal nutritional intake, regardless of how we feel about those foods or whether they fit into our overall food consumption preferences and priorities

I mean, it’s a lot of conditions that need to be met. I hate a lot of foods. Also, I have a pretty specific diet that’s geared towards my fitness and body goals. There’s not a ton of wiggle room there unless I’m willing to compromise on my other preferences for my meat suit. So, supplements it is.

I’ve been taking the Goli Women’s Multi gummy supplements every day since summer of 2022. Fall of 2022 is about when I started to notice my hair fall decreasing (and my nails getting noticeably stronger). I kept taking the gummies. My hair kept getting denser. My hair mice kept decreasing.

Also, for those of you who didn’t care for the stickiness: they changed the recipe and they are no longer sticky!

I’ve taken other multivitamins before and never noticed a change in my hair fall. It seems pretty obvious to me that the main driver here is the biotin in the Goli Women’s Multis. The nutritional content of these gummies is about on par with other standard multivitamins, with one key difference. They contain 750% DV of biotin per serving.

Biotin is naturally occurring in some foods. Mostly foods I hate (nuts, legumes) and others that I just don’t eat much (whole grains, egg yolks), so I’m not surprised I was deficient. Biotin plays a role in keratin production, so it makes sense that it might help promote healthier hair, nails, and possibly skin (though I don’t see any difference there because my skincare routine has been solid for years anyway).

The jury is out on biotin, as far as research goes. Obviously there’s some evidence to support its benefits for hair and nail growth. That’s why it’s in every damn hair and nails supplement ever as well as in many collagen beauty supplements too. However, there’s also evidence suggesting that it doesn’t do anything. My theory about the conflicting data is very simple. Not everyone’s hair shedding or hair growth issues are due to a biotin deficiency. If some research subjects are losing hair for other reasons, taking biotin isn’t going to do anything. There.

My friend Dot @sumomosuki sees similar results.

Don’t take this as me suggesting you grab any biotin supplement, though. For one thing, the vast majority of biotin supplements or hair, skin, and nails supplements contain what seems to be to be way too much biotin—upwards of 10,000% DV in many cases!

Biotin is water-soluble, so theoretically the most that would happen is you’d get the aforementioned expensive pee, but from my layperson’s perspective, ingesting 10,000-15,000% DV of anything can’t be a good idea. Some people have also reported developing acne while taking biotin. It didn’t happen to me. It may not happen to you. But it may be worth starting with a lower dose to make sure you won’t have that issue.

Also, it isn’t a case of the more the better for me. Briefly in late 2023, I switched to the Vegamour Gro Biotin Gummies. Unlike the Goli Women’s Multis, the Vegamour gummies are explicitly marketed for hair health. And while Vegamour, like other brands, walks the line of not claiming hair growth improvements, they’re literally called Gro. The Vegamour Gro gummies contain a lot more biotin than the Goli. 16,666% DV.

It took a few weeks, but after I switched over to the Vegamour version, my hair mice started appearing again. At an alarming rate. I hadn’t had to dig clumps that big out of my drain in quite a long time. I was digging them out almost every night again. I’m actually still pretty upset about it.

This is my upset face.

I got a sinking feeling every time I shampooed and found my hands covered in shed hairs. I let this go on for a couple more weeks still before tossing the Vegamour gummies and going back to Goli. And a few weeks after that, my hair shedding dropped off again.

It’s been smooth sailing ever since. In fact, this year I’ve shed even less than before. My no shed days are up to almost half the days of every month. The other days are very minimal shed.

I suspect that in addition to the comparatively moderate dose of biotin, the specific combination and ratio of trace minerals in the Goli Women’s Multis, some of which are absent in the Vegamour, are doing some heavy lifting too. Whatever it is, I’m grateful for it and I’ll be taking these for as long as they remain available on the market.

Goli Gummies at Goli.com (code FIDDYSNAILS gives 17% off one-time orders and 32% off first time subscription orders)

In addition to the Goli gummies, I also feel the MSM supplements I’ve been taking since early 2023 have helped my hair and nails come in thicker and stronger than before. I notice the effect of these on my nails more than my hair—my nails used to be paper thin and prone to tearing, and now they’re rock hard and grow as long as I want them—but I figured I’d mention them too.

MSM is a (cheap) sulfur compound with some evidence supporting its benefits for hair and nail growth. Like biotin, it plays a role in keratin formation. It’s also anti-inflammatory and commonly used for muscle and joint health.

These are a bit horse pill-ish, but I put up with it.

I actually started taking it because my boyfriend (the handsome guy in the before picture I’ve been using) suggested it might help with the horrible headaches I used to get all the time. It…didn’t really do anything for my headaches, but my nails started growing crazy strong and my hair strands were getting thicker and stronger too. So I continue to take it.

Doctor’s Best MSM on Amazon

The final part of my nutritional diatribe is: Hair is made out of protein. So make sure you’re eating enough protein to give your body the building blocks it needs to grow hair (and nails and skin) in the first place. It’s pretty well known that people on very restrictive diets or people suffering from malnutrition (regardless of the volume of food they consume) lose their hair. Your hair itself is dead, but it’s grown through processes in your living body. Nourish your body!

Anyway. Now the easier parts!

Some years ago, my friend Tracy (of the now mostly retired but eternally relevant skincare and K-Beauty blog Fanserviced-B) blew my mind with the concept of scalp acids.

Your scalp is skin. And if that skin isn’t healthy, it can affect hair growth or induce more hair shedding than necessary. I don’t just mean actual skin disorders like seborrheic dermatitis or psoriasis, but also just run-of-the-mill clogs, dryness, flakiness, and itching. For example, if your scalp is always itching and you’re always scratching, you’re bound to cause some stress to your hair, similar to the manual stress that causes friction or traction alopecia.

Clarifying the scalp with an occasional exfoliating acid turned out to be a great first step towards a healthier scalp and hair. Tracy turned me on to using The Ordinary’s glycolic acid toner for this. It comes in a big bottle, making it perfect for generous use all over the scalp, and dispenses from a narrow-tipped nozzle, making it perfect for carefully squirting it down into hair parts onto the skin.

Perfect.

For quite a long time, I did this about once every week or two. About half an hour before showering, I would apply the glycolic toner on my scalp and carefully massage it in. After a half hour wait, I’d go shower and shampoo and condition as usual.

I used to get itchy bumps and clogs on my scalp. The scalp acids cleared those away easily. My hair gained a little extra lift and volume since it wasn’t being weighed down by dead skin cells at my scalp, too. While I don’t do this anymore, since I found a shampoo that gives similar effects without adding the extra step, I still think it’s a great way to quickly improve scalp health.

The Ordinary Glycolic Acid 7% Solution at TheOrdinary.Com

These days, instead of using scalp acids, I use 107’s Scalp Purifying Microbiome Shampoo once a week.

For my purposes, this is a magnificent clarifying shampoo. It contains citric acid, traditionally brewed vinegar, and salicylic acid to break down buildup on the scalp. It foams up beautifully and leaves my scalp and hair feeling deep cleaned and refreshed. It also contains a bevy of supporting ingredients, like ginseng, centella, ferments, and rosemary leaf oil to help soothe inflammation and support healthier growth.

Also: Nice big bottle.

The pH of this shampoo is around 5.5. This is important to note because the scalp is skin, and like skin, generally stays healthiest when cleansed with products at a lower than neutral pH. The outermost layer of skin, its protective barrier against both moisture loss and external irritants and contaminants, generally stays at a pH of between about 4.5 and 6. When we use cleansing products at a much higher pH, they can weaken the structural integrity of this barrier. As with facial cleansers, I prefer shampoos that are around pH 5.5.

I do find the 107 shampoo very deep cleansing, and using it more than twice a week can leave my hair feeling a little squeaky. On top of that, I color my hair and need to be extra careful not to strip out the color, so it isn’t my everyday shampoo. I think of it as a replacement for my occasional scalp acids treatment.

107 Scalp Purifying Microbiome Shampoo at 107.com

For daily haircare, I focus on keeping my scalp and hair clean and well conditioned. This helps minimize breakage, which contributes to hair fall. I don’t just use any shampoo or conditioner. The wrong ones (and I’ve tried a ton) do more harm than good. I know a product isn’t working out if my hair feels weak and stretchy when it’s wet, or when it snaps or tangles easily. Hair shed from breakage isn’t quite as bad in my eyes as hair falling out from the root, but I’d still rather keep as much of my hair on my head as possible.

I use the Olaplex No. 4 Bond Maintenance Shampoo as my daily shampoo. My old hairstylist turned me on to this shampoo years ago and I haven’t looked back.

Both the shampoo and conditioner are fab.

Like the 107 Scalp Purifying Microbiome Shampoo, the Olaplex 4 is pH 5.5. It also manages the feat of getting my hair sparkling clean without drying out the strands or my scalp. It doesn’t strip my color, and a tiny tiny bit goes a very long way. Even when my hair is down to my waist, I never need more than about a quarter size blob of shampoo to get mountains of lather all over my head. One bottle lasts me about half a year even with near-daily use!

One important tip to note with this shampoo: Emulsify it with a little water in your hands first before putting it in your hair. This helps work up the lather faster and better.

Olaplex No. 4 Bond Maintenance Shampoo on Amazon

Because my hair is fine and straight, I’m also extra careful with conditioner. I need conditioner to moisturize, smooth, and lubricate the strands. This keeps them soft and pliable, helps prevent tangling that could lead to breakage, and, of course, keeps my hair looking shiny and pretty. Because that’s the point of all of this, right? We’re not going to die if our hair is thinning. But we want it to stay healthy so it looks pretty! However, I don’t want my hair weighed down with a heavy moisturizer. That would just make it look thin and flat.

107 Hair & Scalp Hydrating Microbiome Treatment, meant to be the counterpart to the Scalp Purifying Microbiome Shampoo, works great for me as an everyday conditioner. It’s super lightweight and clean-rinsing, but detangles like a dream and leaves my hair feeling strong.

So this is my everyday shampoo and conditioner duo.

This product also has an extra benefit over a lot of other conditioners. It’s made to act as a calming, hydrating scalp treatment too. There aren’t many ways to moisturize the scalp without leaving hair looking greasy at the roots, but this does the trick. I was concerned about oily roots the first few times I used this as directed, then pleasantly surprised. My hair keeps a bit of lift at the roots but my scalp feels soothed and nourished.

107 Hair & Scalp Hydrating Microbiome Treatment on 107.com

If I didn’t bleach or heat-style my hair, the previous three products would be enough to keep it healthy and strong. But I have some bleached streaks, and they’re bleached bleached because I have to leave the bleach in for a solid 45 minutes to lift my natural color enough for the purple dye I like to show up. I also blow dry and heat style it several times a week at minimum. I have been self-soothing by doing my hair a lot lately, and this takes a toll.

One of the ways my newfound love of hot tools takes a toll is in dryer than normal hair. The lightweight conditioning that the 107 treatment provides is enough for most uses, but I do occasionally need a deeper conditioning treatment. So about once a week, I swap out the 107 treatment for the Olaplex No 5 Bond Maintenance Conditioner.

Therefore: My once weekly swap out shampoo and conditioner routine.

A long, long time ago, during the Memebox glory days, Tracy and I were obsessed with the Korean haircare brand Lador’s Hydro LPP Treatment. It was a rich deep conditioner that actually seemed to sink into hair instead of just leaving a slimy film on the surface. Lador Hydro LPP still exists, but it’s been through a couple of reformulations since then and I fell out of love with it with the first reformulation.

Anyway, it doesn’t matter because Olaplex 5 has completely taken Hydro LPP’s place in my heart. I apply this to wet hair right after shampoo and leave it in for a few minutes while doing the rest of my shower before rinsing. When I rinse, hardly anything comes out, because it feels like it actually penetrates into my hair, giving it more strength from within.

Olaplex No. 5 Bond Maintenance Conditioner on Amazon

I won’t be linking the last product in my scalp and haircare section because I haven’t used it long enough to give a full-hearted recommendation. I do want to mention it anyway, because it is extremely interesting and so far very very promising for me.

You’ve probably heard of Bosley, the hair transplant clinic chain. They make haircare too, through their Bosley MD brand. Last month, I was invited to join the launch Zoom for their new Revive+ Densifying Foam. I’ve been using the women’s version of the Revive+ foam for about a month now, and I’m actually pretty excited about it.

Mitochondria are the powerhouse of the cell.

Mitochondria are so hot right now. It’s because they’re the powerhouse of the cell. This indisputable scientific fact that all of us know has implications for beauty. Last year, I reviewed products from Timeline Skin Health, whose main active ingredient accelerates the skin renewal process by inducing mitophagy to help cells clear out defective mitochondria more effectively.

Bosley claims similar effects in the Revive+ formula. According to the brand, revitalizing the mitochondria at the hair follicle helps to extend the hair growth cycle. Also according to the brand, this can help mitigate hair follicles’ sensitivity to stressors like hormonal fluctuations as well as reduce deterioration due to age.

Since I’ve only been using the Revive+ foam for a few weeks, I can’t say for sure whether I’m seeing results. I will note, however, that I shed a lot less hair during the heavier shed days of my monthly cycle this month. That’s promising.

Also, I’m a ho for foam.

Bosley’s marketing emphasizes their use of AI to help develop this product. I actually think this was a misstep. The AI concept doesn’t exactly inspire positive feelings in a lot of people. The first time I mentioned that aspect of the product in my stories, I got a lot of replies expressive negative reactions to the idea of AI taking over the research like this.

My understanding of the way they used AI isn’t quite so dire. Bosley wanted to create a drug-free product, because not everyone wants to use minoxidil. (I can’t, because minoxidil is toxic to cats and I’d rather go full bald than put my cats in danger for the sake of my vanity.) They used AI to accelerate the initial stages of R&D by having it go through vast amounts of ingredient research to identify the precise molecule that they believed could achieve the desired effect, then went from there.

Keep an eye on my social media if you’re intrigued by this product. I’m sure I’ll be posting about it more as I keep using it.

If you don’t use hot tools much, if the occasional blow dry is the most you put your hair through, then you can probably stop reading here. Vitamins and shampoo and conditioner are the backbone of the routine that has helped me grow my hair thicker and denser than it ever was before.

Vitamins and shampoo and conditioner are not quite enough if you’re like me and enjoy regularly frying your hair into submission with hot tools set to 390F.

Like this.

The fact that I have so much fun heat styling my hair now is actually more evidence of how much it’s improved over the years. I used to be too scared of damage and breakage to ever do anything fun with my hair. Plus, it was so thin that I never really thought it looked nice styled unless my hairstylist did it anyway.

Now that I’ve got plenty of hair to work with, curling it or putting a wave in it or even just blow-drying it into a shiny sheet of smooth glass hair bring me so much joy. In order to continue doing so without absolutely destroying my hair, I have a whole arsenal of products to repair damage and protect it as much as possible from more.

Story time.

If you lived in San Diego around 2005 or 2006, and you liked to go to the mall, and you were a woman with at least a few inches of hair on your head, I probably tried to sell you a hair straightener at some point. Possibly kind of aggressively. Sorry about that.

I worked at some kiosks selling ceramic flat irons and curling wands. Generally we tried to stop people and get them to let us demo the products on their hair. I think people had just figured out how to do flat iron curls and that was very exciting. Anyway, not everyone wanted to let us touch their hair. This was actually fine with me, because I don’t really like touching people (which is why I never moved over to selling those Dead Sea skincare products instead even though it was better money).

When people were curious but didn’t want us screwing with their hair, or we were selling to men, we just demonstrated the products on ourselves. What that meant was my hair got fried. Fast. I mostly showed the product and technique on a couple of pieces of hair close to my face because those were easiest to get right. Those pieces of hair ended up rough and crispy and broke off in chunks. At night, I tried everything I could think of to at least mitigate the damage. Hot oil, hair masks, deep conditioners, vitamin E capsules cut open to release the thick goopy grease within. None of it really helped. The rest of my hair followed suit because I did also do my whole head at the kiosks when I was bored.

If I had had the products I’m about to discuss, my hair would probably have survived. It would at least have lasted longer before crumbling into dust and forcing me to get a shoulder length bob after I left that job.

I heat style my hair almost as frequently these days as I did back then. These days, it is not crumbling into dust. This is despite the fact that I have that particularly stubborn, straight Asian hair that requires very high heat to hold a shape. I always have the blow dryer on the highest heat setting, and my curlers and straighteners have to be set to at least 390F to work.

Of all the ways I heat style my hair, blow drying is the least damaging. It’s just hot air rather than nearly 400F metal or ceramic plates clamped directly onto the strands. It is still heat, however, and it is drying. So before blow drying, I usually apply a bit of Olaplex No. 6 Bond Smoother to my hair.

This is how it looks just blow dried.

Olaplex 6 is a moisturizing styling cream that you can also use as a leave-in conditioner if you want. I primarily started using it because it cuts down drying time significantly, which further helps to limit the damage to hair. I got extra diligent about it after blow drying my hair without it a couple of times. Without it, my hair feels rougher and looks duller and more frizzy after a blow dry. With it, my hair comes out lustrous and silky, and I don’t hit any tangles when I go to brush it.

A little goes a long way.

I blow dry with my Shark FlexStyle. Originally, I bought this Dyson AirWrap dupe because I got sucked in by how cool the hot air vortex curling rods look on camera. I quickly grew tired of struggling with the curlers because they’re a lot less easy for me than everyone else on social media makes them appear.

But I don’t regret my purchase at all, because it makes a perfect blow dryer. It’s super lightweight with a slim profile, so my arm doesn’t get tired of wielding it, and it dries my whole head incredibly fast. I used to say I could do my whole head in 5 minutes. I have more hair now, so I’ll revise that up and say it takes a bit less than 10 minutes, but it’s still amazingly quick, especially when I use the Olaplex 6 with it too.

Not too upset the curling rods aren’t my favorite.

Olaplex No. 6 Bond Smoother on Amazon

Shark FlexStyle on Amazon

My Shark FlexStyle also came with a blow dry brush attachment, but I ended up hating it. It pulls and rips my hair like crazy. I do love a good blow dry brush for when I want to blow dry my hair totally straight but with more bounce and movement than when I just let it dry straight naturally.

Like this.

When I’m doing a straight blowout, I’ll start by using the Shark FlexStyle (with the concentrator attachment) to lift and dry my roots. Then I go in on the length with a blow dry brush. I don’t have the coordination to wield a round brush in one hand and a blow dryer in the other. Trust me, I’ve tried. I can punch myself out with my own styling tools more easily than I can manage to make the whole two tools at once thing work.

After using a few blowout brushes, including the Revlon one that everyone had at some point in the past decade, I’m very confident that my Insert Name Here blowout brush is the best for me. The bristles are densely set enough to grab my hair and guide it into shape, but not so densely set that they pull or tear on my hair. The high heat setting is enough to create a style but not so hot that it creates unnecessary damage. And, like my Shark FlexStyle, it’s lightweight. I don’t like getting tired when I’m doing my hair.

The bristles are turning purple from my hair dye and that’s fine with me.

Finally, for that extra glassy glass hair look, I run a few drops of Olaplex No. 7 Bonding Oil through my hair before I use the blow dry brush. This oil is magical. It only takes a few drops on each side of my hair to leave it as fluidly glossy as liquid silk. It doesn’t feel oily at all, and if I apply it at night to damp hair after shampooing and conditioning, I wake up with incomparably silky hair too.

Liquid gold.

INH Insert Name Here Insert Blowout Here blow dry brush on Amazon­­

Olaplex No. 7 Bonding Oil on Amazon

Remember the story about flat iron curls that I told like six hundred words ago? Yeah, I still like doing those. They’re so fun when I want a bombshell kind of look.

This picture is about a year old and I just realized I can also tell I have way more hair now, not just length but density.

I also find flat iron curls slightly less damaging than curling with a curling iron or rod. Instead of clamping the hot metal down on your hair and holding it there, you’re moving the hot metal down the length of your hair. That way, hair spends less time on the hot metal. Hence, less damage.

For best results with flat iron curls, you need a flat iron with a fairly narrow and rounded profile and very smooth plates so that they glide down the hair shaft easily. I’ve tried a few cheapie models, and a lot of them tend to stick to hair, causing tugging and unnecessary damage. I have two different Kristin Ess mini flat irons that are the same size and shape, and I end up using the Nanoblack more, because it slides a bit more easily.

The black plates also don’t show my hair dye, which is nice.

My one complaint about these is that the power cord on the minis is pretty short. That’s really more of a complaint about my apartment, though. There are no outlets in the bathroom, so I end up trapped near the door with the hot tool plugged in to the kitchen outlet instead.

While flat iron curls are less damaging than curling irons or curling rods, however, they are still pretty damaging because of the direct contact with the high heat plates. When I’m doing these, I prep my hair with Olaplex No. 9 Bond Protector serum. This is a lightweight gel serum made to protect hair up to 450F.

I use this a bit more generously than 6 or 7.

It also adds a lot of shine and gives what the brand calls “style memory” and what my elder millennial self just calls “hold.” It’s not stiff and crunchy like the styling gels of yore, though. While this makes my hair hold a shape all the way until my next shampoo, it doesn’t feel like a hold product. Hair stays soft and moves naturally with it.

Kristin Ess Nanoblack ¾” travel flat iron at Ulta

Olaplex No. 9 Bond Protector Nourishing Hair Serum on Amazon

The Olaplex 9 comes in extra handy when I’m doing my current absolute favorite hairstyle: mermaid waves!

THESE

I actually had the INH Insert Waves Here waving iron for something like a year before I dared to try it out. Because it looks terrifying. It’s basically three curling irons fused together with a plate that clamps down on one side to create a a big wave pattern. It’s the kaiju version of a crimper.

Then I finally worked up the nerve to try it. I burned myself a couple of times at first, but I also fell in love. It’s huge, so you can fit a lot of hair in it at a time, making styling super fast and easy. Takes maybe 5 or so minutes to get a full head of glorious beachy waves. I’ll do an updated tutorial on my Insta soon.

It is scary looking though right

It is, however, the most damaging of all my styling tools, because you do hold it clamped down on your hair without moving it for a few seconds on each piece. After much experimentation, I’ve found that counting to five Mississippily works best for my stubborn hair. I do have to be very on top of my repairing routine when I use this thing a lot, but it’s so worth it.

INH Insert Name Here Insert Waves Here waver on Amazon

No heat protectant is magic. The Olaplex products I use before heat styling help significantly, but when you’re clamping 400 degrees of hot metal or ceramic directly on your hair, it’s going to take some damage. Doubly so if some of your hair is bleached, as mine is.

I absolutely would not have half my hair length if I didn’t use a good bond repair product religiously. A little over a year ago, a new brand called Epres—founded by Eric Pressly, one of the original creators of the Olaplex molecule—reached out with an offer to try their bond repair product. I said yes, and the rest is history (but my hair is not).

This vial contains the precious molecule.

The Epres molecule is nothing short of a miracle. My hair can be fried to hell and back, but 15-20 minutes saturated with the Epres Bond Repair Treatment restores it to a strong, shiny, almost virgin state. Epres (and, to a slightly lesser extent, the older Olaplex bond repair treatment) works by penetrating the hair shaft and forming new keratin bonds within it to replace the bonds that were broken by bleach, heat styling, or general rough handling. It’s also nearly instantaneous.

I find the Epres Bond Repair Treatment much easier to use than the somewhat comparable Olaplex No. 3 Hair Perfector. You have to apply Olaplex 3 to damp hair, meaning you need to get your hair wet first, then put the product in, then wash it out afterwards. Epres goes right on dry hair. You mix the concentrate provided in a little vial with plain water in their spray bottle, then just spray it on to saturate hair and brush through. Put it up for a little while and then shampoo and condition as normal.

They just updated the spray bottle to a smaller, slimmer design, so check my Instagram stories later today for a look.

Per Dr. Pressly, one of the key advantages of the Epres molecule is that it moves more easily through hair and penetrates better than the Olaplex molecule, for more complete damage repair. In my comparison of the two products, I found that to be true.

The effects of any bond builder product like this do go away after a few washes, as the newly created keratin bonds eventually wash out (or get broken by your styling habits anyway), but the results of the Epres treatment last longer than Olaplex’s. When I’m not doing much with my hair, I just do it once a week. If I’ve been going hard with my waver or flat iron, I do it twice a week. It does so much to keep my hair intact.

Epres Bond Repair Treatment starter kits and refill packs at Epres.com (20% off with code FIDDYSNAILS)

You might be wondering why, if it took so much time and so much work to grow my hair out from thinning to so much denser and thicker than before, I’m so eager to style it and fry it and potentially damage it more. And that would be a good question.

I do it because it’s fun! Originally I did just want my hair to grow out more so that I’d feel less self-conscious about the thin spots. But the more it grew out, the more I wanted to play with it, experiment with different looks, actually have fun with it. Because for me, that’s the point of taking so much care with my meat suit. To have a canvas for creativity and new ways to feel joy in existing in my physical form! Just like I didn’t go to all the trouble of growing a butt just to hide it away in baggy pants, I also didn’t go to all the trouble of reversing my hair thinning just to let it hang limp or put it up in a bun.

I’m pretty sure everyone but me also knew I was going to dye it purple eventually.

But that’s just me. Like I said, my routine is not meant to be an instruction manual—you don’t have to do every single thing I do. If you’ve made it this far, I applaud you. That was a lot! I hope you found some suggestions that apply to your situation, and I equally hope you ignore the ones that don’t.

If you have any questions or want me to go into any more detail about anything I mentioned here, please please ask in the comments. This is the most comprehensive piece of writing I’ve done since my book, but I still omitted quite a lot for the sake of all our attention spans. I’m happy to answer questions and take requests for follow-ups.

In between hairstyling sessions.

Also, if you enjoyed reading this and wish I’d write more blog posts…stay tuned, because I have some big plans in that area for you.

Thanks for reading!


Source link

June 2, 2025 0 comments
0 FacebookTwitterPinterestEmail
Asian Beauty

I visited Seoul in 2023 and all I got was fabulous. Notes on a long-awaited kbeauty trip.

by Lina Clémence June 1, 2025
written by Lina Clémence


I visited Seoul in 2023 and all I got was fabulous. Notes on a long-awaited kbeauty trip. – fanserviced-b


We use cookies to ensure that we give you the best experience on our website. If you continue to use this site we will assume that you are happy with it.Ok


Source link

June 1, 2025 0 comments
0 FacebookTwitterPinterestEmail
Asian Beauty

Product Review: Organique by Olinda Spring Whitening Skincare

by Lina Clémence June 1, 2025
written by Lina Clémence


The entire world is hopping onto the organic skincare trend, and for good reason. Products that are organic are safe for the skin, less likely to irritate sensitive skins, and gentle, yet effective. Today I’m reviewing a range of organic whitening products, so if you’re looking for bright, luminous, clear skin – you’re in the right place (or at least, reading the right article). Here we go.
Product

Organique by Olinda Spring is a skincare brand that formulates their products using the natural spring waters of Olinda, in Mt. Dandenong, Australia. The waters are not only naturally filtered and pure, they’re also mineral rich and supposedly good for health and highly beneficial to your skin. They’ve been making waves in Australia and beyond with their effective, natural, and affordable skincare, and they have, happily, reached Malaysian shores.
I received their entire whitening range. In this Whitening range there is the Gentle Cleanser, Multi-Active Toner, Facial Serum, Day Care Lotion, and Eye Cream. The range utilises Magnolia extract – high in antioxidants, anti-inflammatory, and prevents UV-induced pigmentation.
I have been using and testing the products over the past 3 weeks. My skin at the beginning of my trial was pretty good – dehydrated, but clear and even. I did have freckles and sun spots around my cheekbones and temples, and I was hoping to reduce their appearance with continued use of this range.
Packaging

What struck me immediately about Organique’s packaging was the high quality, despite the product’s price point. The bottles are made of a beautiful frosted glass and have the weight and feel of a luxury product. The pumps and covers all function beautifully and smoothly, and in these 3 weeks of use their functionality has remained top notch. I was incredibly pleased and impressed.
Performance
As is expected when you receive an entire range, I used all the products together in my daily skincare routine, only swapping out the day cream for a heavier, more hydrating moisturiser (the one I was using daily before trialling this range) at night.


The cleanser is foaming but doesn’t give you the kind of crazy foam that you get from most – I personally prefer this because I feel it doesn’t strip the skin as much.

I expected the lotion and day cream to be heavy and sticky, but they were both very lightweight and absorbed into the skin very quickly. My entire experience using the range was delightful and refreshing. The eye cream was slightly heavier, but still very lightweight, and almost felt like a heavier serum instead of a cream. This range is mildly scented, but I found it quite pleasant and the smell disappeared pretty quickly after application.
Verdict

After my 3 weeks of use, I’ve found that my skin is brighter and more luminous – there is this glow about it when it’s photographed, and my skin is less flaky in the dry areas around my cheeks and mouth. I haven’t noticed a significant reduction in the darkness of my freckles and sun spots, though I do think this range is much more effective at preventing the development of new spots than it is for removing pre-existing spots.
In my opinion, this is a beautiful starter range for anyone looking to begin an affordable, complete whitening skincare routine. It covers all the bases – great value for money, good hydration, good protection for the skin. If you’re looking to solve a more serious pigmentation problem, you might want to look at more extreme options instead (e.g. laser or peeling treatments).
This range retails at the below prices and is currently available at www.organique-skincare.com.my and I have a promo code! Enter EMILY20 for 20% off at checkout on their site.
Gentle Cleanser RM69
Multi-Active Toner RM79
Facial Serum RM129
Day Care Lotion RM89
Eye Cream RM99


Source link

June 1, 2025 0 comments
0 FacebookTwitterPinterestEmail
Asian Beauty

DuSol Beauty Singapore-BLOG-What is Olivetta Hair Treatment ?

by Lina Clémence May 31, 2025
written by Lina Clémence


CMC is a natural lipid that glues the chain proteins in the middle layer (cortex) of the hair. It determines the hair strength, elasticity, shape and colour. CMC is lost during chemical processes like colouring and perming. However, the hair does not reproduce CMC again. CMC in the Olivetta treatment helps to repair the hair starting from the cortex, building hair strength and quality.  

Step 2

After washing off the product applied in Step 1, spray a moisturising serum which helps to close up cuticles that were opened during the chemical process. Our hairstylist will massage the products into your hair for better absorption. It also creates another protective layer to seal moisture and nutrients in the hair shaft. 

Step 3

The last step is to create a final layer for extra smoothness for better manageability of hair. Lay down and relax as your hair soaks up the product. 

And that’s the end of the treatment. Enjoy getting your hair styled by our hair stylists and look forward to stronger and healthier hair*!

*results vary for different people


Source link

May 31, 2025 0 comments
0 FacebookTwitterPinterestEmail
Asian Beauty

Am I Still Blogging? Yes, I Still Am.

by Lina Clémence May 31, 2025
written by Lina Clémence


I am doing this blog post simply because I get soooo many questions about whether I am still blogging or not!

In my heart, I still am, but I get where the questions are coming from as it’s been like 10 months since my last blog post. I don’t have any intentions to give this up at present, it’s just that I really went through a lot in the last 10 months, health-wise and logistics-wise. The health part, I feel like it’s a conversation for another time, but for the logistics, oh boy. My iMac was debilitatingly slow and couldn’t do anything productive anymore, it could take 30 seconds to execute a single command or mouse click. It would take a right click even up to a minute before the menu would appear. On the worst days, it could hang for 20-30 minute periods and I couldn’t do anything. Even starting it up took 20-30 minutes! Simple reels that might have taken 30-40 minutes to edit would have taken days on the iMac. Since I couldn’t get anything done anymore, I had to have it checked in for diagnostics and repair, and when it came back after many weeks, it really still was slow in many ways so the entire ordeal of having a backlog pile up went on for at least half a year. It took me quite some time to acquire another computer, transfer and back up all relevant files, and set up shop. This is why I have yet to recover from the worst backlog in my own history as a content creator.

By the time I got to adjust to all the file transfers, I found myself just as overwhelmed as any other content creator. With Instagram introducing reels in late 2021 and then starting to punish any non-reel content in 2022, it became so hard to catch up with blogging as I now had to conceptualize which content would be done in a reel and which would not. And sadly, more of that needed to be in a reel, adding so much more workload strain. Before the algorithm started to punish non-reel posts, I was able to do things seamlessly somehow as I would shoot photos that I could use for both Instagram and the blog, as well as for Facebook and even Twitter. Fast forward to this month, the average content creator now has to churn out video content for Instagram Reels, TikTok, YouTube Shorts, and YouTube non-Shorts––but every single platform wants a different approach and a different kind of content.

It would take a TED talk to explain all the intricacies, but I think it’s easy to see that for creators who were able to seamlessly use photos for blog posts and Instagram + Facebook posts before, it’s now much more complex and I’m honest that I’m not able to catch up. I wish I had an editing and shooting team like other creators so that I could free up so much of my time that goes into editing, shooting, and setting up and focus that time instead on conceptualizing and ‘performing/modeling’ for shoots. Everyone wants to be an influencer these days thinking about all the glitz and glamour, but in reality, if you’re unable or unwilling to shell out the money for professional equipment or professional teams, it will really be very hard to catch up with all the content requirements in both quality and quantity these days.

Even myself, I actually can’t even tell if people even read blogs anymore. As far as this blog’s stats are concerned, it’s been generally stable, but even I wonder who are the people who are still coming to visit my blog. I’m thankful for those who still come over to read or check out swatches because all the industry clamor has been short-form video content these days.

But when I do analyze things, I still want to continue blogging because being in this for so long, what I have come to realize is that there is no single social media site that can be dominant forever. I don’t know when will the algorithm of a certain app favor my posts or when an app might start punishing me, and every year, there is a new and more dominant site that everyone wants to swarm into. I want to continue providing reviews and swatches that can be easily searched for any time without having to suffer from decay algorithms that social media sites do (i.e. the older your post, the more hidden it will get). 

So I guess the best explanation I can say is that I don’t have the intention to stop blogging, I just am overwhelmed with all the new industry content requirements like the rest of the creators in this industry. As someone who does everything myself, I still really am figuring out how I can continue conceptualizing, filming, editing, and managing all the replies and follow-ups without sacrificing my health and well-being.

Please give me time to figure this out. I think I’ll get to a solution somehow.


Source link

May 31, 2025 0 comments
0 FacebookTwitterPinterestEmail
Asian Beauty

Lisa Eldridge Liquid Lurex eyeshadows

by Lina Clémence May 31, 2025
written by Lina Clémence


I am a massive fan of liquid sparkly makeup and two days before receiving my LE eye shadows, enthused by the holiday spirit, I shot a roundup of some of my favorite sparkly shimmery eye shadows. It didn’t end well. My eyes have been itchy, watery, sore since, and the reel I shot didn’t get saved. But I DID get some pretty pictures out of that exercise which had everyone DMing me about the eye shadow details.

About the Lisa Eldridge Liquid Lurex eye shadows (from the website) These easy-to-use eye embellishments will see you through the party season and beyond. With a flattering formula that is both creamy and lightweight, the Liquid Lurex Eyeshadow has a lustrous, wet-look finish with a durable shine that disco diva dreams are made of. Each of the five effortlessly blendable shades contains a mirrorball blend of multi-colored pearls that dance across the lids. Apply Liquid Lurex directly to the eyelids with the applicator and blend out immediately with fingertips or a brush for a sparkling wash of color. For more intense coverage apply a second layer for seamless full coverage disco drama. Liquid Lurex can also be used as an eyeliner either using a small liner brush or blended as a smoky line along the upper and lower lash line for a subtle flash of shimmering color.

So today, when I saw my little LE package, I wasn’t particularly excited, having categorized the new liquid lurex in the same general category of liquid sparkly eye shadows. I am happy to report that these are unlike anything else I have tried in the past! The formula is dense, uniform (I don’t like eyeshadows where the particles are unevenly distributed in the medium), and applies smoothly like silk. When you touch it, it doesn’t feel gritty AT ALL and YET, it gives that beautiful multi-dimensional sparkle, which thus far, only chunky, itch-inducing sparkly eye shadows have given me so far.

These don’t dry out very quickly either, which can be good or bad. You have some time to play with them before they ‘set’, but even as they set, they don’t give that dry, crepe-y, tight feeling to the eyelids. It didn’t bother me when I was 22 (I’m looking at you, MAC Paint Pots) but at 32, it does. I want my makeup to feel comfortable. And glamorous. And this does both!

With these liquid lurex eye shadows, Lisa has forever changed the liquid sparkly eyeshadow game for me! My collection thus far has the Pixi fairy light liquid, Stila, Wet n Wild liquid catsuit, Colourpop Supernova, Etude House Mirrorholic, but I don’t think I’ll be needing those anymore!

So if you’re in the market for smooth, non-gritty sparkle for the holiday season that has your lids sparkling like an expensive bauble, do consider these! I bought Angelica which is like dusty pink-toned champagne on my medium complexion (I’m no.17 in the LE Seamless Skin foundation) and Lauren which is a rich, molten yellow gold. There are 3 other shades in the range and I hope she considers expanding the range to include some more plums, purples, and jewel-toned shades!

Image: Angelica on top, Lauren on bottom

Image : Wearing Lauren on my lids here

What do you think of these? Would you be giving these a try? Let me know your thoughts in the comments below! x


Source link

May 31, 2025 0 comments
0 FacebookTwitterPinterestEmail
  • 1
  • …
  • 5
  • 6
  • 7
  • 8

Categories

  • Arab Beauty
  • Asian Beauty
  • Beauty
  • Beauty
  • British Beauty
  • Canadian Beauty
  • Cosmetics
  • Fashion Over 50
  • Hair Styling
  • Indonesian Beauty
  • Luxury Fashion
  • Plus Size Fashion
  • Skin Care
  • Sustainable Fashion
  • Women's Fashion

Recent Post

Recent Comments

No comments to show.
  • Arab Beauty (18)
  • Asian Beauty (77)
  • Beauty (1)
  • Beauty (77)
  • British Beauty (75)
  • Canadian Beauty (73)
  • Cosmetics (76)
  • Fashion Over 50 (1)
  • Hair Styling (78)
  • Indonesian Beauty (78)
  • Luxury Fashion (72)
  • Plus Size Fashion (154)
  • Skin Care (76)
  • Sustainable Fashion (77)
  • Women's Fashion (78)
  • Rainbowdorable by Auzola | Indonesian Beauty Blogger: (Bahasa Indonesia) Review: Skintific 5x Ceramide Serum Sunscreen
  • The inevitable – My Women Stuff
  • Giving Thanks – Fresh Salon Blog
  • SiMa.ai secures $85m to support global expansion
  • Is Scotch & Soda Sustainable in 2025? Why They Lost Certification

@2025 - All Right Reserved. Designed and Developed by Mahasun


Back To Top
glow-vogue.site
  • Beauty
    • Beauty
    • Arab Beauty
    • Asian Beauty
    • British Beauty
    • Canadian Beauty
    • Indonesian Beauty
  • Cosmetics
  • Fashion
    • Fashion Over 50
    • Luxury Fashion
    • Plus Size Fashion
    • Sustainable Fashion
    • Women’s Fashion
  • Hair Styling
  • Skin Care
  • Uncategorized