glow-vogue.site
  • Beauty
    • Beauty
    • Arab Beauty
    • Asian Beauty
    • British Beauty
    • Canadian Beauty
    • Indonesian Beauty
  • Cosmetics
  • Fashion
    • Fashion Over 50
    • Luxury Fashion
    • Plus Size Fashion
    • Sustainable Fashion
    • Women’s Fashion
  • Hair Styling
  • Skin Care
  • Uncategorized
Category:

Beauty

Canadian Beauty

NARS Soft Matte Complete Foundation – CrystalCandy Makeup Blog

by Lina Clémence June 2, 2025
written by Lina Clémence


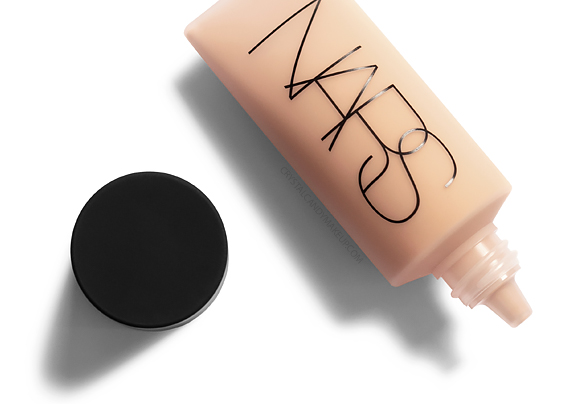
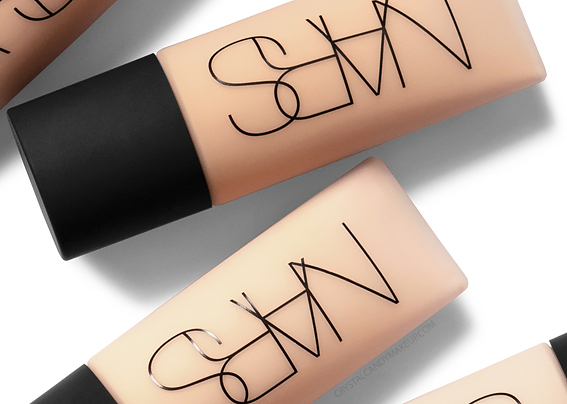
Have you heard? NARS came out with a new full coverage foundation! Available in 34 shades, the Soft Matte Complete Foundation helps balance excess sebum while keeping skin hydrated, thanks to a combination of micro-algae and bio hyaluronic acid. In addition, oil-absorbing powders create a second-skin finish!

(Vous parlez français? Cliquez ici!)

Despite the fact that my skin is quite oily, I usually avoid matte foundations at this time of the year because my skin becomes very dehydrated and sensitive when the temperature drops. I like this foundation though, because it doesn’t accentuate dry patches and doesn’t feel like it sucks the life out of my skin!

I’m not sure if it would be matte enough for those of you who prefer a true matte finish and have very oily skin, as it doesn’t stay matte for a long period of time in comparison to other matte foundations I tried. But overall, I really liked this foundation for my skin type (oily, acne-prone and dehydrated)!

When I set it with a bit of loose powder, the Soft Matte foundation lasts more than 12 hours on me and has a semi-matte finish for about 3 hours.

NARS Soft Matte Complete Foundation Review Before After

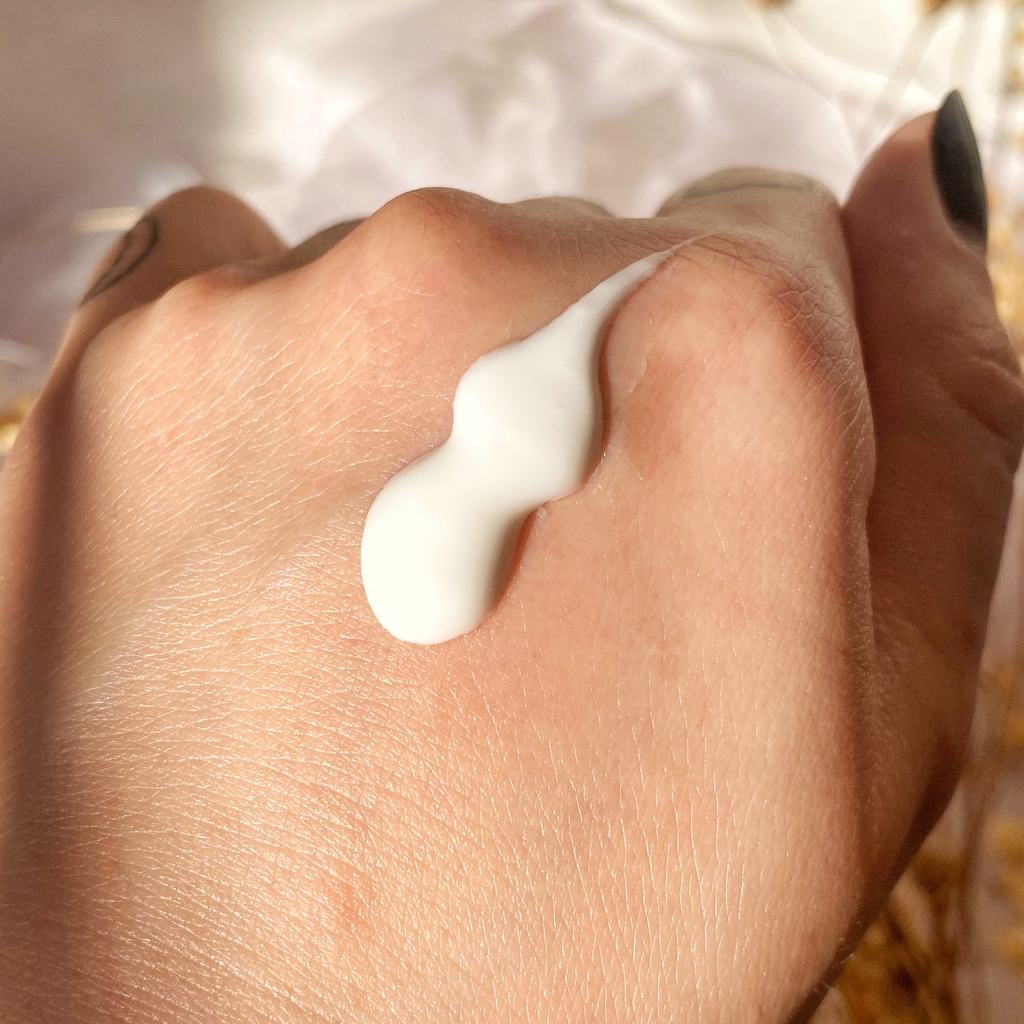
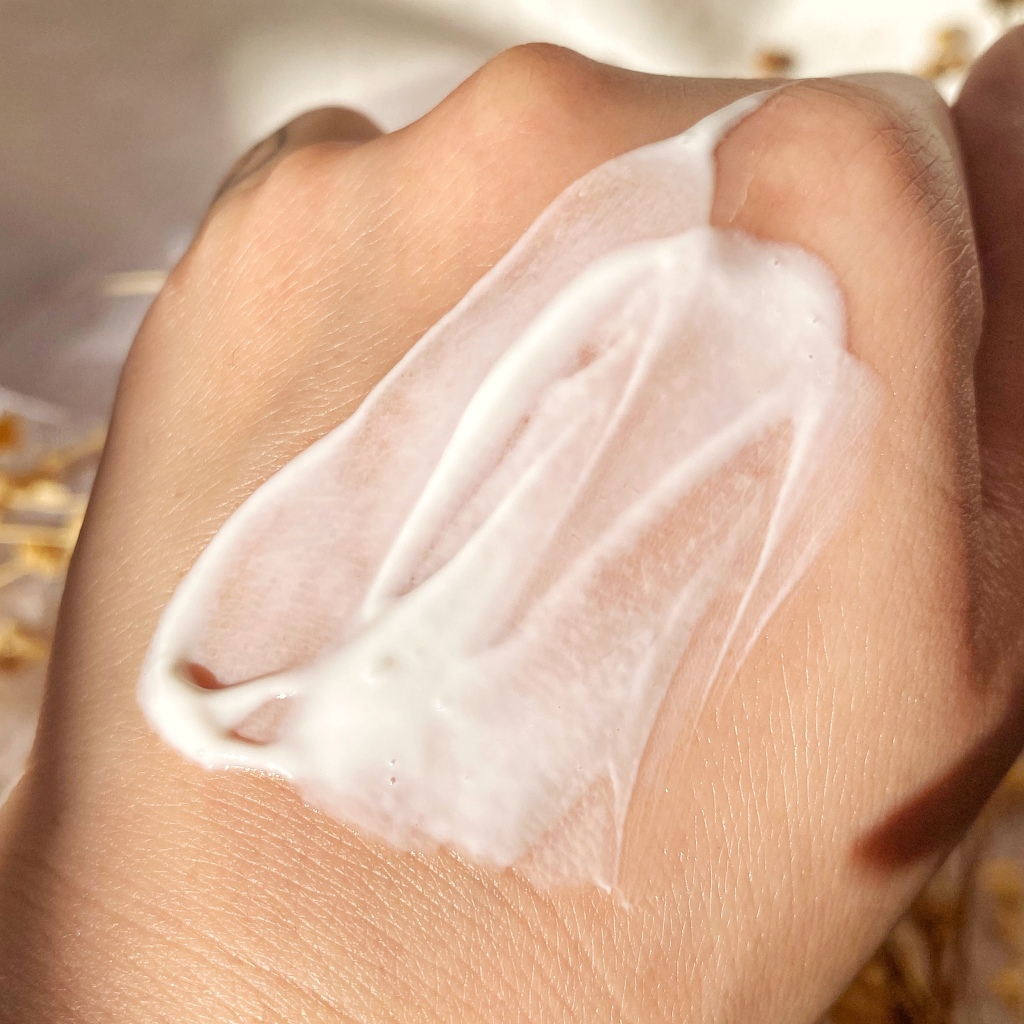
One thing I would suggest though, is to start with less product than you think you need. I find that this foundation looks best if I apply a thin layer with a damp Beautyblender, which gives me medium coverage.

The coverage can be build up from medium to full, but it was a bit too cakey for my liking when I tried it this way. It doesn’t feel heavy or sticky though!

NARS Soft Matte Complete Foundation Review Photos Packaging

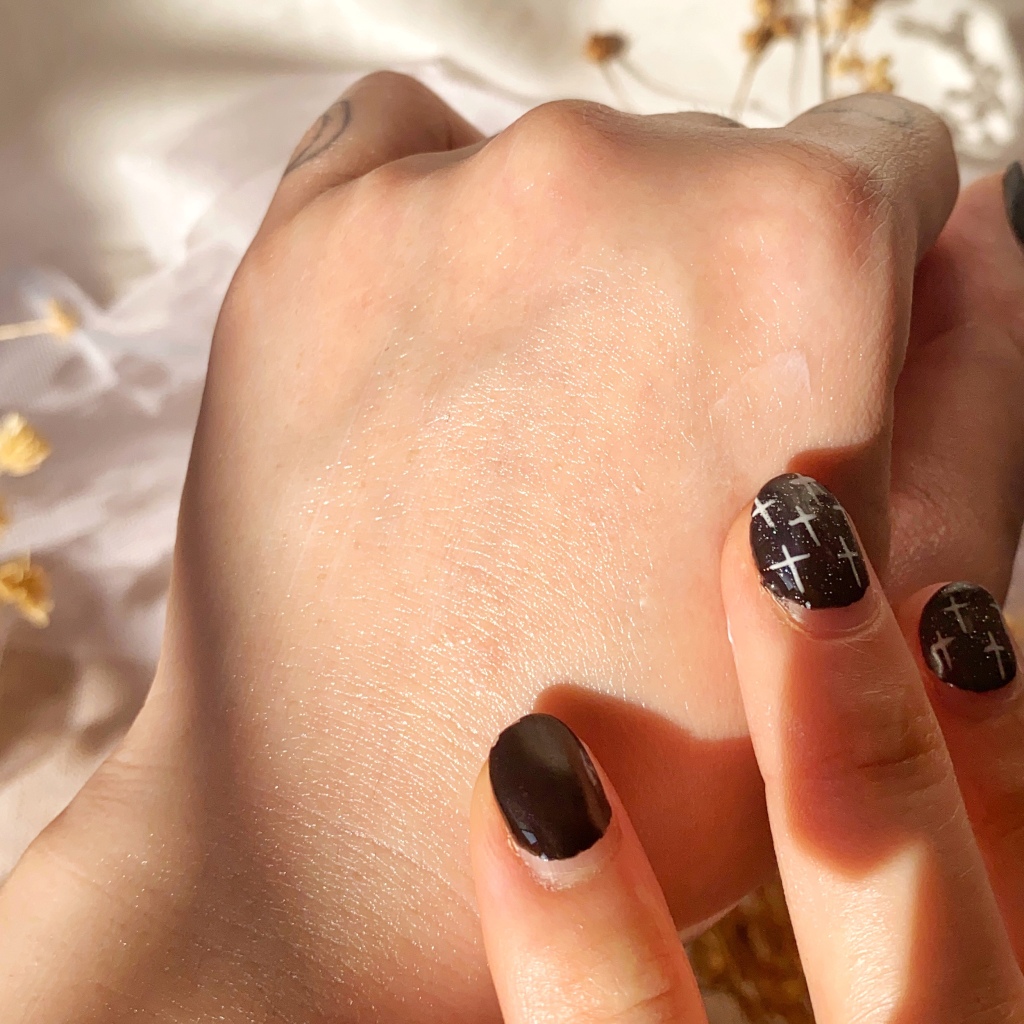
The Soft Matte Foundation doesn’t oxidize on me, but it dries much darker once on the skin. So I would highly recommend to try it in store first, and let the product dry for about 20 minutes to see the true color.

Also, please note that the shades in the Soft Matte Complete Foundation are not equivalent to the ones in the Natural Radiant Longwear Foundation.

NARS Soft Matte Complete Foundation Swatches Montblanc Yukon Vienna Vallauris Stromboli Vanuatu MAC NW20 NW25 NC25 NC40 NW35
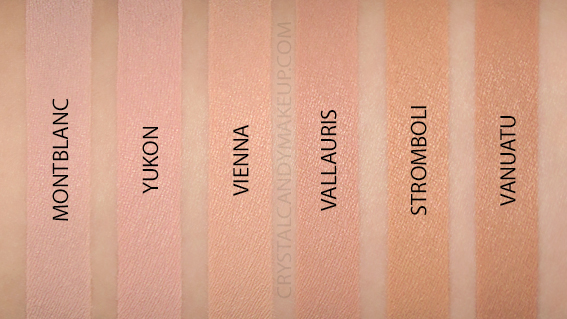
Swatches on light skin (NC15)

Montblanc is darker than NW20 (but lighter than NW25) and has pink beige undertones.

Yukon is slightly lighter than NW25 and has pink undertones.

Vienna
is a bit darker than NC25 and has neutral undertones.

Vallauris
is slightly darker than NW35 and has pink undertones.

Stromboli
is a bit lighter than NC40 and has golden peach undertones.

Vanuatu
is darker than NW35 (but lighter than NW40) and has neutral, slightly pink undertones.

NARS Soft Matte Complete Foundation Review Photos

The NARS Soft Matte Complete Foundation retails for $53 CAD for 45ml and is available at Sephora.

(I received these products in order to evaluate them and give my opinion, but rest assured that my comments are always honest and impartial. This post contains affiliate links.)


Source link

June 2, 2025 0 comments
0 FacebookTwitterPinterestEmail
Indonesian Beauty

[Review] Dermaluz Soothing Cream & Hydrating Sunscreen

by Lina Clémence June 2, 2025
written by Lina Clémence


Salah satu brand lokal yang tiga minggu belakangan aku coba ini mungkin sudah cukup familiar kalian dengar dan sebenernya juga cukup lama lalu lalang di dunia perskincare-an tapi aku baru kesampaian coba sekarang. Yes, Dermaluz ini adalah brand yang cukup banyak ditanyakan untuk ku review dan akhirnya nyobain si Soothing Cream With Ekstrak Kaktus & Hydrating Sunscreen nya.

First impression waktu lihat packaging kedua produk ini adalah ; duh ganteng banget yak item-item hehe. Cuma masih ada sentuhan ‘fun’ nya dari warna hijau dan kuning sehingga gak nampak ‘macho’ banget haha.

Kalau dilihat sepintas dari foto di bawah, keliatan memang mereka ini tipe formula nya lightweight dengan kemasan yang handy ya. Nah, Untuk lebih detail nya , please keep on reading !

SOOTHING CREAM WITH EKSTRAK KAKTUS

Kemasan berupa squeeze tube yang dominan hitam, dengan sticker label kombinasi abu-abu dan hijau, mewakili produknya yang mengandung kaktus itu kali ya hijaunya. Tidak ada dus nya ya, tapi semua penjelasan sudah ada pada kemasan dengan cukup lengkap dan informative. Ukuran tube nya kecil dengan isi 20 gr, sangat travelling friendly karena gampang diselip-selipin.

Ujung tube nya cukup kecil, sehingga saat kita squezee out produknya gak keluar berlebihan. Tekstur nya berupa cream-gel berwarna putih yang mudah sekali diratakan dengan formula yang lightweight karena memang kalau aku lihat dia tipe moisturizer humektan. Tidak ada fragrance dan alkohol jadi bagi yang kulitnya cukup sensitive dengan dua bahan tersebut dijamin aman.

Begitu kontak dengan kulit saat diaplikasikan, dia langsung “leleh” jadi watery , jadi yang kulitnya oily juga gak usah khawatir akan semakin berminyak . Ada kandungan ekstrak kaktus ini loh yang mampu retain moisture kulit dan merupakan sumber antioksidan. Efek soothing nya dari Centella Asiatica, Panthenol dan Allantoin , dan bagi yang butuh untuk memperbaiki dan memperkuat skin barrier moisturizer ini juga mengandung Ceramide.

Dikulitku yang kering, moisturizer ini memang sedikit terlalu ringan jika dipakai malam tapi karena dia lightweight jadi enak aja kalau mau dimix dengan face oil karena dikulit jatuhnya gak terlalu heavy. Feels soothing nya menurutku memang nampol banget untuk meredakan kemarahan dan menenangkan wajah yang lagi sensitised. Adem gitu lo pas nyentuh kulit, apalagi buat kalian yang misalnya habis panas-panasan diluar lalu olesin ini langsung nyessss dingin dan kalem. Dengan tekstur dan formula kayak gini oily skin masih bisa pakai pagi-malam, karena jatuhnya gak akan berat dan gak bikin greasy.

HYDRATING SUNSCREEN

Masih dengan packaging squueze tube dominan hitam , hanya saja yang Hydrating Sunscreen nya ini ada aksen yellow nya. Jadi mudah untuk membedakan mana yang Soothing Cream dan mana yang Hydrating Suncsreen.

Ujung tube nya itu juga cukup kecil , jadi gak perlu khawatir produk akan keluar berlebihan. Hydrating Sunscreen ini merupakan tipe hybrid , aku bilang hybrid karena ada Zinc Oxide nya tapi memang kalau dilihat dari ingredients nya sih dominan chemical ya makanya tekstur nya ringan. Since ada Zinc Oxide nya, dia ngasih sedikit efek tone up pada kulit, tapi masih sangat tolerable karena finishnya gak putih “ndemblug” , lebih ke brighten complexion gitu lah keliatan seger.

Tekstur nya berupa lotion putih yang lightweight, dan karena dia dominan chemical makanya gampang banget diratakan. Kalian gak akan menjumpai whitecast berlebih, seperti yang aku tulis diatas, akan ada efek tone-up aja yang masih cakep jatuhnya dikulit. Tidak ada synthetic fragrance dan sama sekali gak ada blaring sunscreen smell yang mengganggu.

Feels nya cukup hydrating dikulit, sesuai klaim nya sih memang, bahkan menurutku bagi kalian yang oily bisa banget skip moisturizer dan langsung pakai si Dermaluz Hydrating Sunscreen ini. Finish nya ketika sudah fully absorbed adalah semi matte, jadi bukan tipe yang bikin kulit terlihat basah dan overly glowing. Aman lah bagi temen-temen yang oily, tinggal ditimpa bedak aja and you’re good to go.

Cuma memang saranku sebelum pakai Hydrating Sunscreen ini, layer skincare sebelumnya jangan terlalu ketebalan or else akan ngerasa sedikit “berkeringat” di area atas mulut dan ujung hidung. Selain itu, all is good I really enjoy using this sunscreen. Di kulit kering pun dia gak akan kerasa drying setelah dipakai beberapa jam.

On top of it, Hydrating Sunscreen ini jug mengandung 8% Niacinamide loh, keren gak sih jadi bisa banget untuk membantu meredakan jerawat, control sebum dan tentunya soothing kulit. Ada Ceramide nya juga yag bagus untuk memperbaiki skin barrier.

FINAL THOUGHTS

Truth be told, aku gak menyangka kedua produk Dermaluz ini ternyata juara banget tekstur dan formula nya. Mereka tuh yang bener-bener bisa untuk all skin types dengan ingredients yang bagus untuk skin barrier. Soothing Cream nya ini memang bekerja cepet juga untuk. meredakan kemerahan, dan walaupun dikulit ku yang kering Soothing Cream ini agak keringanan kalau dipakai malam hari tapi masih enak kalau ditandem dengan face oil buat retain moisture. Besok paginya kulit masih kerasa lembab dan kenyal . Hydrating Sunscreen nya juga punya formula yang melembabkan dikult tanpa ada bau-bau mengganggu.

Kedua produk ini ukurannya 20 gr dengan harga Rp 72.000 yang menurutku masih affordable lah ya dan since ukurannya kecil jadi cocok juga nih bagi yang suka coba-coba skincare.

Untuk detail lebih lanjut tentang produk-produk lainnya dari Dermaluz bisa ke Instagram mereka yah.

Thank you for reading, hope it helps!!!


Source link

June 2, 2025 0 comments
0 FacebookTwitterPinterestEmail
Beauty

Beauty Review: 5 Reasons I Love Conscious Coconut Oil

by Lina Clémence June 2, 2025
written by Lina Clémence


Photos by @thisjenngirl

We already know that coconut oil is life, so I’m not here to sell you on its various benefits, but I was recently gifted some Conscious Coconut Oil (AKA CoCo) and I’m loving it, y’all!

Not only is this a line of quality products that yield exceptional results, but they are rooted in charity that helps people and our planet!

Here are 5 reasons why I absolutely adore Conscious Coconut as a brand and why you should try their products ASAP!

1. They create clean, eco-friendly, quality products that work!

These products are fantastic! They’re certified organic, are cold-pressed and virgin and are made in small batches without the use of machinery. As a result of this, CoCo is never exposed to any harsh or toxic chemicals.

Yasss!! I use it as makeup remover, to help with my toddler’s eczema and on my skin and hair.⠀⠀⠀⠀⠀⠀⠀⠀

tampa-riverwalk-yoga-teacher-conscious-coconut-oil-tube-beauty-and-the-beat-blackyogamom

3. Conscious Coconut empowers people with disabilities through employment opportunities.

They empower people with disabilities right here in Tampa, FL by partnering with Macdonald Training Center (MTC). MTC provides employment placement services to adults with many challenges, including hearing impairments and other physical or cognitive disabilities. MTC packages their finished coconut oil and serves as their fulfillment center to the rest of the country.

4. Every purchase made, helps feed a child.

Conscious Coconut donates a meal to a child in need via a partnership with Feeding America for every meal sold. I didn’t realize how large the number was, but nearly 16 million kids in the US go hungry everyday. 💔
It’s certified through Fair Trade USA, which ensures fair working conditions for their farmers in the southern Philippines and packaging factories in China.

5. It’s easy to travel with.

Their packaging is TSA-certified which is super-clutch since I travel often for work and pleasure. And they have sustainable packaging. You can snag some of your own here!

Have you tried Conscious Coconut oil products before? What are your thoughts?

Ciao Bellas,


Source link

June 2, 2025 0 comments
0 FacebookTwitterPinterestEmail
Asian Beauty

How I Grew My Thinning Hair Back Thicker and Stronger Than Ever Before (with no drugs or medical treatments) – Fifty Shades of Snail

by Lina Clémence June 2, 2025
written by Lina Clémence


Self-perception is whack. Because we see ourselves in the mirror every day, we often fail to see changes taking place over time. Sometimes the brain refuses to perceive changes and keeps showing us the same image of ourselves we used to see. Other times, the brain continually rewrites our self-image, tricking us into thinking we’ve always looked the way we look now. It’s why I always encourage people to take periodic progress pictures. Being able to look back and forth from then to now can make changes obvious that we don’t pick up on in the mirror.

Anyway, last week I got curious and made a quick side-by-side of my hairline. I’ve been working on reducing my hair fall and regrowing my hair for a few years now. I used a picture from a couple of years ago and a picture from a couple months ago. The visible difference—which I had completely overlooked until then—blew me away.

This is a long, long blog post. It’s the culmination of almost everything I’ve tried for my hair over the past three years and everything I’ve learned in that time. If you’ve been worried you’re shedding too much hair, I hope you find something helpful in here for you.

I used to be afraid to wash my hair, because every time I did, so much fell out. Clumps of it at a time, often so big that they’d stop the tub from draining. I had to pull the clumps out of the drain catcher after every shower.

I called the clumps hair mice because, well, they were the size of small rodents. They were so bad that my own kid would call me out if I forgot to dispose of one before he used the shower. Obviously the drain rodents were bigger when my hair was longer, but even when I had my hair cut into a shorter bob, I’d still shed clumps of it at a time. They just came out more gerbil-sized. Maybe dormouse sized if I was lucky, but that was rare. You get the idea.

My hair has always been a huge source of insecurity for me. It’s always been fine and thin. It became my biggest insecurity these past few years, as I’ve chipped away at what I can change and grown into real acceptance of what I can’t change about my meat suit.

Definitely never felt like this back then.

I felt self-conscious of my fivehead, and of how much scalp showed through the extra sparse baby hairs on either side of my widow’s peak. Unfortunately, I had to let the thin hair at the front show, because I kept my hair pushed back from my face to cover up the thin spot at the crown of my head, which bothered me even more. I could just think of the thin hair in front as a high forehead and widow’s peak. The patch on my crown just felt like a bald spot. I knew intellectually that it was probably just my whorl, positioned a little too close to my natural part, but I hated it anyway.

Despite how unhappy I was with the state of my hair, though, I didn’t really do anything about it for the longest time. Since it had always been thin, I figured that’s just how it was supposed to be. And I figured the amount of hair I shed in the shower was normal and, again, just how it’s supposed to be.

I’m not afraid to wash my hair anymore. I realized that when I was taking a shower tonight. It has been a long time since I’ve winced at the amount of hair that would come off into my hands when I shampooed. It has been a long time since the shower water has puddled up to my ankles from how clogged the drain catcher would get. I’m kind of sad I didn’t fix this problem years ago, but not that sad, because better now than never.

I’m even happy with it unstyled these days!

According to the American Academy of Dermatology, “It’s normal to shed between 50 and 100 hairs a day.” And while I never got fixated enough to actually count the hairs in the hair mouse, or my hair brush, or the vacuum roller brush, or the hair tumbleweed zone in the corner of the bathroom where air currents carry strays, I figured it was about that much. Even if it was more than 100, I assumed that my hair shedding was within a normal range anyway. Not something that I could change. Just something I had to live with.

Over the past few years, however, I’ve learned so many lessons about how much control I actually had over “normal” physical attributes that I used to think were unchangeable. Like the first signs of sagging skin from age, previous lifestyle choices, and sun damage. Or my formerly flat ass.

Two major victories in one picture: a chubby braid and…you know.

We often place a lot of value on the concept of “normal.” So much so that we can conflate the concepts of normalcy—which just means that an attribute is common and shared by a lot of people—and inevitability. It was normal for my skin to start losing elasticity. It was normal for me to have so little booty meat that it hurt to sit on flat surfaces. But as it turns out, just because those things were normal, doesn’t mean they had to stay as they were.

I was probably shedding hair at a “normal” rate. My hair was thin, but not outside a normal range compared to others. And then I made some changes here and there. Those changes added up over time. Turns out I wasn’t suffering from permanent hair loss, where the follicles die and don’t produce more hair anymore.

I started to feel new hair growing in—a lot of it in some places. The hair mice were getting smaller and smaller. I saw fewer and fewer of them in the drain catcher. The new strands kept growing, turning into visible new layers of hair. They stuck out awkwardly in some places but blended in as they grew longer. My braid got fatter. The super sparse baby hair zones at my hairline filled in and took the top cm of my fivehead with them. Even the thin patch at the crown of my head is shrinking.

To really confirm, I took another comparison pic in similar lighting conditions and angle as the original one.

I’ve been wanting to share everything I did and everything I learned to get to this point. Originally, I was going to make a YouTube video, but I kept stalling. It’s a lot of information to try to organize into one video. Video creation really isn’t my strong suit anyway. I knew scripting, shooting, and editing it would take a million years.

The only reason I didn’t just write up a blog post as I’m doing now is because my blog posts get scraped and reposted without my permission on random shady websites within minutes of publishing. Getting those removed from Google and taken down from the websites is a massive pain in the ass. But ultimately, I knew writing this out gave me the best shot of actually presenting my full routine in the most easily digested and easily referenced format. So here we are. I’ll just deal with the plagiarism bots if I have to.

I’m not a doctor. I’m not a trichologist. I’m not a dietitian nor even a self-styled nutritionist with an online certification. I am a layperson, telling you my personal story of how I reversed my hair shedding and grew my own hair back. I just happen to be a very vain and obsessive person who enjoys learning how to improve my meat suit and communicating what I’ve learned even more.

There are a lot of potential medical causes for hair shedding (which can grow back) and hair loss (which can’t). If you feel you’ve been losing hair at an unusual rate and you can see a doctor, absolutely do that first. Get checked out, get bloodwork done. Similarly: it’s always best to first check with your doctor before you make any major changes to your diet or begin taking any supplements.

However. I live in the United States. I know a lot of you do too. “Go see a doctor” isn’t always (or even often) feasible for something that’s really a cosmetic issue. The changes that I made are minimally invasive and minimally drastic, which is why I feel comfortable sharing them for those who may want to try what I tried.

Everyone’s body is different. The reasons for your hair fall may be totally different from mine. Therefore I can’t promise that anything I did will have the same results for you. But I do feel that the things I did that helped me immensely are very low-risk. They’re also fairly inexpensive as compared to treatments like, say, scalp microneedling with PRP in a clinical environment. So if you’ve been noticing a lot of hair shedding, I suggest that the solutions I use are, if nothing else, a solid starting point.

I couldn’t have predicted that I’d end up here.

As always, my routines are not an instruction manual. I’m not saying try every single thing I do. Look through. Think about which ones sound like they might apply to you. Start with one or two. Build from there. As you get more mindful of your own routine and the effects you see, you’ll get a better sense of where to go next. What’s right for me may not be right for you!

Finally: I use affiliate links and codes in this post, which enable me to earn a small commission if purchases are made from my links or codes. Many of the products I discuss are provided to me by the brands.

I swear we’re almost ready to dive into the products and practices that have helped me stop my hair shedding. But one last thing before we get down to the details: my data!

I’ve been keeping track of my hair shedding since summer of 2022. That’s when it started bothering me enough to actually try to do something about it.

My system is pretty simple. Every day, I’d note down the size of the hair mouse (none, tiny, small, medium, or large—and none doesn’t mean I literally didn’t drop a single hair, just that I dropped so few that none of them got caught in the drain catcher).

I call it the hair mouse, but this also includes hair found elsewhere in the house too. It’s not a perfect system by any means. Neither was my record-keeping for the first few months. But it’s more than good enough for me to be able to spot patterns and correlate any changes with my cycle and with changes to my haircare or supplement routine, which I also always note down.

In June of 2022, I was shedding some amount of hair every day. By the end of 2022, I was seeing fewer large hair mouse days and, more excitingly, starting to see some no hair mouse days.

The left picture is from summer 2022, the start of this journey.

By spring of 2023, my hair fall had stabilized enough for me to spot a pattern. I shed the most at a certain point in my monthly cycle. By the end of the year (with one blip very obviously caused by a change in my nutrition), even those heavier shed days were only adding up to medium hair mice. No more large ones. Also by the end of 2023, my number of no hair mouse days had increased significantly. By that point, I was finding more long, curly blond hairs in the house (courtesy of my boyfriend, who does not live here and is not losing his hair) than I was finding my own long, straight black ones.

(If this was tedious to read, I’m sorry! It was even more tedious to track, and to transfer my 2022 and 2023 data over to a grid format like I’ve been doing with my 2024 so that I can visualize the patterns more easily.)

2024 has been great for my hair so far. My number of no hair mouse days is at its all-time high. My monthly heavier shed days only result in small hair mice. And after almost two years of steady improvement, I can actually see the changes on my head. The thin, sparse baby hair regions by my hairline are filling in. So is the thin patch at the crown of my head. I can run my hands through my hair back there without seeing my scalp. I have to clip my hair up in sections to style it because there’s now too much to just style it in one go, the way I used to. My hair has always grown fast, which is why I’m not focusing on length at all—it’s the density that’s gotten so much better.

It feels amazing. This is why I realized it’s time to finally dig in and tie everything together in one comprehensive post. I’ve talked about it plenty on my Instagram, but only in little snippets here and there, and Instagram posts are hard to search through and get buried quickly by both newer content and the algorithm.

So. You’ve borne with me for almost 2000 words. Let’s get into the meat of this post!

As I mentioned before, I’m no doctor or trichologist. If you suspect a medical cause for your hair shedding, consult a doctor if you can. But if you’re really not sure where to even begin figuring out the causes for your hair mouse infestation, here are some common ones, straight from the American Academy of Dermatology.

  • Damage to hair: Bleach and heat damage or overly rough brushing can contribute to increased hair shedding. We’ll talk about this one a lot below.
  • Friction and traction alopecia: If you frequently wear tight hats or headbands, the rubbing against your scalp can cause permanent hair loss. Similarly, if you often pull your hair back tightly in a ponytail, braid(s), or bun, watch out for traction alopecia, which usually shows up as thinning at the hairline.
  • Nutritional deficiencies: Per the AAD, deficiencies in biotin, iron, protein, or zinc can cause excessive hair shedding. We’ll discuss this in much more detail below.
  • Scalp health issues: Infections, skin disorders, and general poor skin condition on the scalp can cause increased hair shedding or permanent hair loss.
  • Medical problems: I’m grouping a number of these together under this category because I won’t be delving into them much since I’m not a doctor. Certain medications, including chemotherapy, can cause increased hair fall or permanent hair loss. So can some autoimmune disorders and hormonal balances, as well as childbirth, breastfeeding, illness, and chronic or extreme stress. Please see a doctor if you’re concerned that medical issues are causing your hair to fall out.
  • Genetics: Both men and women can suffer from androgenic alopecia, aka hereditary balding. Male pattern baldness typically affects the top of the head from the hairline back and results in total hair loss in that area. Female pattern baldness typically involves some amount of hair loss all over, and/or marked thinning outwards from the hair part on the top of the head, but usually doesn’t end in fully bald spots. Both can be emotionally distressing.
  • Age: Many of us experience some loss of hair density as we get older. Over time, our hair follicles slow down and may stop growing new hair. You’d think this is inevitable, but actually…it might not be. Let’s see.

Below I’m going to break down my hair regrowth routine into several sections working from the inside out. You’ll see how they link back up to some of the causes discussed here.

As I mentioned before, my hair has always been pretty fine and thin. Because it has always been pretty fine and thin, I assumed it was just destined to be fine and thin. And yes, it will probably always be on the finer side, but I had no idea how much changing my nutrition would impact my hair density. Because adding a couple of supplements apparently unlocked a whole new world of hair growth for me.

When it comes to hair regrowth, almost everything else in this post is secondary to the nutrition piece. Scalp care, haircare, heat protectants, and various tools only help what’s already growing. The nutrition piece is what allowed me to grow more.

I know the party line when it comes to supplements. “It’s expensive pee.” “You should be getting all the nutrition you need from your food.”

Sure. In ideal conditions. The conditions where we have:

  • Access to blood work to figure out exactly what our nutritional needs and deficiencies are
  • The time and inclination to do the research to figure out exactly which foods we need to include in our diets in order to get the nutrients we’re currently missing
  • The budget to procure the foods we’ve identified as containing the nutrients we’re missing
  • The time and inclination to prepare those foods if necessary
  • The willingness to eat whatever foods we’ve identified we should be eating in order to round out our personal nutritional intake, regardless of how we feel about those foods or whether they fit into our overall food consumption preferences and priorities

I mean, it’s a lot of conditions that need to be met. I hate a lot of foods. Also, I have a pretty specific diet that’s geared towards my fitness and body goals. There’s not a ton of wiggle room there unless I’m willing to compromise on my other preferences for my meat suit. So, supplements it is.

I’ve been taking the Goli Women’s Multi gummy supplements every day since summer of 2022. Fall of 2022 is about when I started to notice my hair fall decreasing (and my nails getting noticeably stronger). I kept taking the gummies. My hair kept getting denser. My hair mice kept decreasing.

Also, for those of you who didn’t care for the stickiness: they changed the recipe and they are no longer sticky!

I’ve taken other multivitamins before and never noticed a change in my hair fall. It seems pretty obvious to me that the main driver here is the biotin in the Goli Women’s Multis. The nutritional content of these gummies is about on par with other standard multivitamins, with one key difference. They contain 750% DV of biotin per serving.

Biotin is naturally occurring in some foods. Mostly foods I hate (nuts, legumes) and others that I just don’t eat much (whole grains, egg yolks), so I’m not surprised I was deficient. Biotin plays a role in keratin production, so it makes sense that it might help promote healthier hair, nails, and possibly skin (though I don’t see any difference there because my skincare routine has been solid for years anyway).

The jury is out on biotin, as far as research goes. Obviously there’s some evidence to support its benefits for hair and nail growth. That’s why it’s in every damn hair and nails supplement ever as well as in many collagen beauty supplements too. However, there’s also evidence suggesting that it doesn’t do anything. My theory about the conflicting data is very simple. Not everyone’s hair shedding or hair growth issues are due to a biotin deficiency. If some research subjects are losing hair for other reasons, taking biotin isn’t going to do anything. There.

My friend Dot @sumomosuki sees similar results.

Don’t take this as me suggesting you grab any biotin supplement, though. For one thing, the vast majority of biotin supplements or hair, skin, and nails supplements contain what seems to be to be way too much biotin—upwards of 10,000% DV in many cases!

Biotin is water-soluble, so theoretically the most that would happen is you’d get the aforementioned expensive pee, but from my layperson’s perspective, ingesting 10,000-15,000% DV of anything can’t be a good idea. Some people have also reported developing acne while taking biotin. It didn’t happen to me. It may not happen to you. But it may be worth starting with a lower dose to make sure you won’t have that issue.

Also, it isn’t a case of the more the better for me. Briefly in late 2023, I switched to the Vegamour Gro Biotin Gummies. Unlike the Goli Women’s Multis, the Vegamour gummies are explicitly marketed for hair health. And while Vegamour, like other brands, walks the line of not claiming hair growth improvements, they’re literally called Gro. The Vegamour Gro gummies contain a lot more biotin than the Goli. 16,666% DV.

It took a few weeks, but after I switched over to the Vegamour version, my hair mice started appearing again. At an alarming rate. I hadn’t had to dig clumps that big out of my drain in quite a long time. I was digging them out almost every night again. I’m actually still pretty upset about it.

This is my upset face.

I got a sinking feeling every time I shampooed and found my hands covered in shed hairs. I let this go on for a couple more weeks still before tossing the Vegamour gummies and going back to Goli. And a few weeks after that, my hair shedding dropped off again.

It’s been smooth sailing ever since. In fact, this year I’ve shed even less than before. My no shed days are up to almost half the days of every month. The other days are very minimal shed.

I suspect that in addition to the comparatively moderate dose of biotin, the specific combination and ratio of trace minerals in the Goli Women’s Multis, some of which are absent in the Vegamour, are doing some heavy lifting too. Whatever it is, I’m grateful for it and I’ll be taking these for as long as they remain available on the market.

Goli Gummies at Goli.com (code FIDDYSNAILS gives 17% off one-time orders and 32% off first time subscription orders)

In addition to the Goli gummies, I also feel the MSM supplements I’ve been taking since early 2023 have helped my hair and nails come in thicker and stronger than before. I notice the effect of these on my nails more than my hair—my nails used to be paper thin and prone to tearing, and now they’re rock hard and grow as long as I want them—but I figured I’d mention them too.

MSM is a (cheap) sulfur compound with some evidence supporting its benefits for hair and nail growth. Like biotin, it plays a role in keratin formation. It’s also anti-inflammatory and commonly used for muscle and joint health.

These are a bit horse pill-ish, but I put up with it.

I actually started taking it because my boyfriend (the handsome guy in the before picture I’ve been using) suggested it might help with the horrible headaches I used to get all the time. It…didn’t really do anything for my headaches, but my nails started growing crazy strong and my hair strands were getting thicker and stronger too. So I continue to take it.

Doctor’s Best MSM on Amazon

The final part of my nutritional diatribe is: Hair is made out of protein. So make sure you’re eating enough protein to give your body the building blocks it needs to grow hair (and nails and skin) in the first place. It’s pretty well known that people on very restrictive diets or people suffering from malnutrition (regardless of the volume of food they consume) lose their hair. Your hair itself is dead, but it’s grown through processes in your living body. Nourish your body!

Anyway. Now the easier parts!

Some years ago, my friend Tracy (of the now mostly retired but eternally relevant skincare and K-Beauty blog Fanserviced-B) blew my mind with the concept of scalp acids.

Your scalp is skin. And if that skin isn’t healthy, it can affect hair growth or induce more hair shedding than necessary. I don’t just mean actual skin disorders like seborrheic dermatitis or psoriasis, but also just run-of-the-mill clogs, dryness, flakiness, and itching. For example, if your scalp is always itching and you’re always scratching, you’re bound to cause some stress to your hair, similar to the manual stress that causes friction or traction alopecia.

Clarifying the scalp with an occasional exfoliating acid turned out to be a great first step towards a healthier scalp and hair. Tracy turned me on to using The Ordinary’s glycolic acid toner for this. It comes in a big bottle, making it perfect for generous use all over the scalp, and dispenses from a narrow-tipped nozzle, making it perfect for carefully squirting it down into hair parts onto the skin.

Perfect.

For quite a long time, I did this about once every week or two. About half an hour before showering, I would apply the glycolic toner on my scalp and carefully massage it in. After a half hour wait, I’d go shower and shampoo and condition as usual.

I used to get itchy bumps and clogs on my scalp. The scalp acids cleared those away easily. My hair gained a little extra lift and volume since it wasn’t being weighed down by dead skin cells at my scalp, too. While I don’t do this anymore, since I found a shampoo that gives similar effects without adding the extra step, I still think it’s a great way to quickly improve scalp health.

The Ordinary Glycolic Acid 7% Solution at TheOrdinary.Com

These days, instead of using scalp acids, I use 107’s Scalp Purifying Microbiome Shampoo once a week.

For my purposes, this is a magnificent clarifying shampoo. It contains citric acid, traditionally brewed vinegar, and salicylic acid to break down buildup on the scalp. It foams up beautifully and leaves my scalp and hair feeling deep cleaned and refreshed. It also contains a bevy of supporting ingredients, like ginseng, centella, ferments, and rosemary leaf oil to help soothe inflammation and support healthier growth.

Also: Nice big bottle.

The pH of this shampoo is around 5.5. This is important to note because the scalp is skin, and like skin, generally stays healthiest when cleansed with products at a lower than neutral pH. The outermost layer of skin, its protective barrier against both moisture loss and external irritants and contaminants, generally stays at a pH of between about 4.5 and 6. When we use cleansing products at a much higher pH, they can weaken the structural integrity of this barrier. As with facial cleansers, I prefer shampoos that are around pH 5.5.

I do find the 107 shampoo very deep cleansing, and using it more than twice a week can leave my hair feeling a little squeaky. On top of that, I color my hair and need to be extra careful not to strip out the color, so it isn’t my everyday shampoo. I think of it as a replacement for my occasional scalp acids treatment.

107 Scalp Purifying Microbiome Shampoo at 107.com

For daily haircare, I focus on keeping my scalp and hair clean and well conditioned. This helps minimize breakage, which contributes to hair fall. I don’t just use any shampoo or conditioner. The wrong ones (and I’ve tried a ton) do more harm than good. I know a product isn’t working out if my hair feels weak and stretchy when it’s wet, or when it snaps or tangles easily. Hair shed from breakage isn’t quite as bad in my eyes as hair falling out from the root, but I’d still rather keep as much of my hair on my head as possible.

I use the Olaplex No. 4 Bond Maintenance Shampoo as my daily shampoo. My old hairstylist turned me on to this shampoo years ago and I haven’t looked back.

Both the shampoo and conditioner are fab.

Like the 107 Scalp Purifying Microbiome Shampoo, the Olaplex 4 is pH 5.5. It also manages the feat of getting my hair sparkling clean without drying out the strands or my scalp. It doesn’t strip my color, and a tiny tiny bit goes a very long way. Even when my hair is down to my waist, I never need more than about a quarter size blob of shampoo to get mountains of lather all over my head. One bottle lasts me about half a year even with near-daily use!

One important tip to note with this shampoo: Emulsify it with a little water in your hands first before putting it in your hair. This helps work up the lather faster and better.

Olaplex No. 4 Bond Maintenance Shampoo on Amazon

Because my hair is fine and straight, I’m also extra careful with conditioner. I need conditioner to moisturize, smooth, and lubricate the strands. This keeps them soft and pliable, helps prevent tangling that could lead to breakage, and, of course, keeps my hair looking shiny and pretty. Because that’s the point of all of this, right? We’re not going to die if our hair is thinning. But we want it to stay healthy so it looks pretty! However, I don’t want my hair weighed down with a heavy moisturizer. That would just make it look thin and flat.

107 Hair & Scalp Hydrating Microbiome Treatment, meant to be the counterpart to the Scalp Purifying Microbiome Shampoo, works great for me as an everyday conditioner. It’s super lightweight and clean-rinsing, but detangles like a dream and leaves my hair feeling strong.

So this is my everyday shampoo and conditioner duo.

This product also has an extra benefit over a lot of other conditioners. It’s made to act as a calming, hydrating scalp treatment too. There aren’t many ways to moisturize the scalp without leaving hair looking greasy at the roots, but this does the trick. I was concerned about oily roots the first few times I used this as directed, then pleasantly surprised. My hair keeps a bit of lift at the roots but my scalp feels soothed and nourished.

107 Hair & Scalp Hydrating Microbiome Treatment on 107.com

If I didn’t bleach or heat-style my hair, the previous three products would be enough to keep it healthy and strong. But I have some bleached streaks, and they’re bleached bleached because I have to leave the bleach in for a solid 45 minutes to lift my natural color enough for the purple dye I like to show up. I also blow dry and heat style it several times a week at minimum. I have been self-soothing by doing my hair a lot lately, and this takes a toll.

One of the ways my newfound love of hot tools takes a toll is in dryer than normal hair. The lightweight conditioning that the 107 treatment provides is enough for most uses, but I do occasionally need a deeper conditioning treatment. So about once a week, I swap out the 107 treatment for the Olaplex No 5 Bond Maintenance Conditioner.

Therefore: My once weekly swap out shampoo and conditioner routine.

A long, long time ago, during the Memebox glory days, Tracy and I were obsessed with the Korean haircare brand Lador’s Hydro LPP Treatment. It was a rich deep conditioner that actually seemed to sink into hair instead of just leaving a slimy film on the surface. Lador Hydro LPP still exists, but it’s been through a couple of reformulations since then and I fell out of love with it with the first reformulation.

Anyway, it doesn’t matter because Olaplex 5 has completely taken Hydro LPP’s place in my heart. I apply this to wet hair right after shampoo and leave it in for a few minutes while doing the rest of my shower before rinsing. When I rinse, hardly anything comes out, because it feels like it actually penetrates into my hair, giving it more strength from within.

Olaplex No. 5 Bond Maintenance Conditioner on Amazon

I won’t be linking the last product in my scalp and haircare section because I haven’t used it long enough to give a full-hearted recommendation. I do want to mention it anyway, because it is extremely interesting and so far very very promising for me.

You’ve probably heard of Bosley, the hair transplant clinic chain. They make haircare too, through their Bosley MD brand. Last month, I was invited to join the launch Zoom for their new Revive+ Densifying Foam. I’ve been using the women’s version of the Revive+ foam for about a month now, and I’m actually pretty excited about it.

Mitochondria are the powerhouse of the cell.

Mitochondria are so hot right now. It’s because they’re the powerhouse of the cell. This indisputable scientific fact that all of us know has implications for beauty. Last year, I reviewed products from Timeline Skin Health, whose main active ingredient accelerates the skin renewal process by inducing mitophagy to help cells clear out defective mitochondria more effectively.

Bosley claims similar effects in the Revive+ formula. According to the brand, revitalizing the mitochondria at the hair follicle helps to extend the hair growth cycle. Also according to the brand, this can help mitigate hair follicles’ sensitivity to stressors like hormonal fluctuations as well as reduce deterioration due to age.

Since I’ve only been using the Revive+ foam for a few weeks, I can’t say for sure whether I’m seeing results. I will note, however, that I shed a lot less hair during the heavier shed days of my monthly cycle this month. That’s promising.

Also, I’m a ho for foam.

Bosley’s marketing emphasizes their use of AI to help develop this product. I actually think this was a misstep. The AI concept doesn’t exactly inspire positive feelings in a lot of people. The first time I mentioned that aspect of the product in my stories, I got a lot of replies expressive negative reactions to the idea of AI taking over the research like this.

My understanding of the way they used AI isn’t quite so dire. Bosley wanted to create a drug-free product, because not everyone wants to use minoxidil. (I can’t, because minoxidil is toxic to cats and I’d rather go full bald than put my cats in danger for the sake of my vanity.) They used AI to accelerate the initial stages of R&D by having it go through vast amounts of ingredient research to identify the precise molecule that they believed could achieve the desired effect, then went from there.

Keep an eye on my social media if you’re intrigued by this product. I’m sure I’ll be posting about it more as I keep using it.

If you don’t use hot tools much, if the occasional blow dry is the most you put your hair through, then you can probably stop reading here. Vitamins and shampoo and conditioner are the backbone of the routine that has helped me grow my hair thicker and denser than it ever was before.

Vitamins and shampoo and conditioner are not quite enough if you’re like me and enjoy regularly frying your hair into submission with hot tools set to 390F.

Like this.

The fact that I have so much fun heat styling my hair now is actually more evidence of how much it’s improved over the years. I used to be too scared of damage and breakage to ever do anything fun with my hair. Plus, it was so thin that I never really thought it looked nice styled unless my hairstylist did it anyway.

Now that I’ve got plenty of hair to work with, curling it or putting a wave in it or even just blow-drying it into a shiny sheet of smooth glass hair bring me so much joy. In order to continue doing so without absolutely destroying my hair, I have a whole arsenal of products to repair damage and protect it as much as possible from more.

Story time.

If you lived in San Diego around 2005 or 2006, and you liked to go to the mall, and you were a woman with at least a few inches of hair on your head, I probably tried to sell you a hair straightener at some point. Possibly kind of aggressively. Sorry about that.

I worked at some kiosks selling ceramic flat irons and curling wands. Generally we tried to stop people and get them to let us demo the products on their hair. I think people had just figured out how to do flat iron curls and that was very exciting. Anyway, not everyone wanted to let us touch their hair. This was actually fine with me, because I don’t really like touching people (which is why I never moved over to selling those Dead Sea skincare products instead even though it was better money).

When people were curious but didn’t want us screwing with their hair, or we were selling to men, we just demonstrated the products on ourselves. What that meant was my hair got fried. Fast. I mostly showed the product and technique on a couple of pieces of hair close to my face because those were easiest to get right. Those pieces of hair ended up rough and crispy and broke off in chunks. At night, I tried everything I could think of to at least mitigate the damage. Hot oil, hair masks, deep conditioners, vitamin E capsules cut open to release the thick goopy grease within. None of it really helped. The rest of my hair followed suit because I did also do my whole head at the kiosks when I was bored.

If I had had the products I’m about to discuss, my hair would probably have survived. It would at least have lasted longer before crumbling into dust and forcing me to get a shoulder length bob after I left that job.

I heat style my hair almost as frequently these days as I did back then. These days, it is not crumbling into dust. This is despite the fact that I have that particularly stubborn, straight Asian hair that requires very high heat to hold a shape. I always have the blow dryer on the highest heat setting, and my curlers and straighteners have to be set to at least 390F to work.

Of all the ways I heat style my hair, blow drying is the least damaging. It’s just hot air rather than nearly 400F metal or ceramic plates clamped directly onto the strands. It is still heat, however, and it is drying. So before blow drying, I usually apply a bit of Olaplex No. 6 Bond Smoother to my hair.

This is how it looks just blow dried.

Olaplex 6 is a moisturizing styling cream that you can also use as a leave-in conditioner if you want. I primarily started using it because it cuts down drying time significantly, which further helps to limit the damage to hair. I got extra diligent about it after blow drying my hair without it a couple of times. Without it, my hair feels rougher and looks duller and more frizzy after a blow dry. With it, my hair comes out lustrous and silky, and I don’t hit any tangles when I go to brush it.

A little goes a long way.

I blow dry with my Shark FlexStyle. Originally, I bought this Dyson AirWrap dupe because I got sucked in by how cool the hot air vortex curling rods look on camera. I quickly grew tired of struggling with the curlers because they’re a lot less easy for me than everyone else on social media makes them appear.

But I don’t regret my purchase at all, because it makes a perfect blow dryer. It’s super lightweight with a slim profile, so my arm doesn’t get tired of wielding it, and it dries my whole head incredibly fast. I used to say I could do my whole head in 5 minutes. I have more hair now, so I’ll revise that up and say it takes a bit less than 10 minutes, but it’s still amazingly quick, especially when I use the Olaplex 6 with it too.

Not too upset the curling rods aren’t my favorite.

Olaplex No. 6 Bond Smoother on Amazon

Shark FlexStyle on Amazon

My Shark FlexStyle also came with a blow dry brush attachment, but I ended up hating it. It pulls and rips my hair like crazy. I do love a good blow dry brush for when I want to blow dry my hair totally straight but with more bounce and movement than when I just let it dry straight naturally.

Like this.

When I’m doing a straight blowout, I’ll start by using the Shark FlexStyle (with the concentrator attachment) to lift and dry my roots. Then I go in on the length with a blow dry brush. I don’t have the coordination to wield a round brush in one hand and a blow dryer in the other. Trust me, I’ve tried. I can punch myself out with my own styling tools more easily than I can manage to make the whole two tools at once thing work.

After using a few blowout brushes, including the Revlon one that everyone had at some point in the past decade, I’m very confident that my Insert Name Here blowout brush is the best for me. The bristles are densely set enough to grab my hair and guide it into shape, but not so densely set that they pull or tear on my hair. The high heat setting is enough to create a style but not so hot that it creates unnecessary damage. And, like my Shark FlexStyle, it’s lightweight. I don’t like getting tired when I’m doing my hair.

The bristles are turning purple from my hair dye and that’s fine with me.

Finally, for that extra glassy glass hair look, I run a few drops of Olaplex No. 7 Bonding Oil through my hair before I use the blow dry brush. This oil is magical. It only takes a few drops on each side of my hair to leave it as fluidly glossy as liquid silk. It doesn’t feel oily at all, and if I apply it at night to damp hair after shampooing and conditioning, I wake up with incomparably silky hair too.

Liquid gold.

INH Insert Name Here Insert Blowout Here blow dry brush on Amazon­­

Olaplex No. 7 Bonding Oil on Amazon

Remember the story about flat iron curls that I told like six hundred words ago? Yeah, I still like doing those. They’re so fun when I want a bombshell kind of look.

This picture is about a year old and I just realized I can also tell I have way more hair now, not just length but density.

I also find flat iron curls slightly less damaging than curling with a curling iron or rod. Instead of clamping the hot metal down on your hair and holding it there, you’re moving the hot metal down the length of your hair. That way, hair spends less time on the hot metal. Hence, less damage.

For best results with flat iron curls, you need a flat iron with a fairly narrow and rounded profile and very smooth plates so that they glide down the hair shaft easily. I’ve tried a few cheapie models, and a lot of them tend to stick to hair, causing tugging and unnecessary damage. I have two different Kristin Ess mini flat irons that are the same size and shape, and I end up using the Nanoblack more, because it slides a bit more easily.

The black plates also don’t show my hair dye, which is nice.

My one complaint about these is that the power cord on the minis is pretty short. That’s really more of a complaint about my apartment, though. There are no outlets in the bathroom, so I end up trapped near the door with the hot tool plugged in to the kitchen outlet instead.

While flat iron curls are less damaging than curling irons or curling rods, however, they are still pretty damaging because of the direct contact with the high heat plates. When I’m doing these, I prep my hair with Olaplex No. 9 Bond Protector serum. This is a lightweight gel serum made to protect hair up to 450F.

I use this a bit more generously than 6 or 7.

It also adds a lot of shine and gives what the brand calls “style memory” and what my elder millennial self just calls “hold.” It’s not stiff and crunchy like the styling gels of yore, though. While this makes my hair hold a shape all the way until my next shampoo, it doesn’t feel like a hold product. Hair stays soft and moves naturally with it.

Kristin Ess Nanoblack ¾” travel flat iron at Ulta

Olaplex No. 9 Bond Protector Nourishing Hair Serum on Amazon

The Olaplex 9 comes in extra handy when I’m doing my current absolute favorite hairstyle: mermaid waves!

THESE

I actually had the INH Insert Waves Here waving iron for something like a year before I dared to try it out. Because it looks terrifying. It’s basically three curling irons fused together with a plate that clamps down on one side to create a a big wave pattern. It’s the kaiju version of a crimper.

Then I finally worked up the nerve to try it. I burned myself a couple of times at first, but I also fell in love. It’s huge, so you can fit a lot of hair in it at a time, making styling super fast and easy. Takes maybe 5 or so minutes to get a full head of glorious beachy waves. I’ll do an updated tutorial on my Insta soon.

It is scary looking though right

It is, however, the most damaging of all my styling tools, because you do hold it clamped down on your hair without moving it for a few seconds on each piece. After much experimentation, I’ve found that counting to five Mississippily works best for my stubborn hair. I do have to be very on top of my repairing routine when I use this thing a lot, but it’s so worth it.

INH Insert Name Here Insert Waves Here waver on Amazon

No heat protectant is magic. The Olaplex products I use before heat styling help significantly, but when you’re clamping 400 degrees of hot metal or ceramic directly on your hair, it’s going to take some damage. Doubly so if some of your hair is bleached, as mine is.

I absolutely would not have half my hair length if I didn’t use a good bond repair product religiously. A little over a year ago, a new brand called Epres—founded by Eric Pressly, one of the original creators of the Olaplex molecule—reached out with an offer to try their bond repair product. I said yes, and the rest is history (but my hair is not).

This vial contains the precious molecule.

The Epres molecule is nothing short of a miracle. My hair can be fried to hell and back, but 15-20 minutes saturated with the Epres Bond Repair Treatment restores it to a strong, shiny, almost virgin state. Epres (and, to a slightly lesser extent, the older Olaplex bond repair treatment) works by penetrating the hair shaft and forming new keratin bonds within it to replace the bonds that were broken by bleach, heat styling, or general rough handling. It’s also nearly instantaneous.

I find the Epres Bond Repair Treatment much easier to use than the somewhat comparable Olaplex No. 3 Hair Perfector. You have to apply Olaplex 3 to damp hair, meaning you need to get your hair wet first, then put the product in, then wash it out afterwards. Epres goes right on dry hair. You mix the concentrate provided in a little vial with plain water in their spray bottle, then just spray it on to saturate hair and brush through. Put it up for a little while and then shampoo and condition as normal.

They just updated the spray bottle to a smaller, slimmer design, so check my Instagram stories later today for a look.

Per Dr. Pressly, one of the key advantages of the Epres molecule is that it moves more easily through hair and penetrates better than the Olaplex molecule, for more complete damage repair. In my comparison of the two products, I found that to be true.

The effects of any bond builder product like this do go away after a few washes, as the newly created keratin bonds eventually wash out (or get broken by your styling habits anyway), but the results of the Epres treatment last longer than Olaplex’s. When I’m not doing much with my hair, I just do it once a week. If I’ve been going hard with my waver or flat iron, I do it twice a week. It does so much to keep my hair intact.

Epres Bond Repair Treatment starter kits and refill packs at Epres.com (20% off with code FIDDYSNAILS)

You might be wondering why, if it took so much time and so much work to grow my hair out from thinning to so much denser and thicker than before, I’m so eager to style it and fry it and potentially damage it more. And that would be a good question.

I do it because it’s fun! Originally I did just want my hair to grow out more so that I’d feel less self-conscious about the thin spots. But the more it grew out, the more I wanted to play with it, experiment with different looks, actually have fun with it. Because for me, that’s the point of taking so much care with my meat suit. To have a canvas for creativity and new ways to feel joy in existing in my physical form! Just like I didn’t go to all the trouble of growing a butt just to hide it away in baggy pants, I also didn’t go to all the trouble of reversing my hair thinning just to let it hang limp or put it up in a bun.

I’m pretty sure everyone but me also knew I was going to dye it purple eventually.

But that’s just me. Like I said, my routine is not meant to be an instruction manual—you don’t have to do every single thing I do. If you’ve made it this far, I applaud you. That was a lot! I hope you found some suggestions that apply to your situation, and I equally hope you ignore the ones that don’t.

If you have any questions or want me to go into any more detail about anything I mentioned here, please please ask in the comments. This is the most comprehensive piece of writing I’ve done since my book, but I still omitted quite a lot for the sake of all our attention spans. I’m happy to answer questions and take requests for follow-ups.

In between hairstyling sessions.

Also, if you enjoyed reading this and wish I’d write more blog posts…stay tuned, because I have some big plans in that area for you.

Thanks for reading!


Source link

June 2, 2025 0 comments
0 FacebookTwitterPinterestEmail
British Beauty

Lips and Lashes on Lock! – All Things Aesthetic

by Lina Clémence June 2, 2025
written by Lina Clémence


Good morning! I genuinely hope it is a good morning for you all. I’ve been a little more positive this week about things and I’ve been going on long walks as my daily outdoor exercise which I have also found beneficial.

It’s also been quite refreshing to have a break from makeup, although my skin doesn’t seem to think so! I’ve seen so many posts where people have been saying lockdown has done wonders for their skin. Has this happened with mine??? NOPE! If you’re a regular on my posts, you’ll know I’ve struggled with bad skin since I was about 11. Although having more time on my hands has enabled a greater focus on my skincare regime, mother nature making an appearance and my stress levels recently have caused an annoying breakout. I’ve just completed a two week social media detox and I absolutely loved it because I wasn’t constantly viewing pictures of picture perfect women (which can really impact your confidence if you’re not feeling great). I have them back now, but I’ve reduced my screen time massively, and instead of posting a cheerful photo of me looking all dolled up and pretending everything is fab, you can have some photos of my flared up skin instead! My best advice at the moment would be to try and stay away from social media; it’s inevitable that were not gonna be feeling amazing, and seeing unrealistic and photoshopped pictures where people are looking their best will only exacerbate the problem. Take time out and be happy in your own skin (I’ve embraced the spots)!

  • Wow ok I also really need to brush my hair!

Right, now for the subject of this week’s blog: lips and lashes! And first up we have….

Product 1 – The Lip Mask

It’s no secret that I’ve used dermal fillers in the past (click here to see my blog post where I discuss them). They’re not for everyone and it’s really not a decision that should be taken lightly, so I just want to make it clear that I never have and never will promote the use of lip fillers.

Of course, being in lockdown I can’t actually get my lips topped up anyway! I mentioned in last week’s post that I was feeling pretty rubbish, so my best friend very kindly left a care package outside for me, which included these really cool lip masks!

Dermal fillers start at around £100 for 0.5ml and can go upwards of £250 for more. These little masks are…£1!!! That’s 50p per lip mask as they come in a pack of two – check them out on the B&M website here. The packet says that they moisturise and plump the lips, and they’re infused with collagen, which is a natural remedy for enhancing lip volume. I’m sure given the bargain price you may be skeptical as to whether they work – let’s see!

  • BEFORE
  • LEAVE ON FOR 15 MINS
  • AFTER!

Not only is the volume of my lips visibly enhanced, they were left feeling really soft and smooth so the moisturising promise was most certainly met. While the effects are less permanent, I’m excited to continue using these masks throughout lockdown to keep my full lips in place! These little masks are a must have (even if I did looks a little strange while wearing one).

Product 2 – The Last Lift

I’ve never been one to wear individual lashes as I just end up picking them all out, so my usual go to lash treat is the lash lift. Right now, more than ever, I felt like this was a must-have because I’m makeup free every day but still want a little boost so that I’m feeling good when rocking the natural look. So, I thought why not try it myself…

I purchased this product from amazon for £20.99 – click here to buy! The instructions are really clear, but I just want to say, it is really fiddly to use at first. Here are the steps:

Sounds easy right? I mean, it was once I got the hang of it! So for step one, my advice is to apply the glue to your lashes and the pads before trying to fix them on the lid. Once you’ve placed the glue on the pad/your lashes, fix onto your eyelid and use a cotton bud to gently stroke up the lashes so that they stick to the pad. I also used a cotton bud to apply the perm solution and the fixation lotion. This is what it will look like – it’s a little strange.

  • 1) Glue
  • 2) Perm
  • 3) Fixation

Staying still for around 30 minutes was harder than you’d think, but I was actually really happy with the finished result.

  • Before
  • After

As you can see, my lashes are visibly lifted, although I wouldn’t say it’s salon quality. I think it would be better to use the product with a tinting solution too for optimal results, but I was still really pleased with the outcome for my first time trying! You’ve got to be patient, but we all have a lot of time on our hands right now don’t we?

That’s all for this week! I have honestly really enjoyed trying out some cool home treatments during lockdown and I would recommend giving it a go if you’re looking for something new to try. We’re all missing our usual beauty treatments at the moment, but that doesn’t mean we have to go without! It’s also a really nice distraction, particularly if you’re an over-thinker like myself. I say it every week, but if you’re struggling and need a chat, contact me here! Sometimes it’s good to speak with someone you don’t know as well. Also give me a message or leave a comment with recommendations of any other products you think I should try – I am open to all suggestions. Here’s a picture of me with half wet hair, no makeup, and pretty rubbish skin as a reminder that what you see on social media isn’t always accurate – don’t pay too much attention to it!

Stay safe everyone xxx


Source link

June 2, 2025 0 comments
0 FacebookTwitterPinterestEmail
Canadian Beauty

MAKEUP | L’Oreal Paradise Big Deal Mascara (Definitely NOT a Big Deal For Me!) | Cosmetic Proof

by Lina Clémence June 2, 2025
written by Lina Clémence


Press sample. Affiliate links.

I very rarely discuss mascara on here because even though it is a product I use daily, there are very few that manage to make my little lashes look substantial and today is no different. If anything, this is the first mascara I have tried in a long time that had such a minimal result that I wanted to talk about it! A little backwards when you think about how most beauty reviews work, but I was indeed amazed just in the opposite direction!

 
The L’Oreal Paradise Big Deal Mascara promises buildable volume and length, lightweight wear and lash by lash separation. This formula is flake and smudge resistant AND interestingly removes easily with soap and water!

L'Oreal Paradise Big Deal Mascara Review

The “cross-conic” brush, which I am assuming refers to the conical shape of the brush and the way the bristles criss-cross, allows for even application to volumize each lash with every swipe. What I will agree with is that this formula was indeed very buildable as I applied multiple coats hoping to SEE some difference in my lashes, but was very disappointed! 

L'Oreal Paradise Big Deal Mascara Review

In both of these photos, I am wearing 3-4 coats of mascara, but the only way you can tell is that my lashes are very defined and separated as well as darker. For a photo of me without mascara, see this post.
L'Oreal Paradise Big Deal Mascara Review

I will also give props to the brush as I do like brushes like this that are smaller as I often feel a bit blind if the brushes are so massive that I can’t see my own eyes. I will also give a thumbs up to the easy removability of the mascara even though it was able to stay on my eyes the whole day (with lash primer). If this mascara actually made it look like I had lashes, this mascara would have been a dream!

I have not tried the original Lash Paradise Mascara, but for a comparison of the two, Slashed Beauty, does an intensive side by side review as they both give different lash looks and have very different brushes.

L'Oreal Paradise Big Deal Mascara Review

Final verdict: Unfortunately, this was a no for me because of just how my lashes are. I have seen way better success with other ethnicities who have longer lashes so if you have fine, straight, Asian lashes your results will probably be fairly lackluster like mine were.


loading..


Source link

June 2, 2025 0 comments
0 FacebookTwitterPinterestEmail
Indonesian Beauty

Resolusi Sehat 2025: Diet Sukses Dimulai dari Mindset

by Lina Clémence June 2, 2025
written by Lina Clémence


Halo, 2025! Nggak terasa ini kita sudah masuk di bulan ketiga di tahun 2025. Tahun baru selalu membawa semangat baru, setuju?  Bertepatan dengan hari pertama bulan Ramadan, aku mau berbagi cerita tentang perjalanan untuk mendapatkan berat badan ideal. Yup, pasti sudah bisa nebak ya kalau salah satu resolusiku di tahun ini adalah diet untuk menurunkan berat badan. 

Kesalahan yang aku lakukan saat diet

Kalau flashback ke tahun-tahun sebelumnya, aku tuh sudah mencoba banyak cara untuk menurunkan berat badan. Tapi, jujur saja, kebanyakan usaha yang aku lakukan tidak berhasil. Kenapa? Karena aku melakukan beberapa kesalahan saat diet.

Nah, kalau kamu juga lagi berjuang buat dapetin berat badan ideal, mungkin pengalaman aku ini bisa relate sama kamu. Siapa tahu kita pernah melakukan kesalahan yang sama!

Terlalu Ambisius Menetapkan Target

Hampir setiap tahun, menurunkan berat badan selalu masuk dalam daftar resolusi aku. Hehehe. Targetnya? Balik ke berat badan pas baru menikah, sekitar 50-55 kg. Makanya, aku selalu memulai tahun dengan target ambisius seperti “turun 10-15 kg dalam sebulan” biar cepat sampai ke angka ideal. 

Tapi realitanya? Target yang terlalu muluk ini justru bikin aku stres sendiri. Aku lupa kalau seiring bertambahnya usia, metabolisme tubuh ikut berubah, jadi cara diet yang dulu berhasil belum tentu efektif sekarang. Begitu hasilnya nggak sesuai harapan, semangat langsung anjlok, motivasi hilang, dan akhirnya resolusi ini cuma jadi wacana lagi.

Diet yang Terlalu Ekstrem

Sejak punya anak pertama di tahun 2010 sampai sekarang, aku sudah coba berbagai macam diet. Mulai dari Cabbage Soup Diet (yang kaum millennial pasti familiar banget), diet golongan darah (bahkan sampai bela-belain beli bukunya), sampai diet hypnolangsing yang katanya bisa mengubah mindset lewat hipnotis. Nggak cuma itu, selama menjalankan program diet, aku sangat menghindari karbohidrat dan terlalu membatasi makanan. 

Seperti biasa, di awal semangatnya membara, tapi begitu masuk tengah jalan, motivasi mulai kendor karena hasilnya nggak se-signifikan yang diharapkan. Ditambah lagi, aku nggak pernah konsultasi dulu dengan ahli gizi sebelum mulai diet dan tidak dibarengi dengan olahraga rutin. Alhasil, craving nggak terkendali, dan ujung-ujungnya malah over-eating.

food craving dan over eating akibat diet ekstrem
Food craving dan over eating akibat diet ekstrem

Ternyata, terlalu membatasi makanan atau menjalani diet ekstrem malah bisa bikin usaha menurunkan berat badan jadi lebih sulit—bahkan gagal total. Ini karena tubuh memproduksi hormon stres kortisol secara berlebihan, yang justru bisa menghambat proses penurunan berat badan. 

Pada jurnal ilmiah dengan judul Stress and Eating Behaviours disebutkan bahwa kortisol adalah hormon utama yang dilepaskan sebagai respons terhadap stres. Ketika melakukan diet ekstrem, tubuh akan merespon kondisi defisit kalori ini sebagai kondisi stres atau kelaparan dan memicu produksi kortisol. Jumlah kortisol yang tinggi akan meningkatkan nafsu makan, terutama terhadap makanan yang hyper palatable (tinggi gula, garam, dan lemak).

Tidak rutin berolahraga

Salah satu kesalahan terbesar yang aku lakukan selama diet adalah nggak rutin berolahraga.

Dulu, sebelum menikah, gaya hidupku bisa dibilang cukup aktif. Aku rajin nge-gym dan bahkan sempat ikut klub capoeira di UI. Tapi setelah menikah dan mulai bekerja, pelan-pelan kebiasaanku berubah jadi lebih banyak duduk alias sedentary lifestyle. Ditambah lagi, stres yang memicu craving serta kurangnya aktivitas fisik bikin berat badanku makin membengkak. Makin besar angka di timbangan, makin besar juga rasa malas buat mulai olahraga lagi. Rasanya berat banget buat memulai dari nol.

Malas berolahraga membuat tubuh jadi lemas dan memicu obesitas
Malas berolahraga membuat tubuh jadi lemas dan memicu obesitas. Foto: Canva.

Padahal, olahraga secara rutin nggak cuma soal membakar kalori, tapi juga membantu meningkatkan metabolisme dan menjaga kesehatan tubuh secara keseluruhan. Selain itu, olahraga juga bisa jadi cara yang efektif untuk mengurangi stres. Nah ini berkaitan dengan poin sebelumnya yaitu dengan meningkatnya produksi kortisol yang jadi pemicu emotional eating.

Dulu tuh aku berpikir kalau olahraga harus yang berat dan intens, seperti lari berjam-jam atau nge-gym setiap hari. Karena memang dulu itulah yang aku lakukan.Aku bisa ke gym tiap hari dengan fokus latihan yang berbeda-beda setiap harinya. Jangan tanya, dulu aku bisa mengangkat beban hingga 80 kg. Dulu yaaa. Hahaha. Kalau sekarang sih udah jompo. 

Tapi sebetulnya memulai dengan aktivitas ringan seperti jalan kaki 30 menit sehari atau stretching di pagi hari pun sudah cukup banget untuk membangun kebiasaan. 

Tidak konsisten menjalankan diet

Ini dia nih, salah satu masalah terbesar yang bikin usahaku menurunkan berat badan selalu mentok di tengah jalan: nggak konsisten!

Kadang, aku semangat banget olahraga setiap hari, bahkan sampai bela-belain bangun pagi buat workout. Tapi seminggu kemudian? Malas total! Tiba-tiba mulai banyak alasan: capek kerja, cuaca nggak mendukung, atau sekadar “Ah, istirahat sehari aja nggak apa-apa,” yang ujung-ujungnya malah jadi seminggu penuh jadi couch potato alias nggak gerak sama sekali.

Hal yang sama juga terjadi soal pola makan. Awalnya niat banget meal prep dan ngikutin menu sehat. Tapi begitu ada godaan makanan enak—apalagi kalau ada acara keluarga atau kumpul sama teman—langsung lupa semua aturan. “Ah, cheating sekali aja nggak bakal ngaruh kok,” pikirku. Tapi nyatanya? Satu cheat day berubah jadi cheat week, dan akhirnya malah balik lagi ke kebiasaan lama.

Yang bikin tambah nyesek, setiap kali sadar sudah keluar jalur, rasanya makin malas buat mulai lagi dari awal. Progress yang sudah aku buat jadi sia-sia, dan akhirnya aku kembali ke titik nol. Begini terus polanya, muter-muter tanpa hasil yang benar-benar signifikan.Udah kaya lingkaran setan deh. 

Mengubah mindset dan kebiasaan ini yang sulit karena aku terlalu fokus pada hasil instan. Aku maunya turun 5 kg dalam seminggu, perut rata dalam sebulan, dan langsung langsing tanpa harus struggle lama-lama. Ujung-ujungnya ya cuma semangat di awal saja, di akhir auto melempem. Aku baru sadar kalau masalahnya bukan cuma di diet atau olahraga yang aku pilih, tapi lebih ke konsistensi dan pola pikir. Aku harus belajar menikmati prosesnya, bukan sekadar mengejar angka di timbangan.

Resolusi 2025: Lebih Sehat dan Lebih Konsisten 

Setelah berkali-kali gagal nurunin berat badan gara-gara berbagai kesalahan—mulai dari diet ekstrem yang bikin stres, nggak rutin olahraga, sampai mindset yang terlalu fokus sama hasil instan—tahun ini, aku mau jadi lebih sehat dan konsisten menjalankan healthy lifestye. 

Dari semua pengalaman dan kesalahan yang aku lakukan selama menjalani diet, aku jadi paham kalau menurunkan berat badan itu nggak cuma soal angka. Yang lebih penting adalah bagaimana caranya agar aku bisa hidup lebih sehat dengan cara yang realistis dan konsisten. 

Dulu, aku selalu pasang target turun 10 kg dalam sebulan, tapi akhirnya malah nyerah di tengah jalan. Sekarang, aku pengen fokus ke bikin kebiasaan sehat yang bisa aku jalankan tanpa beban. Berikut ini adalah beberapa hal yang aku mulai jalankan: 

1. Rutin Berolahraga

Aku sadar kalau olahraga itu bukan cuma buat nurunin berat badan, tapi juga bikin badan lebih fit dan sehat secara keseluruhan. Apalagi usia aku juga sudah tidak muda lagi. Jadi di tahun ini aku mulai lebih serius menjadwalkan olahraga secara rutin. Lalu apa bedanya dengan resolusi olahraga di tahun-tahun sebelumnya? Kali ini aku mau fokus pada aktivitas ringan yang mudah dilakukan supaya aku enjoy menjalaninya dan bisa konsisten.

Beberapa aktivitas yang aku lakukan adalah jalan kaki setiap pagi selama 30 menit atau mengikuti walking workout agar tubuh tetap aktif. Selain itu aku juga mulai coba latihan angkat beban ringan agar otot tetap terjaga. 

Yang paling penting, aku nggak mau lagi melihat olahraga sebagai hukuman karena makan terlalu banyak. Aku ingin menjadikan olahraga sebagai bagian dari rutinitas yang aku nikmati dan bisa aku jalani dalam jangka panjang.

2. Mengatur Pola Makan

Salah satu kesalahan terbesar aku dulu adalah terlalu membatasi makanan sampai akhirnya craving dan malah makan berlebihan. Sekarang, aku nggak mau lagi jatuh ke pola diet yang menyiksa. Aku lebih fokus ke makan dengan lebih mindful, bukan sekadar ngitung kalori tapi juga benar-benar memperhatikan apa yang aku makan dan bagaimana tubuh aku meresponsnya. Aku mulai memperbanyak protein, serat, dan lemak sehat, sambil tetap menikmati makanan kesukaan tanpa merasa bersalah.

Mengatur pola makan dengan metode isi piringku

Selain itu, aku juga belajar mendengarkan tubuh, benar-benar lapar dan cuma pengen ngemil karena bosan atau stres. Aku juga belajar untuk lebih peka terhadap makanan yang bikin badan aku terasa lebih energik dan yang malah bikin aku gampang lemas atau kembung. Dengan pola pikir ini, aku berharap pola makan sehat ini bisa jadi bagian dari gaya hidup, bukan sekadar diet.

3. Menggunakan Tools untuk Menunjang Keberhasilan Diet

Biar bisa lebih disiplin dan bisa melihat progres dengan lebih jelas, aku juga mulai pakai berbagai tools untuk bantu diet. Contohnya, aku pake weight loss calculator buat ngecek target yang realistis, aplikasi penghitung kalori buat monitor asupan makanan, spreadsheet untuk mencatat apa yang aku makan (meal tracker), dan smartwatch buat memantau aktivitas harian. Dengan cara ini, aku jadi lebih terarah dan nggak gampang menyerah kalau progresnya terasa lambat.

Menggunakan smartwatch untuk mengecek aktivitas fisik harian
Meal planner dari Loka Jorney untuk bantu pantau diet

Aku tahu ini nggak akan mudah, tapi kali ini aku nggak mau menyerah di tengah jalan lagi. Karena yang aku kejar bukan sekadar tubuh langsing, tapi tubuh yang lebih sehat, kuat, dan bahagia.

Mengenal Weight Loss Calculator dari culinaryschools.org 

Menurunkan berat badan memang nggak bisa asal tebak-tebakan atau sekadar ikut tren diet yang lagi viral. Biar hasilnya lebih efektif dan sesuai dengan kebutuhan tubuh, aku butuh cara yang lebih terukur. Nah, salah satu tools yang membantu aku buat lebih realistis dalam menentukan target penurunan berat badan adalah Weight Loss Calculator dari Culinary Schools.

Kalkulator weight loss dari culinary schools org mudah digunakan dan hasilnya cepat

Kalkulator ini sangat membantu aku untuk menghitung berapa banyak kalori yang perlu aku konsumsi setiap hari berdasarkan usia, berat badan, tinggi badan, tingkat aktivitas, dan target penurunan berat badan yang aku inginkan. Jadi, nggak asal ngurangin makan atau diet ekstrem, tapi lebih ke memahami bagaimana tubuh bekerja dan berapa banyak energi yang sebenarnya dibutuhkan.

Yang aku suka dari kalkulator ini, dia bisa langsung memperkirakan kapan target berat badan ideal bisa tercapai, asalkan aku konsisten dengan pola makan dan aktivitas fisik yang sesuai. Jadi, aku nggak cuma nebak-nebak atau sekadar berharap turun sekian kilo dalam waktu yang nggak realistis. Selain itu, kalkulator ini juga menghitung indeks massa tubuh (BMI). Hasil kalkulasi menunjukkan kalau aku masuk dalam kategori obesitas. Huhuhu. 

hasil perhitungan weight loss calculator dari culinaryschools.org
Hasil perhitungan weight loss calculator dari culinaryschools.org

Selain itu, kalkulator ini juga bisa jadi acuan buat aku lebih mindful dalam memilih makanan. Aku jadi lebih paham kalau defisit kalori itu penting, tapi tetap harus seimbang, nggak boleh terlalu ekstrem karena justru bisa bikin tubuh stres dan metabolisme jadi kacau. Makanya, aku lebih fokus ke pola makan yang sehat dan bernutrisi, bukan sekadar mengurangi makan asal-asalan.

Dengan adanya health tools dari Culinary Schools, aku jadi lebih termotivasi buat konsisten dan nggak gampang nyerah kalau progress-nya nggak instan. Soalnya, aku tahu kalau aku sedang bergerak ke arah yang benar dan setiap perubahan kecil yang aku lakukan tetap punya dampak besar dalam jangka panjang.

Kalkulator kesehatan Culinary Schools
Fitur kalkulator kesehatan yang tersedia di CulinarySchools.org

Selain menyediakan berbagai tools seputar kesehatan dan diet, website Culinary Schools juga punya kategori Fun, yang berisi berbagai fitur seru dan edukatif seputar dunia kuliner. Salah satunya adalah Cooking Games for Kids, game memasak interaktif yang cocok buat anak-anak agar lebih mengenal dunia kuliner dengan cara yang menyenangkan.

Di sini, anak-anak bisa bermain berbagai game edukatif bertema makanan, memasak, dan manajemen restoran yang tidak hanya menghibur tetapi juga melatih keterampilan berpikir logis, kreativitas, dan pemahaman dasar tentang makanan sehat. Mulai dari game memasak sederhana hingga simulasi menjalankan restoran, semua games-nya cocok untuk mengasah ketertarikan anak-anak pada dunia kuliner sejak dini.

Beberapa games favorit aku dan anak-anak adalah Waffle, Go to Market, Serve the Pizza, dan Sweet Chocolate.

Berbagai game edukatif di CulinarySchools.org

Selain permainan memasak, situs Culinary Schools juga menyediakan berbagai permainan edukatif lainnya. Untuk melatih daya pikir dan strategi, tersedia Brain Games seperti permainan kartu, board games, mahjong, dan teka-teki logika.

Sementara itu, bagi anak-anak yang gemar olahraga, ada Sports Games yang dikategorikan berdasarkan jenis olahraga seperti sepak bola, golf, dan bola basket. Dengan berbagai pilihan ini, anak-anak bisa belajar sambil bermain sesuai dengan minat mereka.

Penutup

Pada akhirnya, perjalanan menurunkan berat badan ini bukan cuma tentang angka di timbangan, tapi bagaimana aku bisa menjalani hidup yang lebih sehat, lebih kuat, dan lebih bahagia. Dengan menjadi lebih sehat, aku juga bisa lebih maksimal menjalani peranku sebagai ibu. Aku sadar bahwa perubahan besar itu dimulai dari langkah kecil yang konsisten. Bukan soal diet ketat atau olahraga ekstrem, tapi lebih ke membangun kebiasaan yang bisa aku jalani dalam jangka panjang.

Apakah kamu punya resolusi yang sama seperti aku? Kita mulai bareng-bareng, yuk! Nggak perlu langsung sempurna, yang penting terus bergerak maju. Setiap usaha yang kita lakukan hari ini adalah investasi untuk versi diri kita yang lebih sehat di masa depan. Jadi, let’s do this—pelan-pelan tapi pasti, wujudkan resolusi hidup lebih sehat di 2025! 


Source link

June 2, 2025 0 comments
0 FacebookTwitterPinterestEmail
Beauty

Fable & Mane Volumizing Shampoo and Conditioner Review

by Lina Clémence June 2, 2025
written by Lina Clémence


[unpaid/sample/affiliate/ad] I think my experience with Fable & Mane Volumizing Shampoo and Conditioner is one of ‘great brand, wrong product’. The Volumizing formula just wasn’t right for my hair and while this brand focuses on age old Indian hair secrets, the promise of soft, bouncier and fuller hair just didn’t happen for me.

There’s a pre-shampoo hair oil that I am really looking forward to using and instinctively feel that it will be great for my bleached hair, but in this instance, not only was there no volume to speak of, it also looked rather dull. Annoying. To make hair products do some form of amplifying, you need to use ingredients that directly impact the hair shaft or contribute to the appearance of volume – typically hydrolyzed ingredients and indeed this does contain hydrolyzed rice proteins which can adhere to the hair shaft to make it look thicker than it really is, but the bulk of the INCI is very typical and usual hair cleansing ingredients. I also have questions on why a shampoo and conditioner are exactly the same price when the ingredients are different – my instinct tells me it’s more expensive to create a conditioner than a shampoo purely because the ingredients are richer.

The scent is delicious – the father of the founders (siblings Akash and Niki) worked for Jean Patou so early on, the pair realized that getting a nose to create the fragrance for the products was key in marking out a difference. It’s a delicate, petal-like scent with clean notes that genuinely adds to the wash experience. I’d recommend Volumizing for thin or oily hair, not for dry and bleached hair like mine. I can’t help feeling that what these products needed was some silicone – they’re a silicone free brand. At £28 per bottle, I’d consider this a luxury buy and I want to have better experience with the brand. Watch this space for a review of the pre-shampoo oil. You can find Fable & Mane HERE.


Source link

June 2, 2025 0 comments
0 FacebookTwitterPinterestEmail
Arab Beauty

BEAUTY TIPS USING ALOE VERA – eyana, salonindubai

by Lina Clémence June 1, 2025
written by Lina Clémence


Everyone wants to look beautiful and gorgeous from head to toe.  But dark and dull skin fades your beauty. So girls if you are looking for an effective remedy for your beautiful and radiant skin. Here is a solution. Eyana is one of the best beauty salons in karama dubai. We have well-experienced beauticians here to make you more beautiful. Eyana beauty salon is the top ladies beauty parlor in karama. Our experts share aloe Vera beauty tips for you. Aloe Vera is great for all skin types. Just try out and do it yourself, you can see the change.

Benefits of Aloe Vera

salons in dubai

  • Aloe Vera gel has an antibacterial property which helps to reduce skin problems like pimples, dark spots, black and white heads, acne and blemishes, etc.
  • Aloe Vera helps to moisturize your skin, keeping it hydrated and rejuvenated. Using Aloe Vera gel you can get a smooth and radiant skin.
  • Aloe Vera can include your diet for maximizing your weight loss. It contains vitamins and minerals that reduce your weight.
  • Aloe Vera contains the proteolytic enzyme. It repairs dead sells and reduces hair fall.
  • Aloe Vera has an anti-aging property, which reduces wrinkles and pimples. Keep your skin so young.
  • Aloe Vera gel has anti-oxidant properties that are great for your overall health.

Aloe Vera for dry skin

best facial karama

Mix Aloe Vera gel with yogurt. Apply this mixture on your face. This is the perfect solution for avoiding pimples and dead cells.

Aloe Vera scrub

hair salon karama

Mix 2 teaspoons of Aloe Vera gel, 2 teaspoons of sugar and one spoon of fresh lemon juice. Apply this mixture on your face and scrub it well. After 20minutes you can wash it off.

Aloe Vera for sensitive skin

best pedicure in karama

Mix 3 teaspoons of cucumber juice with 2 teaspoons of Aloe Vera gel. Mix it well and add one spoon of yogurt. Apply this mixture on your face. Keep it for 20-30 minutes on your face. This very cooling face masks and rinse with lukewarm water.

Aloe Vera for hair loss

best manicure in karama

Ingredients;

  • 1 cup Fresh Aloe Vera Gel
  • 2 tbsp Castor Oil
  • 2 tbsp Fenugreek Powder
  • Shower Cap
  • Towel

In a bowl mix these ingredients very well. Apply this mixture on your scalp and hair. Then cover with a shower cap. Keep this on your hair in the night. In the morning wash your hair with cool water and shampoo.


Source link

June 1, 2025 0 comments
0 FacebookTwitterPinterestEmail
Asian Beauty

I visited Seoul in 2023 and all I got was fabulous. Notes on a long-awaited kbeauty trip.

by Lina Clémence June 1, 2025
written by Lina Clémence


I visited Seoul in 2023 and all I got was fabulous. Notes on a long-awaited kbeauty trip. – fanserviced-b


We use cookies to ensure that we give you the best experience on our website. If you continue to use this site we will assume that you are happy with it.Ok


Source link

June 1, 2025 0 comments
0 FacebookTwitterPinterestEmail
  • 1
  • …
  • 9
  • 10
  • 11
  • 12
  • 13
  • …
  • 18

Categories

  • Arab Beauty
  • Asian Beauty
  • Beauty
  • Beauty
  • British Beauty
  • Canadian Beauty
  • Cosmetics
  • Fashion Over 50
  • Hair Styling
  • Indonesian Beauty
  • Luxury Fashion
  • Plus Size Fashion
  • Skin Care
  • Sustainable Fashion
  • Women's Fashion

Recent Post

Recent Comments

No comments to show.
  • Arab Beauty (17)
  • Asian Beauty (33)
  • Beauty (1)
  • Beauty (32)
  • British Beauty (32)
  • Canadian Beauty (31)
  • Cosmetics (32)
  • Fashion Over 50 (1)
  • Hair Styling (33)
  • Indonesian Beauty (33)
  • Luxury Fashion (32)
  • Plus Size Fashion (65)
  • Skin Care (33)
  • Sustainable Fashion (33)
  • Women's Fashion (33)
  • Get it NOW: Quick & Cute Holiday Beauty Gifts $15 or LESS
  • Tried this microneedling treatment and it shaved years off my age! » myBeautyCravings
  • Makeup and Beauty Blog Monday Poll, Vol. 883
  • Huda Beauty Blush Filter Liquid Blush Review & Swatches — Raincouver Beauty
  • Mari Tetap Menulis di Era Gempuran Audio Visual

@2025 - All Right Reserved. Designed and Developed by Mahasun


Back To Top
glow-vogue.site
  • Beauty
    • Beauty
    • Arab Beauty
    • Asian Beauty
    • British Beauty
    • Canadian Beauty
    • Indonesian Beauty
  • Cosmetics
  • Fashion
    • Fashion Over 50
    • Luxury Fashion
    • Plus Size Fashion
    • Sustainable Fashion
    • Women’s Fashion
  • Hair Styling
  • Skin Care
  • Uncategorized