glow-vogue.site
  • Beauty
    • Beauty
    • Arab Beauty
    • Asian Beauty
    • British Beauty
    • Canadian Beauty
    • Indonesian Beauty
  • Cosmetics
  • Fashion
    • Fashion Over 50
    • Luxury Fashion
    • Plus Size Fashion
    • Sustainable Fashion
    • Women’s Fashion
  • Hair Styling
  • Skin Care
  • Uncategorized
Tag:

Hairstyle

Hair Styling

Fishtail Updo Hairstyle For Parties, Prom, Wedding | Fancy Hair Tutorial | Hairstyles For Girls

by Lina Clémence July 25, 2025
written by Lina Clémence


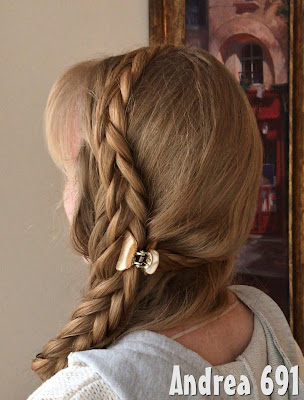
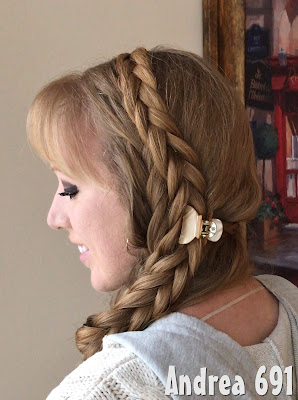
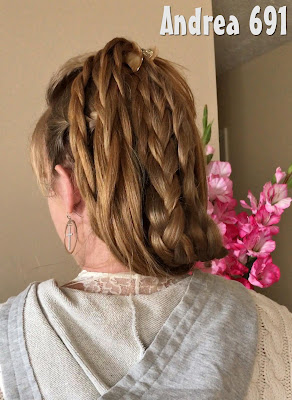
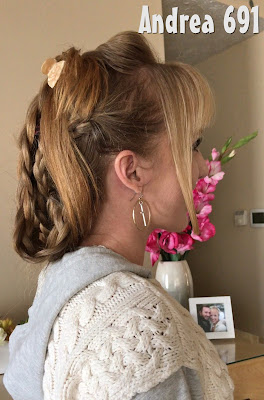
Today’s hairstyle tutorial is a beautiful updo style created using a simple fishtail braid!

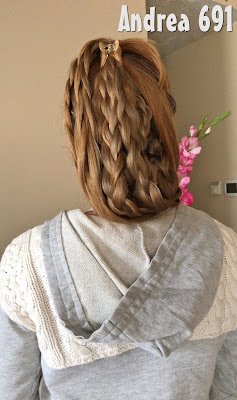
Our step by step video instructions (below) show how to make a simplified french fishtail braid, transitioning into a standard fishtail, then wrapping and tucking the finished braid into a pretty updo hairstyle. This formal hairstyle is quite easy even though it doesn’t look like it would be!

Fishtail Updo Hairstyle Video Tutorial:

(Click here to watch the video directly on YouTube.)


This hairstyle would be great for many special occasions: The Prom, Homecoming, weddings (hairstyles for the bride and bridesmaids as well as guests) parties, dinners, church, etc.

Pretty updo hairstyle tutorial

Gorgeous fishtail updo hairstyle for Prom and Homecoming

Wedding hair tutorial

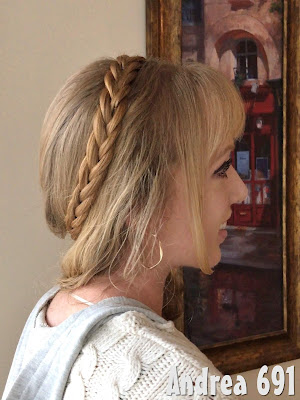
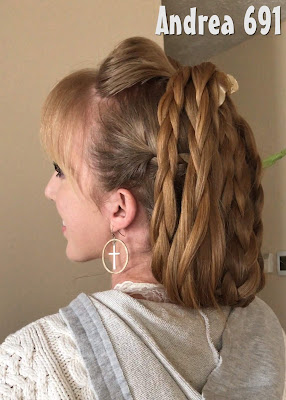
As mentioned in our video, the braid can also be left down for another adorable look!

French fishtail braid video tutorial

Tips and tricks:

  • Use hair product to help prevent flyaways while you are creating the fishtail and for the finishing touches.  
  • Stretch the edges of your braid for a more voluminous final look. 
  • Miniature bobby pins (affiliate) are easier to hide in styles like this. 
  • You may want to loosen the hair at the crown of her head before you wrap up the braid for a softer and more effortless look.


July 25, 2025 0 comments
0 FacebookTwitterPinterestEmail
Hair Styling

Easy Scarf Hairstyle Tutorial for Wavy / Curly Hair

by Lina Clémence July 24, 2025
written by Lina Clémence


I love a quick hairstyle, and this easy scarf hairstyle tutorial is so easy for wavy / curly hair. It started as an experiment and has become my new fave hairstyle tutorial.


Sometimes when you don’t have the “right” hair accessories, you can end up creating an even better style. Inspired by my curly roll updo, this scarf hairstyle tutorial is a new fave.

The scarf you choose makes all the difference in the finished look – and you can use any kind of scarf you have at home.

So grab the nearest scarf and let’s get styling. Watch the video tutorial below.

Easy Scarf Hairstyle Tutorial for Wavy / Curly Hair

Video tutorial – Click here if you can’t see the video

Btw, have you subscribed to my YouTube channel? I’d love you to click here to subscribe now!

This hairstyle tutorial was inspired by this curly roll hairstyle tutorial. You can also find a picture tutorial of the easy roll hairstyle here. I love creating easy tutorials for all hair types and this was so fun to style. You can change up the look in so many ways by the choice of scarf – experiment with prints, patterns and colours.


curly hair scarf hairstyle tutorial


curly hairstyle with a scarf


What type of scarf to use?

The scarf featured in my video was a gift so I don’t have a link – but anything lightweight will work.

I recommend using a silk or poly scarf and to fold it into a rectangle.

Look around at what you already have, try a fabric tie belt from a dress, or a strip of fabric to create a unique hairstyle.

The print, colour and pattern of your scarf makes this hairstyle one of a kind. And you can repeat this hairstyle, changing the scarf, and it will look like a completely new hairstyle.

Hair products featured:


Hair Romance curly hairstyle with a scarf


If you’ve got any hair questions or video requests, please leave me a comment below. I always love to see your hair if you try my hairstyles, please tag me on Instagram or use #hairromance so I can see you.

Have fun with your hair!


July 24, 2025 0 comments
0 FacebookTwitterPinterestEmail
Hair Styling

Simple Braided Hairstyle~ plus UK’s Daily Mail features a new article on my hair

by Lina Clémence July 19, 2025
written by Lina Clémence


Hi friends,

     I hope you are having a wonderful Valentine’s week!  A few days ago I braided my hair in this simple braided hairstyle.  It’s a hybrid braid, which is practically the same as a chunky fishtail braid.  It’s a fishtail braid made with four interchanging sections of hair.  I pinned the end of my braid around my head like a halo.  I love this simple boho look.  Thank you for coming to see!  Check out this article that the Daily Mail is featuring about my hair, especially my favorite hair secret of eating a spoonful of peanut butter every day 🙂


July 19, 2025 0 comments
0 FacebookTwitterPinterestEmail
Hair Styling

Short and easy updo~ today’s hairstyle

by Lina Clémence July 4, 2025
written by Lina Clémence


Hello friends,

     Happy March!  How fun to begin a brand-new month.  Today I fixed my hair in a simple short updo style.  I braided two small braids on either side of my hair, then made three braids with the remaining loose hair and arranged all my braids in place just so.  I love wearing short hairstyle just for the day, no cutting involved 🙂


July 4, 2025 0 comments
0 FacebookTwitterPinterestEmail
Hair Styling

20 Best Diamond Face Shape Hairstyle for Women in 2025

by Lina Clémence July 1, 2025
written by Lina Clémence


Finding the perfect hairstyle that complements your unique face shape can truly enhance your natural beauty and boost your confidence. If you have a diamond face shape—characterized by a narrow forehead and chin with wider cheekbones—choosing the right hairstyle is key to balancing your features and highlighting your best angles. In this blog post, we’ll explore expert tips and stunning hairstyle ideas tailored specifically for diamond face shapes, helping you discover looks that flatter your contours and elevate your style effortlessly. Whether you prefer bold cuts or soft waves, these insider recommendations will guide you to your next flawless hairstyle.

Check Also: Online Hairstyle Changer for Man

Best Diamond Face Shape Hairstyles

When it comes to styling hair for a diamond face shape, the goal is to balance the narrow forehead and chin while highlighting the cheekbones, which are typically the widest part of this face shape. The best diamond face shape hairstyle accentuates your natural bone structure while softening sharp angles and creating harmony. One of the top choices is a layered cut that adds volume around the forehead and jawline, helping to create the illusion of a more balanced face. Side-swept bangs or fringe can also be flattering, as they soften the forehead and draw attention to the eyes. Hairstyles with waves or curls add softness and fullness around the chin area, which balances the sharpness of the cheekbones. For those who prefer longer hair, styles that tuck behind the ears or feature loose, face-framing layers work beautifully. If you’re thinking of going shorter, consider a chin-length bob or lob with subtle texturing to add width where needed without overwhelming your natural features. Ultimately, the best diamond face shape hairstyle is one that complements your unique features while enhancing your confidence—so feel free to experiment with these styles to find the perfect look for you!

Related


July 1, 2025 0 comments
0 FacebookTwitterPinterestEmail
Hair Styling

How to hide regrowth in straight hair & easy hairstyle tutorials

by Lina Clémence June 27, 2025
written by Lina Clémence


Can’t get to the hairdresser? Here are some quick fixes and easy ways to hide your regrowth including hairstyles to cover your regrowth.


Watch the video below for all my best tips to cover regrowth in straight hair. If you have curly hair, I have a special post for you next.

How to hide regrowth in straight hair & easy hairstyle tutorial video

Click here if you can’t see the video above

In the video you’ll learn about:

  • Makeup for your hair! Using special powders, sprays and even eyeshadow or blush on your hair
  • How to choose the best hairstyle to minimise your regrowth
  • How to create a faux fringe to hide your hairline
  • Hats and headwear
  • The higher your hair, the less regrowth you see – how to boost your hair volume fast!
  • Changing your part to reduce your visible regrowth
  • When to use toners and semi permanent dyes
  • Also when NOT to use toners or dyes

DIY hair colour tutorial

In my hair regrowth video, I mentioned that I have a full post on DIY box colour. I’ve also shared the video below:

Click here if you can’t see the video above

Remember that colour on colour always goes darker!

And never go by the picture on the front of the box, always look at the colour grid on the back for a more accurate prediction of how it will look on your hair.

Hair Regrowth Cover Up Products


color wow root touch up and oribe root spray compared


Here are the hair regrowth cover up products I recommend:
(some are affiliate links – thanks for shopping with my links!)

Let me know which is your favourite tip to hide your regrowth!


June 27, 2025 0 comments
0 FacebookTwitterPinterestEmail
Hair Styling

Bailey’s Mini Fishtail Braids | DIY Bandana Hairstyle for Short Hair

by Lina Clémence June 23, 2025
written by Lina Clémence


Any of you short-haired people out there will know the struggle when it comes to creating cute braids on your hair! Sometimes it seems like there just isn’t enough hair to do much, especially with braids.

Today I’m going to show you a step-by-step DIY tutorial on just how my daughter Bailey achieves this cute bandana look with some Tips & Tricks for those extra short strands of hair! I’m honestly so glad that bandanas are coming back on trend! They’re SO cute, and can really change up a look! You can find bandanas in most craft stores, online, or any craft section of a superstore. They’re inexpensive, so you might as well grab one in every color! Let’s get started!

Items Needed: hair elastics (texture powder, hairspray, dry shampoo if desired)

Time Requirement: 15-20 minutes

Skill Level: Easy/Medium


DIY Bandana Hairstyle for Short Hair

  • Place the bandana right along the hairline, and pull all of your hair behind it. Secure with a knot at the base of your neck.

  • Pull the bandana back to where you can start to see the hair on the hairline. Pull out 2 small pieces of hair from either side of the part to frame the face.

  • Split all of the hair into 2 main sections.

  • Starting with the right section of hair, separate that section into 2 sections.

  • Take a small piece of hair from the left section, cross it over the left section, and add that small piece into the right section of hair.

  • Take a small piece of hair from the right section, cross it over the right section, and add that small piece into the left section of hair.

  • Repeat step 5-6 until you reach the bottom of the hair (or until you run out of pieces that are long enough to braid. Secure with an elastic.

  • Repeat steps 4-7 on the left section of hair.

  • Pancake the braids to fluff them up if you want to age up the look, top with hairspray if you’d like. Tweak accordingly. Done!

Watch the full tutorial:


June 23, 2025 0 comments
0 FacebookTwitterPinterestEmail
Hair Styling

Recreating Moms Signature Hairstyle ✨ #luxy #luxyhair #clipinhairextensions #mothersday

by Lina Clémence June 2, 2025
written by Lina Clémence


Recreating Moms Signature Hairstyle ✨ #luxy #luxyhair #clipinhairextensions #mothersday

admin •
May 8, 2025 •


@Jaykaybraidsandbridal created this gorgeous french braid using Luxy Hair 20″ Classic Clip-Ins in Blonde Balayage – shop Mother’s day hair only on LuxyHair.com – P.S. did you spot anything new from Luxy ????????

&nbsp&nbsp&nbsp&nbsp&nbsp&nbsp&nbsp&nbsp&nbsp&nbsp&nbsp&nbsp&nbsp&nbsp&nbsp&nbsp&nbsp&nbsp&nbsp&nbsp&nbsp&nbsp&nbsp&nbsp&nbsp&nbsp&nbsp&nbsp&nbsp&nbsp&nbsp&nbsp&nbsp&nbsp&nbsp&nbsp&nbsp&nbsp&nbsp&nbsp


Source link

June 2, 2025 0 comments
0 FacebookTwitterPinterestEmail
Hair Styling

G-EAZY Hairstyle 2016 – Step By Step Tutorial

by Lina Clémence June 2, 2025
written by Lina Clémence


The Californian rapper G-Eazy (born Gerald Earl Gillum) is producing hits after hits – including collaborations with Britney Spears. The guy’s got an attitude and you frequently see him wearing a cool leather jacket which goes along well with his side-parting slick back hairstyle.

Rapper’s New Fashion

Besides his promising music career, the 30-year-old has taken interest in the world of fashion as he released a collaboration with Rare Panther last fall. G-Eazy himself has also become a fashion icon with his alternative style as a rapper. GQ Magazine even put him on Top 10 of the most stylish people at New York Fashion Week 2016!

Now G-Eazy has found his way to Slikhaar TV and Slikhaar Blog. In this blog post, we’ll give you a step-by-step tutorial on how to pull off his side-parting slick back hairstyle.

Let’s get straight to it guys!

g-eazy

How to get the G-Eazy hairstyle

Step 1: Wash ‘N’ Clean Up

Before getting a haircut it’s always important to wash out all products in the hair. Use shampoo and conditioner like By Vilain Rush to get the hair clean and ultra manageable for the remainder of these steps.

Step 2: Organize Your Fuzz

Form a line backward from your head’s temple on both sides (curving naturally with the head) and connect it with a straight line in the backhead. Comb the hair away from the sectioning using a By Vilain Comb.

Blow dry your hair for a short while beneath the parting and use a By Vilain Skeleton Brush to help locking it firmly in place.

Step 3: Cut Down Low

Trim the lower part of the sides and the backhead and use a scissor when going further and further upwards. Create a gradient from 9 mm to 2 cm on the sides and also 9 mm to 2 cm at the backhead.

Wash and clean up, organize the hair, cut down low

Step 4: Top Gradient

Cut a gradient from 10-12 cm at the fringe to 7-8 cm at the top center. The volume of the hair will be boosted by letting the top front hair lean upon the hair in the back.

Step 5: Get Rid Of Half Of It

After creating the gradient you need to use a thinning scissor to make the hair on top of your headless weighty. By thinning out your hair it will also be easier to style when the haircut is done.

Step 6: Time To Blow

This time (in contrary to step 2) you need to blow-dry your hair for a longer time. Blow-dry it backwards to create the slick back effect before the actual styling.

By getting the hair dry you will also be able to assess the final hairstyle much better. Help yourself locking the hair in place by using a By Vilain Skeleton Brush along with the hair-dryer.

Remember to tip the beak of the hair-dryer and shake it a little to both prevent your hair from burning and to speed up the process.

Cut the top, thin out the hair and blow dry

Step 7: Trimming On The Edge

Use the scissor again to trim the hairstyle into its final shape. Consider using the thinning scissor once more if necessary. Continue by using an electric trimmer for the edges. You need to define a nice and sharp line-up along the side-parting via the trimmer.

Move on to outlining both the edges of your neck and the area around your ears. Use a By Vilain Comb underneath the electric trimmer to achieve completely manual control rather than a preset head for the trimmer.

Step 8: Straighten Your Hair

If your hair is not naturally smooth, use a flat iron to avoid ending up with a wavy slick back like Marlon Brando. A straightener will help to lock the hair into a slick position.

Step 9: Wax & Pomade!

Finish the hairstyle by adding both By Vilain Gold Digger and By Vilain Powermade. The Gold Digger wax should be applied first to style the hair into shape and give it extreme hold for the whole day. Afterward, the pomade will give you a nice glossy finish – just like G-Eazy.

Put on a leather jacket on top of your white T. NOW you got attitude!

Trim the edge, straighten the hair and apply wax and pomade after


Products & Tools necessary for G-Eazy hairstyle

products for G-Eazy hairstyle

1. Shampoo and Conditioner, By Vilain Rush US$20 2. Water spray, By Vilain Freestyler US$20 3. Comb, By Vilain Comb US$20 4. Hair-dryer 5. Brush, By Vilain Skeleton Brush US$20 6. Scissor 7. Thinning scissor 8. Electric trimmer 9. Hair straightener 10.  Wax, By Vilain Gold Digger US$20 11. Pomade, By Vilain Powermade US$20

G-Eazy hairstyle tutorial

If you want to see it all done in a cool video, look no further! Watch this Slikhaar TV video with our talented hairdresser, Charlotte! What do you think of this haircut? Please write your comment down below.

freeshipping_blog

Comments

comments


Source link

June 2, 2025 0 comments
0 FacebookTwitterPinterestEmail

Categories

  • Arab Beauty
  • Asian Beauty
  • Beauty
  • Beauty
  • British Beauty
  • Canadian Beauty
  • Cosmetics
  • Fashion Over 50
  • Hair Styling
  • Indonesian Beauty
  • Luxury Fashion
  • Plus Size Fashion
  • Skin Care
  • Sustainable Fashion
  • Women's Fashion

Recent Post

Recent Comments

No comments to show.
  • Arab Beauty (18)
  • Asian Beauty (77)
  • Beauty (77)
  • Beauty (1)
  • British Beauty (75)
  • Canadian Beauty (73)
  • Cosmetics (76)
  • Fashion Over 50 (1)
  • Hair Styling (78)
  • Indonesian Beauty (78)
  • Luxury Fashion (72)
  • Plus Size Fashion (154)
  • Skin Care (76)
  • Sustainable Fashion (77)
  • Women's Fashion (78)
  • Rainbowdorable by Auzola | Indonesian Beauty Blogger: (Bahasa Indonesia) Review: Skintific 5x Ceramide Serum Sunscreen
  • The inevitable – My Women Stuff
  • Giving Thanks – Fresh Salon Blog
  • SiMa.ai secures $85m to support global expansion
  • Is Scotch & Soda Sustainable in 2025? Why They Lost Certification

@2025 - All Right Reserved. Designed and Developed by Mahasun


Back To Top
glow-vogue.site
  • Beauty
    • Beauty
    • Arab Beauty
    • Asian Beauty
    • British Beauty
    • Canadian Beauty
    • Indonesian Beauty
  • Cosmetics
  • Fashion
    • Fashion Over 50
    • Luxury Fashion
    • Plus Size Fashion
    • Sustainable Fashion
    • Women’s Fashion
  • Hair Styling
  • Skin Care
  • Uncategorized