glow-vogue.site
  • Beauty
    • Beauty
    • Arab Beauty
    • Asian Beauty
    • British Beauty
    • Canadian Beauty
    • Indonesian Beauty
  • Cosmetics
  • Fashion
    • Fashion Over 50
    • Luxury Fashion
    • Plus Size Fashion
    • Sustainable Fashion
    • Women’s Fashion
  • Hair Styling
  • Skin Care
  • Uncategorized
Tag:

Tutorial

Hair Styling

Bantu Knot Out Tutorial | No-Heat Curls

by Lina Clémence August 3, 2025
written by Lina Clémence


I love playing with Paisley’s hair, but I’m always looking for ways to create cute hairstyles using as little heat as possible. This Bantu Knot Out hairstyle delivered on both counts and will last for a couple of days. Bonus!

This hairstyle actually takes some prepping before you start, so Paisley’s Bantu knots had been sitting for a couple of days. Remember to keep hydrating as you go. To prevent fluffing and puffy, I highly recommend the Hairitage “Take Your Vitamins” Argan Oil. You want to rub and twist the hair out in the OPPOSITE direction that you twisted the hair into the knots. The Argan Oil is also great for keeping the scalp hydrated so try to work it in as much as you can. Don’t forget to really take your time when you’re twisting out the Bantu knots. Grab your tools and let’s get started!

Items Needed: Hair Pick, Hairitage “Take Your Vitamins” Argan Oil, Hairitage “To The Max” – Maximum Hold Styling Gel

Time Requirement: 10-15 minutes

Skill Level: Medium


Bantu Knot Out Tutorial | No-Heat Curls

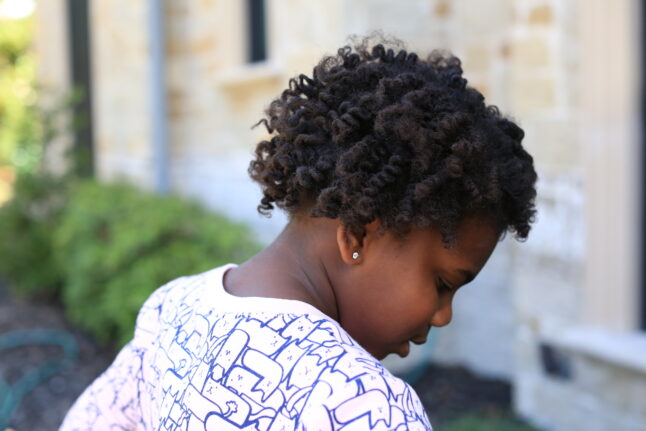
  • Begin with bantu knots all over the head – Paisley’s had been sitting for a couple of days.

  • Apply an argan oil to the hair to keep it moisturized as the knots come out.

  • Begin to untwist the hair while running the oil through it (keeps the hair from immediately puffing out, and adds TONS of moisture!) – Twist the hair out in the OPPOSITE direction that you twisted the hair into the knots

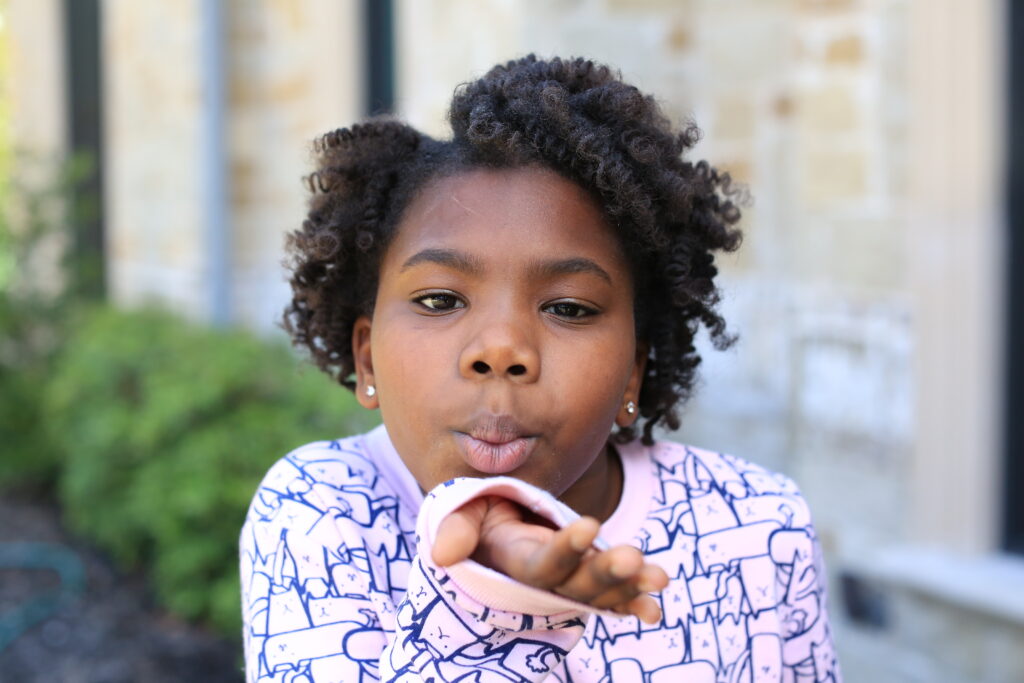
  • Slowly and carefully separate the hair, depending on the size of the knot, you’ll likely get 3-5 curls out of each knot.

  • Continue this process of releasing the knots and separating the curls all over the head.

  • Since the scalp is very exposed, now is a perfect time to add some of the argan oil to the scalp (if needed) for extra moisture and hydration

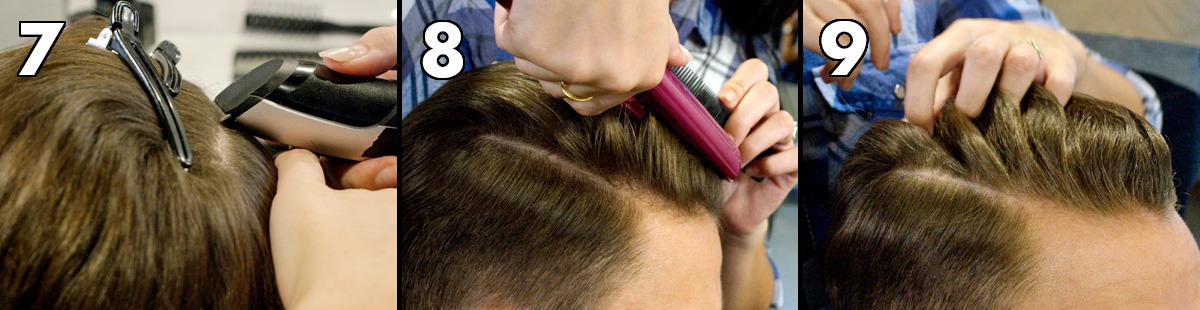
  • Once all of the knots are released, use a hair pick to to loosen up the part lines down at the root of the hair.

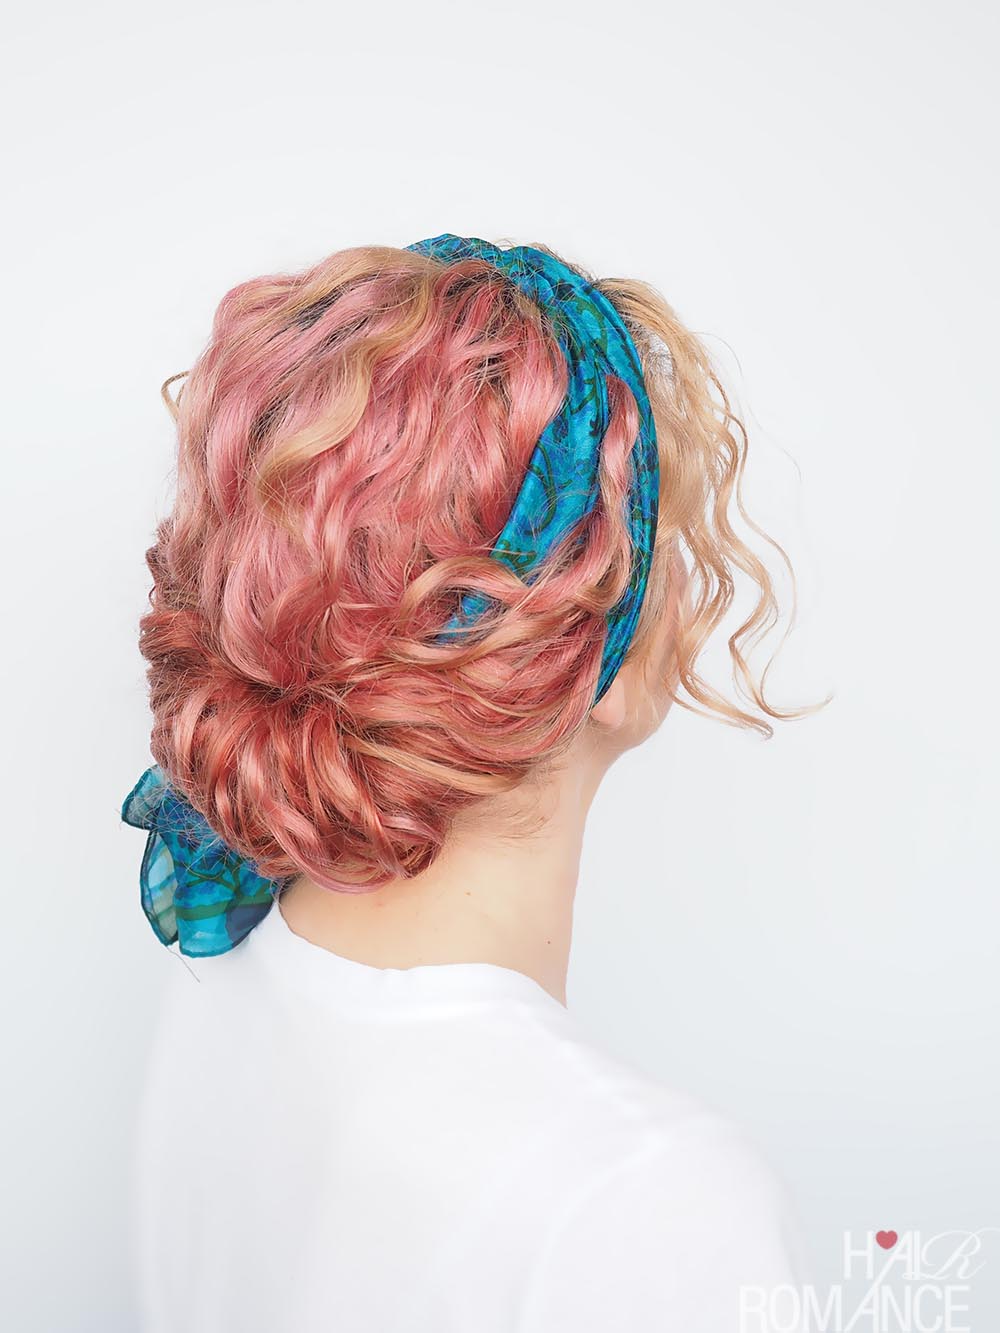
  • Leave the curls free, or part the hair and pin back a section of hair by the face to take the look to the next level!

Young girl with Bantu Knots blows a kiss to the camera

Conclusion

Once all the knots are out, use a hair pick to loosen up the part lines at the root of the hair so you can hide those lines. Be sure to stay close to the root – if you go out to the ends, you risk the curls getting too puffy. You’ll get adorable corkscrew curls that you can leave free, or part the hair and pin back a
section of hair by the face to take the look to the next level! Use some To The Max styling gel by
Hairitage for a smooth, defined edge.

Make the style last by putting the hair up into a pineapple and covering with a head wrap at night. Over the next few days, the curls will loosen and get puffier for a whole new look!

Watch the full tutorial:


For more Cute Girls Hairstyles, click here!


August 3, 2025 0 comments
0 FacebookTwitterPinterestEmail
Hair Styling

Pinterest Inspired Spring Hair Tutorial ????✨ #luxyhair #clipinhair #springhairstyles #mothersday

by Lina Clémence July 29, 2025
written by Lina Clémence


Pinterest Inspired Spring Hair Tutorial ????✨ #luxyhair #clipinhair #springhairstyles #mothersday

admin •
Apr 29, 2025 •


Nina wears 16” Seamless Clip-Ins in Medium Natural Brown ✨ P.S. right now shop just in time for Mother’s Day and get a FREE Precious Metals Hair Adornment Box on orders $300+

&nbsp&nbsp&nbsp&nbsp&nbsp&nbsp&nbsp&nbsp&nbsp&nbsp&nbsp&nbsp&nbsp&nbsp&nbsp&nbsp&nbsp&nbsp&nbsp&nbsp&nbsp&nbsp&nbsp&nbsp&nbsp&nbsp&nbsp&nbsp&nbsp&nbsp&nbsp&nbsp&nbsp&nbsp&nbsp&nbsp&nbsp&nbsp&nbsp&nbsp


July 29, 2025 0 comments
0 FacebookTwitterPinterestEmail
Hair Styling

Fishtail Updo Hairstyle For Parties, Prom, Wedding | Fancy Hair Tutorial | Hairstyles For Girls

by Lina Clémence July 25, 2025
written by Lina Clémence


Today’s hairstyle tutorial is a beautiful updo style created using a simple fishtail braid!

Our step by step video instructions (below) show how to make a simplified french fishtail braid, transitioning into a standard fishtail, then wrapping and tucking the finished braid into a pretty updo hairstyle. This formal hairstyle is quite easy even though it doesn’t look like it would be!

Fishtail Updo Hairstyle Video Tutorial:

(Click here to watch the video directly on YouTube.)


This hairstyle would be great for many special occasions: The Prom, Homecoming, weddings (hairstyles for the bride and bridesmaids as well as guests) parties, dinners, church, etc.

Pretty updo hairstyle tutorial

Gorgeous fishtail updo hairstyle for Prom and Homecoming

Wedding hair tutorial

As mentioned in our video, the braid can also be left down for another adorable look!

French fishtail braid video tutorial

Tips and tricks:

  • Use hair product to help prevent flyaways while you are creating the fishtail and for the finishing touches.  
  • Stretch the edges of your braid for a more voluminous final look. 
  • Miniature bobby pins (affiliate) are easier to hide in styles like this. 
  • You may want to loosen the hair at the crown of her head before you wrap up the braid for a softer and more effortless look.


July 25, 2025 0 comments
0 FacebookTwitterPinterestEmail
Hair Styling

Easy Scarf Hairstyle Tutorial for Wavy / Curly Hair

by Lina Clémence July 24, 2025
written by Lina Clémence


I love a quick hairstyle, and this easy scarf hairstyle tutorial is so easy for wavy / curly hair. It started as an experiment and has become my new fave hairstyle tutorial.


Sometimes when you don’t have the “right” hair accessories, you can end up creating an even better style. Inspired by my curly roll updo, this scarf hairstyle tutorial is a new fave.

The scarf you choose makes all the difference in the finished look – and you can use any kind of scarf you have at home.

So grab the nearest scarf and let’s get styling. Watch the video tutorial below.

Easy Scarf Hairstyle Tutorial for Wavy / Curly Hair

Video tutorial – Click here if you can’t see the video

Btw, have you subscribed to my YouTube channel? I’d love you to click here to subscribe now!

This hairstyle tutorial was inspired by this curly roll hairstyle tutorial. You can also find a picture tutorial of the easy roll hairstyle here. I love creating easy tutorials for all hair types and this was so fun to style. You can change up the look in so many ways by the choice of scarf – experiment with prints, patterns and colours.


curly hair scarf hairstyle tutorial


curly hairstyle with a scarf


What type of scarf to use?

The scarf featured in my video was a gift so I don’t have a link – but anything lightweight will work.

I recommend using a silk or poly scarf and to fold it into a rectangle.

Look around at what you already have, try a fabric tie belt from a dress, or a strip of fabric to create a unique hairstyle.

The print, colour and pattern of your scarf makes this hairstyle one of a kind. And you can repeat this hairstyle, changing the scarf, and it will look like a completely new hairstyle.

Hair products featured:


Hair Romance curly hairstyle with a scarf


If you’ve got any hair questions or video requests, please leave me a comment below. I always love to see your hair if you try my hairstyles, please tag me on Instagram or use #hairromance so I can see you.

Have fun with your hair!


July 24, 2025 0 comments
0 FacebookTwitterPinterestEmail
Hair Styling

French Braid Half Up Bun | Hair Tutorial

by Lina Clémence July 7, 2025
written by Lina Clémence


I wore my hair this way a couple weeks ago when I needed to wash it more than anyone knows. It was pulled back and had so much dry shampoo in it. It was my way of “feeling put together” when underneath I was a total mess. I jumped on stories and was quickly picked… Read More

The post French Braid Half Up Bun | Hair Tutorial appeared first on Dani Marie Blog.


July 7, 2025 0 comments
0 FacebookTwitterPinterestEmail
Hair Styling

Bandables Twisty Braids Headband Review and Tutorial | Hairstyles For Girls

by Lina Clémence June 28, 2025
written by Lina Clémence


Today we are testing the “bandables twisty braids headband” by Localoc.  We saw this at our local Walmart and thought it looked cute and fun to try.

We are always looking for easy hairstyles for school mornings and thought it would be perfect for those days when you need a 5 minute hairstyle. (Which is pretty much every school morning at our house!) 

This would also be a great accessory for 2nd or 3rd day hair, to help disguise when it’s looking slightly greasy. For those of you who are growing out your bangs, this would be fabulous as well!

Review and Tutorial Video: (Click here to watch this hairstyle video directly on YouTube.)


We liked that the little hair elastics on this headband held her hair back quite tightly without pulling or clamping her hair.  We’ve tried similar options in the past (with barrettes or clips attached to the headband) and it seems like you need exactly the right amount of hair to make those work. We’ve had trouble with the hair being too thick to clip the barrettes shut, or the hair being too thin and sliding right out.  So, the elastics are a great option that will accommodate all different hair textures and thickness.

There are many different hairstyles that can be created using this headband.  We have shown just a few basic ideas in this video: 

A half up twist.

Cute and easy half up hairstyle for school using twisty braids headband.

 A ponytail.

Easy 5 minute ponytail hairstyle for school with twisty braids headband.

If you play sports, I think this would be a nice option for keeping your hair out of your face.  You could add a ponytail, bun, or braid and be ready to go.

I think this would look really cute with curled, wavy, or crimped hair as well as straight.  This would also be perfect for short hair, as well as long. So fun!

We unfortunately were not able to find this available to purchase online yet… I think it is too new.  Here are some similar headbands on Amazon, but none with the elastics yet:

Headband 1, Headband 2, Headband 3. You might have better luck finding this at your local drugstore or retailer.


June 28, 2025 0 comments
0 FacebookTwitterPinterestEmail
Asian Beauty

Natural Makeup For Work (Video Tutorial)

by Lina Clémence June 14, 2025
written by Lina Clémence


Is that how my face look like 0_0

Can’t believe I actually filmed my first makeup tutorial in 2.5 years.

I’ve been away THAT long, always wanted to come back and make more makeup/beauty videos, but just never know when I can do it. I thought it would be a lot more smashing and exciting, but it was just like any other day in reality.

I have not reached that state where I dreamed of reaching – silky smooth, hydrated and problem free skin – I now question if perfection is actually achievable. Nonetheless, I am at a state where I’m happy with what I currently have, and have accepted it to be part of me (still working on it, but I’m doing so well now!). It’s so strange to see myself in makeup again after so long. I’ve grown to really like my own face without makeup, and with some makeup on, it adorns my face so beautifully. It makes me feel great to be able to put makeup on once again!

So with the blemish and flaws that are still present on my skin, I present to you this makeup look which is one of the looks I’ve been wearing to work the past 2 months.
It’s understated, natural, no perceivable eyeliner that set off alarms in most people’s eyes.
I love how easy it is, I can put this look together within 15 minutes in the morning rush hour :’D If I don’t mess up my brows that is. And I normally don’t, so I don’t know why I messed it up during recording!

This is the complete eye look, just really minimal. It looks even less obvious in video because the camera washes out some of the colour. In real life, it gives myself beautiful and natural looking depth. Indiscernible to the untrained eyes.

THE PRODUCTS

  1. E.L.F. Perfect Finish HD Powder
  2. KATE Mineral Powder Foundation (OC-C) 
  3. AVENE Very High Protection Cream SPF50+
  4. CANMAKE Mat Fleur Cheeks (04)
  5. KATE Brown Shade Eyes (BR-6)
  6. REVLON Matte Balm (225 Sultry) (Review and swatches here)
  7. MAYBELLINE Volum’ Express The Magnum Waterproof
  8. KATE Lash Maximizer White
  9. INNISFREE Auto Eyebrow Pencil (03 Grey)

Compared to my old looks, this look has a lot less products, right? That’s mostly because I just started getting back into wearing makeup recently, and I am really cautious this time. I don’t want to put on too much just in case it might irritate my skin. So I start with very little products, and slowly add more to it if I want to. Who knows, maybe a few months down the road, the number of products I use will increase exponentially, trying to squeeze every single product from the new releases onto my face all at the same time? Hahaha!

The brushes I used are all from REAL TECHNIQUES (not TRUE TECHNIQUES hahaha). The purple brushes are from their Eye Makeup Starter Kit. Looks like the recently revamped it, kept the brushes the same and changed the case that comes with it (now grey instead of black!).

I’ve actually been looking at getting a new lash curler, but my old KOJI No.73 is still working fine.. Just need to change the rubber lining every so often because it does break apart, which affects the curl that I can get. Speaking of which, it’s time I change to a new rubber lining.

As for the makeup brush cleaning sponge, I bought the sponge from a store that sells household products, cut it to fit the cute tin case my aunt gave me and it’s done. Really handy for cleaning the brushes in between different colours, especially when going from dark to light shades. The excess powder collects at the bottom which I then clean out once in a while. Time to wash the sponge soon, it’s getting brown!

All in all, I am really glad I can do this again. Even though this gratitude is an afterthought, I still want to note it down. It really helps to reflect upon all that have happened in my life and to count my blessings. Even though things aren’t exactly at where I want them to be, I’m still rejoicing at how far I’ve come, and how much improvements I’ve experienced. I will continue to keep my body, mind, and skin healthy, and hope to bring more videos with you all.

And now, the video tutorial.

https://www.youtube.com/watch?v=8Qf16j48EuY


June 14, 2025 0 comments
0 FacebookTwitterPinterestEmail
Hair Styling

G-EAZY Hairstyle 2016 – Step By Step Tutorial

by Lina Clémence June 2, 2025
written by Lina Clémence


The Californian rapper G-Eazy (born Gerald Earl Gillum) is producing hits after hits – including collaborations with Britney Spears. The guy’s got an attitude and you frequently see him wearing a cool leather jacket which goes along well with his side-parting slick back hairstyle.

Rapper’s New Fashion

Besides his promising music career, the 30-year-old has taken interest in the world of fashion as he released a collaboration with Rare Panther last fall. G-Eazy himself has also become a fashion icon with his alternative style as a rapper. GQ Magazine even put him on Top 10 of the most stylish people at New York Fashion Week 2016!

Now G-Eazy has found his way to Slikhaar TV and Slikhaar Blog. In this blog post, we’ll give you a step-by-step tutorial on how to pull off his side-parting slick back hairstyle.

Let’s get straight to it guys!

g-eazy

How to get the G-Eazy hairstyle

Step 1: Wash ‘N’ Clean Up

Before getting a haircut it’s always important to wash out all products in the hair. Use shampoo and conditioner like By Vilain Rush to get the hair clean and ultra manageable for the remainder of these steps.

Step 2: Organize Your Fuzz

Form a line backward from your head’s temple on both sides (curving naturally with the head) and connect it with a straight line in the backhead. Comb the hair away from the sectioning using a By Vilain Comb.

Blow dry your hair for a short while beneath the parting and use a By Vilain Skeleton Brush to help locking it firmly in place.

Step 3: Cut Down Low

Trim the lower part of the sides and the backhead and use a scissor when going further and further upwards. Create a gradient from 9 mm to 2 cm on the sides and also 9 mm to 2 cm at the backhead.

Wash and clean up, organize the hair, cut down low

Step 4: Top Gradient

Cut a gradient from 10-12 cm at the fringe to 7-8 cm at the top center. The volume of the hair will be boosted by letting the top front hair lean upon the hair in the back.

Step 5: Get Rid Of Half Of It

After creating the gradient you need to use a thinning scissor to make the hair on top of your headless weighty. By thinning out your hair it will also be easier to style when the haircut is done.

Step 6: Time To Blow

This time (in contrary to step 2) you need to blow-dry your hair for a longer time. Blow-dry it backwards to create the slick back effect before the actual styling.

By getting the hair dry you will also be able to assess the final hairstyle much better. Help yourself locking the hair in place by using a By Vilain Skeleton Brush along with the hair-dryer.

Remember to tip the beak of the hair-dryer and shake it a little to both prevent your hair from burning and to speed up the process.

Cut the top, thin out the hair and blow dry

Step 7: Trimming On The Edge

Use the scissor again to trim the hairstyle into its final shape. Consider using the thinning scissor once more if necessary. Continue by using an electric trimmer for the edges. You need to define a nice and sharp line-up along the side-parting via the trimmer.

Move on to outlining both the edges of your neck and the area around your ears. Use a By Vilain Comb underneath the electric trimmer to achieve completely manual control rather than a preset head for the trimmer.

Step 8: Straighten Your Hair

If your hair is not naturally smooth, use a flat iron to avoid ending up with a wavy slick back like Marlon Brando. A straightener will help to lock the hair into a slick position.

Step 9: Wax & Pomade!

Finish the hairstyle by adding both By Vilain Gold Digger and By Vilain Powermade. The Gold Digger wax should be applied first to style the hair into shape and give it extreme hold for the whole day. Afterward, the pomade will give you a nice glossy finish – just like G-Eazy.

Put on a leather jacket on top of your white T. NOW you got attitude!

Trim the edge, straighten the hair and apply wax and pomade after


Products & Tools necessary for G-Eazy hairstyle

products for G-Eazy hairstyle

1. Shampoo and Conditioner, By Vilain Rush US$20 2. Water spray, By Vilain Freestyler US$20 3. Comb, By Vilain Comb US$20 4. Hair-dryer 5. Brush, By Vilain Skeleton Brush US$20 6. Scissor 7. Thinning scissor 8. Electric trimmer 9. Hair straightener 10.  Wax, By Vilain Gold Digger US$20 11. Pomade, By Vilain Powermade US$20

G-Eazy hairstyle tutorial

If you want to see it all done in a cool video, look no further! Watch this Slikhaar TV video with our talented hairdresser, Charlotte! What do you think of this haircut? Please write your comment down below.

freeshipping_blog

Comments

comments


Source link

June 2, 2025 0 comments
0 FacebookTwitterPinterestEmail
British Beauty

Get Ready With Me (Again) – A Full Makeup Tutorial! – All Things Aesthetic

by Lina Clémence May 29, 2025
written by Lina Clémence


Hi everyone, and welcome to this week’s blog! And what a rubbish week we are having with the weather, although I’m not sure what I prefer; is it better for the weather to be bad when we are stuck indoors anyway, or is the sunshine uplifting in difficult times? I think my mixed views display how neither situation is exactly ideal, however there are things we can do to try and make how we are feeling slightly better. At the moment, I am loving having a daily pamper, reading more books, watching rubbish on Netflix, going on walks, and doing home workouts. I’ve also decided to do my makeup a couple of times a week to keep me feeling human, which you will know if you read my post a couple of weeks ago on my BeautyBay haul! I’ve not actually done a full makeup tutorial for you guys since December though (check it out here), and some products I use have changed since then, so why not do a big makeup post?! Here is a nice little before picture if you guys need a laugh (I know I do)!

I’ve just noticed I am so pale I would probably disappear into my wall if it was white…

Aaaaand here is a meme to summarise how I am feeling about the above picture…

Wow, I also LOVE the caption of this pin haha! Well, at least I am funny sometimes I hope…Anyway, time to stop rambling. Here’s the tutorial!

Step 1 – Prime

So this is a pretty easy step, although for some reason I didn’t actually take a before and after picture. Here is the order in which I apply the products:
1) Dr Everyouth Vitamin C and Hyaluronic Acid Day Moisturiser – £13.99 on gogroupie.
2) The Ordinary High Adherence Silicone Primer – £3.95 from BeautyBay.
3) RCMA No-Color Powder – £11.75 from BeautyBay.
4) Morphe Continuous Setting Mist – £16 from Cult Beauty.

So, I am absolutely IN LOVE with this prime routine. I’ve always moisturised and then applied primer, but I would highly recommend setting your primer with a translucent powder and setting spray – you will notice a huge difference when it comes to the durability of your makeup and it goes on soooo much better.

Step 2 – Brows

The products used here are my all time faves:
1) Anastasia Beverly Hills Dipbrow Pomade in shade Soft Brown – £19 from Cult Beauty.
2) ZOEVA Graphic Brow Fix in shade Ammos – £9 from Beauty Bay.
3) Morphe Liquid Full Coverage Concealer in shade C1.35 – £10 from Cult Beauty

  • STEP 1 – Use a flat angled brush to apply the dipbrow pomade.
  • STEP 2 – Brush on the brow gel in fine strokes.
  • STEP 3 – Apply concealer around the brow and brush down onto the lid to act as a primer.

As my hair is blonde (despite the awful roots I have right now due to being unable to visit a hairdressers) I don’t go too dark with my brows. However, more shades are available in the products I recommend depending on what kind of colour you go for. While £19 is a bit expensive for a brow gel (I may have cried at the time of purchasing), it has lasted for 2 years and I am still no where close to finishing so I think we can view this as an investment.

Step 3 – Eyes

Right, I had to improvise pretty hard here as I don’t have a lot of makeup with me. As mentioned above, I used concealer to prime my lids, and then I used a bronzer and highlighter to create a natural bronze look which I love for the daytime. Here are the products:
1) Doll Beauty Gimme Sun Matte Bronzer in shade Medium – £15 from BeautyBay.
2) MUA Undress Your Skin Highlighter in shade Golden Scintillation – £2.99 from Luxplus.
3) Unicorn Cosmetics Lashes in style Peachy Pie – £10 from BeautyBay.

  • STEP 1 – Use a fluffy brush to buff the bronzer across your lid.
  • STEP 3 – Gently press the highlighter into the mid-to-corner of the lid.
  • STEP 4 – Once the lash glue is tacky, apply and hold for 20 seconds to ensure it stays on.

Now, this is definitely not the most dramatic eyeshadow look I’ve done but this is my go to for a more natural, glowy, daytime look, and I often use highlighters and bronzers as eyeshadows too which makes them an even better investment. While the lashes are £10, they are reusable which means that these are also an investment and they work out cheaper than less expensive lash brands as they last longer.

Step 4 – Base

Here we have two of my favourite ever makeup products for base makeup, and I would highly recommend you purchase ASAP! I’ve tried a lot of brands, but I’ve never found a foundation or concealer as enduring as these two. The products are:
1) EX1 Cosmetics Invisiwear Liquid Foundation in shade 3.5 – £12.50 from BeautyBay.
2) Maybelline Instant Anti-Age Multi-Use Concealer in shade Neutraliser – £8.99 from Superdrug.

  • STEP 1 – Apply the foundation using a flat topped foundation brush (I would say BH Cosmetics are the best).
  • STEP 2 – Apply concealer under the eyes, the forehead, the nose and chin.
  • STEP 3 – Use a small contour brush to blend.

These are really great products which are priced well too! My foundation is a little too dark for me right now though, but that’s purely because I am not fake tanning at the moment! If you want to find the perfect shade in the foundation/concealer, take a look on Findation to get your match based on the shades you use in your current products.

Step 5 – Contour

Time to sculpt my face into something slightly more appealing. Some of the products here can definitely be replaced with cheaper alternatives, but again, I’m limited with the products I have to hand. Products used here are:
1) Laura Mercier Translucent Setting Powder – £32 from Look Fantastic. A cheaper alternative which is *almost* as good is Morphe’s Bake and Set Powder in shade Banana for £12 from Cult Beauty.
2) EX1 Invisiwear Compact Powder in shade 11 – £11.50 from BeautyBay.
3) Mac Studiofix Powder Plus Foundation in shade C35 – £27 from MAC. However, you can get much cheaper pressed powders which do the job – EX1 do many shades on BeautyBay, and you can buy the Revolution Pressed Powder for £2 from Superdrug.

  • STEP 1 – Use a beauty blender to apply the baking powder under the eyes, the nose, forehead and cheeks.
  • STEP 2 – Use a sculpting brush to apply bronzer to the cheeks, sides of the nose (can use a finer brush for that step) and forehead.
  • STEP 3 – Gently press a flat foundation brush into pressed powder and dust off the translucent powder.

As you can see, I am starting to look slightly more human now! Contouring can be quite tricky, so I am fairly basic with my method so as not to overdo it. That being said, I’m happy with the result!

Step 6 – Highlight

As you can see, I sat on this palette and smashed the mirror…

This product is my new favourite highlighter! The BeautyBay Brilliance Bouncy Beam palette is £12 from BeautyBay. I used ‘Radiant’ for contouring the corners of my cheeks, ‘Strobe’ for the corner of my eyes and under my brows and a mix of ‘Charmed’ and ‘Shine Bright’ for contouring my nose, cheekbones and upper lip. Here’s the result! I apply setting spray to my brush before application for the best results.

Step 7 – Lips

Right, I am sure if you’re a regular here you will know that I just ADORE a nude lip! I know I need to branch out, and I will try to do so, but as this is a daytime look I had to go for a natural nude colour. The products used were:
1) Milani Colour Statement Lipliner in shade Nude – £6.50 from BeautyBay.
2) Doll Beauty Lipstick in shade Golden Girl – £13 from BeautyBay.
3) Doll Beauty Lipgloss in shade #Gobby – £13 from BeautyBay.

  • STEP 1 – Apply the lipliner around the lip and blend inwards towards the center of the lip.
  • STEP 2 – Apply the lipstick and blot with tissue.
  • STEP 3 – Run a thin layer of lipgloss across the top.

I absolutely love these colours together as they create a really cute pinky nude that’s both glossy and natural! The lipstick is also nice and creamy which I like, as matte lipsticks can really dry my lips out. The durability of the lipliner is fabulous too, and I love the pinker tone of the gloss – the perfect nude!

Now to set again with setting spray and I am FINISHED! Here is the end result!

  • BEFORE
  • AFTER
I am pretty impressed with this glow up!

Doing my makeup, taking some selfies and going on nice long walk really calmed me down the other day when I was having a bit of a meltdown, and I would strongly advise you all to find something which has the same effect as it genuinely works. Here are some cute pictures I took on my walk…

PHEW – that’s the longest post I’ve done in a while, but I really enjoyed it and I hope some of like the products I have recommended. In the meantime, remember to contact me and/or leave a comment with any anxieties/recommendations or even if you just fancy a chat – my ears are open. Wishing you all a wonderful week!

Stay safe xxxx


Source link

May 29, 2025 0 comments
0 FacebookTwitterPinterestEmail

Categories

  • Arab Beauty
  • Asian Beauty
  • Beauty
  • Beauty
  • British Beauty
  • Canadian Beauty
  • Cosmetics
  • Fashion Over 50
  • Hair Styling
  • Indonesian Beauty
  • Luxury Fashion
  • Plus Size Fashion
  • Skin Care
  • Sustainable Fashion
  • Women's Fashion

Recent Post

Recent Comments

No comments to show.
  • Arab Beauty (18)
  • Asian Beauty (77)
  • Beauty (1)
  • Beauty (77)
  • British Beauty (75)
  • Canadian Beauty (73)
  • Cosmetics (76)
  • Fashion Over 50 (1)
  • Hair Styling (78)
  • Indonesian Beauty (78)
  • Luxury Fashion (72)
  • Plus Size Fashion (154)
  • Skin Care (76)
  • Sustainable Fashion (77)
  • Women's Fashion (78)
  • Rainbowdorable by Auzola | Indonesian Beauty Blogger: (Bahasa Indonesia) Review: Skintific 5x Ceramide Serum Sunscreen
  • The inevitable – My Women Stuff
  • Giving Thanks – Fresh Salon Blog
  • SiMa.ai secures $85m to support global expansion
  • Is Scotch & Soda Sustainable in 2025? Why They Lost Certification

@2025 - All Right Reserved. Designed and Developed by Mahasun


Back To Top
glow-vogue.site
  • Beauty
    • Beauty
    • Arab Beauty
    • Asian Beauty
    • British Beauty
    • Canadian Beauty
    • Indonesian Beauty
  • Cosmetics
  • Fashion
    • Fashion Over 50
    • Luxury Fashion
    • Plus Size Fashion
    • Sustainable Fashion
    • Women’s Fashion
  • Hair Styling
  • Skin Care
  • Uncategorized